简介
- Flutter、Flutter Package、Dart、Flutter中文网、Flutter 实战
Flutter是Google推出并开源的移动应用开发框架,主打跨平台、高保真、高性能。开发者可以通过Dart语言开发 App,一套代码同时运行在 iOS 和 Android 平台移动开发中的跨平台技术
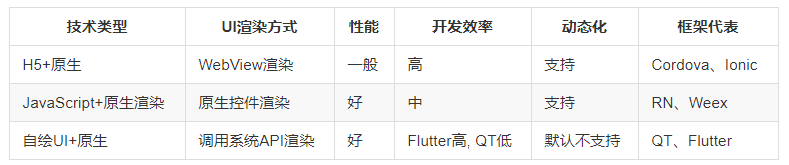
- AOT和JIT
- 程序主要有两种运行方式:静态编译与动态解释
静态编译的程序在执行前全部被翻译为机器码,通常将这种类型称为AOT(Ahead of time),即”提前编译”解释执行的则是一句一句边翻译边运行,通常将这种类型称为JIT(Just-in-time),即”即时编译”- AOT程序的典型代表是用C/C++开发的应用,它们必须在执行前编译成机器码;而JIT的代表则非常多,如JavaScript、python等,事实上,所有脚本语言都支持JIT模式
- 一般认为只要需要编译,无论其编译产物是字节码还是机器码,都属于AOT。如Java、Python,它们可以在第一次执行时编译成中间字节码
- Flutter特性
- 基于JIT的快速开发周期:Flutter在开发阶段采用,采用JIT模式
- 基于AOT的发布包:Flutter在发布时可以通过AOT生成高效的ARM代码以保证应用性能
- 类型安全:由于Dart是类型安全的语言,支持静态类型检测
Dart的设计目标应该是同时借鉴了Java和JavaScript。Dart在静态语法方面和Java非常相似,如类型定义、函数声明、泛型等,而在动态特性方面又和JavaScript很像,如函数式特性、异步支持等- 其他如 React-Native、Weex和uni-app
- UI库
安装及运行
安装
配置环境变量
1
2
export PUB_HOSTED_URL=https://pub.flutter-io.cn
export FLUTTER_STORAGE_BASE_URL=https://storage.flutter-io.cn安装git
- 下载Flutter SDK,解压,并将
%flutter_home%/bin设置到环境变量,执行flutter doctor看是否成功安装(可运行即可) Dart SDK已经捆绑在Flutter SDK中,故无需在单独安装Dart SDK- 安装Android SDK,参考android.md#安装
- 配置编辑器(任意一种, 均需安装插件Flutter、Dart): Android Studio/IntelliJ IDEA/VS Code
- vscode 还可安装 Awesome Flutter Snippets 和 Flutter Widget Snippets 的代码提示工具
- AS一般直接打开项目即可,如果 gradle 编译失败可以考虑单独打开项目下的 android 目录,查看编译日志
修改
%flutter_home%\packages\flutter_tools\gradle\flutter.gradle为国内镜像。否则编译项目报错Error running Gradle1
2
3
4
5
6
7
8
9
10
11
12
13repositories {
// 替换 google() 为阿里云镜像
maven { url = uri('https://maven.aliyun.com/repository/google') }
// 替换 mavenCentral() 为阿里云镜像
maven { url = uri('https://maven.aliyun.com/repository/central') }
// 可选:添加阿里云的公共仓库(包含 jcenter 等镜像)
maven { url = uri('https://maven.aliyun.com/repository/public') }
maven { url = uri('https://maven.aliyun.com/repository/gradle-plugin') }
// 保留官方仓库作为兜底
google()
mavenCentral()
gradlePluginPortal()
}- 如果仍然无法下载依赖,则修改项目目录的
android/build.gradle文件,在buildscript.repositories和allprojects.repositories(建议也要配置一下)同上述一样修改。(出现于需要安装系统尚未安装的Android SDK版本)
- 如果仍然无法下载依赖,则修改项目目录的
- 真机调试
- USB连接必须选择传输文件或者MTP(多媒体传输)
- 手机设置开启USB调试
flutter devices查看设备
Mac安装
- 下载 SDK: https://docs.flutter.cn/install/archive
配置环境变量并生效
source .bash_profile1
2
3
4export FLUTTER_ROOT=/Users/xxx/data/others/flutter-sdk/flutter-3.24.5
export PATH=$PATH:$FLUTTER_ROOT/bin
export PUB_HOSTED_URL=https://pub.flutter-io.cn
export FLUTTER_STORAGE_BASE_URL=https://storage.flutter-io.cn执行
flutter doctor提示需要适配 xcode
1 | brew install cocoapods |
运行(vscode)
flutter create demo01创建项目flutter run进入项目目录即可运行项目,修改代码后在命令行R热加载debug运行
- 打开
lib/main.dart,点击运行-启动调试,在底部选择启动程序-Dart & Flutter,此时会自动编译 (或者点击右上角启动按钮下拉 - Start Debugging)- 期间会提示安装Dart Devtools插件(会自动在浏览器打开类似Vue Devtools的展示页面)
- 修改代码后立即 Cmd+S 会自动重新渲染, 或者点击 Debug 刷新按钮
或者进入调试界面,点击下拉,选择项目添加配置,此时会在项目中产生
.vscode/launch.json文件(或者手动创建)。如下可创建多个调试(可同时启动)1
2
3
4
5
6
7
8
9
10
11
12
13
14
15
16
17{
"version": "0.2.0",
"configurations": [
{
"name": "simple_material_app", // 调试名称
"program": "flutter-examples/simple_material_app/lib/main.dart", // 相对项目根目录调试入口文件
"request": "launch",
"type": "dart"
},
{
"name": "using_theme",
"program": "flutter-examples/using_theme/lib/main.dart",
"request": "launch",
"type": "dart"
}
]
}
- 打开
目录结构
1 | lib # 为项目 dart 代码夹 |
Flutter命令
1 | flutter -h |
- 清空项目依赖缓存
1 | flutter clean # 清理 Flutter 项目缓存 |
基础配置
- 应用的 App ID(也叫包名 / Bundle ID)
- Android:
android/app/build.gradleandroid.defaultConfig.applicationId 和 android.namespace - IOS: 通过 xcode 修改, General - Identity - Bundle Identitier
- Android:
- 应用名称
- Android:
android/app/src/main/AndroidManifest.xml中 application 标签的 android:label 属性 - IOS:
ios/Runner/Info.plist中 CFBundleName 键对应的值 (CFBundleDisplayName也可改下)
- Android:
- 应用Logo
- Android:
android/app/src/main/res/mipmap-xxx/ic_launcher.pngfor file in ./android/app/src/main/res/mipmap-*/ic_launcher.png; do cp ./assets/images/logo.png "$file"; done批量替换文件
- IOS:
ios/Runner/Assets.xcassets/AppIcon.appiconset/Icon-App-*.png- 不能直接用一张文件替换, 图片大小需要符合每个图标尺寸的要求
- 图标尺寸自动生成: https://icon.wuruihong.com/
- iconfont下载的 png 图标, 默认是 200px, PS 画布放到到 250px, 再通过此工具生成白色背景的图标
- Android:
打包安装
- IOS打包(针对没有开发者账号的情况)
- 通过 Xcode 的 Personal Team 功能 (只用通过 USB 连接手机使用,断开就打不开了;理论上是可以在 3 台设备上安装 7 天)
- 使用 xcode 打开 ios/Runner.xcworkspace
- Xcode - Settings - Accounts - Add Apple ID - 登录自己的 AppId(普通 Id 即可) - 增加一个证书
- 运行时选择这个 AppId 对应的 Personal Team即可
- 编译运行到手机
- 第一次可能需要在手机设置 - 通用 - VPN 与设备管理 - 信任开发者账号
- 信任之后需要重新编译运行一次(不成功的话多运行几次即可)
- 第一次需要通过 xcode 设置开发者账号,之后可直接通过 vscode 运行到手机
- 个人免费团队(Personal Team):仅限开发测试,不支持部分高级权限(如 Sign in with Apple、推送通知(APNs)、应用内购买等)。如果包含,测试可以在 xcode 配置中临时去掉
- 需通过 TrollStore 安装
flutter build ios --release --no-codesign打包生成Runner.app(本质是一个文件夹)- 打包成 IPA 文件进行安装. 参考: https://cloud.tencent.com/developer/article/1394918
- 创建一个 Playload 文件夹,将 Runner.app 放到 Playload 文件夹中
- 将 Playload 文件夹压缩成 Playload.zip (注意不能把.DS_Store也压缩进去: 选择文件夹 - 服务 - 使用 Keka 压缩)
- 将 Playload.zip 改成 xxx.ipa
- 再通过
TrollStore等安装ipa,参考酷玩手机.md#ios
- 使用轻松签安装
- 将 Runner.app 压缩成 Runner.zip
- 放到本地服务器, 手机浏览器下载此文件,在手机文件 - 我的iPhone - 下载中找到文件(点击一下压缩文件可进行解压)
- 使用
轻松签- 导入此文件进行安装
- 通过 Xcode 的 Personal Team 功能 (只用通过 USB 连接手机使用,断开就打不开了;理论上是可以在 3 台设备上安装 7 天)
Flutter语法/Dart语法
基本语法
- 注释
flutter pub global activate dartdoc安装 dartdoc 插件dartdoc在项目根目录执行,生成文档
1 | ///(单行文档注释)或 /** ... */(多行) |
变量
- 变量定义
1 | final version = 1; // 常量, 会自动推断类型, 不能重新赋值(也可使用late延迟初始化) |
- 变量类型
1 | dynamic value = "hello"; |
集合/对象
- list
1 | List<String> list = ['123', 'ABC']; |
- 数组解构(不支持 Map 解构)
1 | List<dynamic> info = ['test', 18, null]; |
流程控制
- if语句
1 | // 强制断言 subtitle 非空(! 是「空断言运算符」);若 subtitle 为 null,直接抛出空指针异常,否则返回布尔值 |
方法
- 方法定义
- 同一个类中, 方法名不能相同
1 | // 同步函数 |
- 注解
1 | ('Dev only') |
- 并行调用异步方法
1 | // 并行上传 + 解构赋值提取结果 |
- 同步转异步
- Future.value 适用于无耗时的同步方法 (仅适配异步接口)
- compute/Isolate 适用于CPU密集型/耗时同步方法 (不阻塞 UI 线程)
- 同步及异步案例
1 | import 'package:flutter/foundation.dart'; // compute |
- 异常
throw e;不保留原始堆栈,重置为当前 throw e; 所在位置rethrow;保留原始堆栈,向上传递异常- 打印异常堆栈信息
1 | void calculateDivision(int a, int b) { |
类
- 混入
- 类支持多混入, 和单继承
- Mixin与继承的优先级(同名方法覆盖规则): 后引入的Mixin > 先引入的Mixin > 父类
- 基于 on 关键字, 可以限制 Mixin 只能被特定类混入
1 | // ===== 案例 1 |
封装
- 静态方法调用封装
1 | class CalcManager { |
Flutter基础
常用配置
- 环境变量
1 | # --dart-define: 向 Dart 代码注入环境变量 |
- 环境类型
1 | import 'package:flutter/foundation.dart'; // 必须导入 |
存储
- 获取应用数据目录
1 | import 'package:flutter/material.dart'; |
路由
- 参考: main17
1 | // Navigator 为 Flutter 原生路由, 也可基于 GetX 框架进行路由管理 |
- 自定义路由相关
1 | final Map<String, Function> routes = { |
Key
- 组件在更新的时候,其状态的保存主要是通过判断组件的类型或者 key 值是否一致
- Key分类
- 局部键 LocalKey: ValueKey、ObjectKey、UniqueKey
- 全局建 GlobalKey
1 | // 类一般都要定义 key, 如: |
动画
- 隐式动画: 组件内部自动处理动画, 如: RotationTransition, ScaleTransition, FadeTransition, SlideTransition 等
- 显式动画: 手动控制动画, 如: AnimationController, Animation, Tween 等
- AnimationController: 动画控制器, 用于控制动画的播放, 暂停, 停止等操作
- Animation: 动画对象, 用于定义动画的属性, 如: 动画的时间, 动画的曲线等
- Tween: 动画插值器, 用于定义动画的起始值和结束值, 并根据动画的进度计算中间值
- Curves: 动画曲线, 用于定义动画的变化速率, 如: Curves.linear, Curves.easeInOut, Curves.bounceInOut 等
- 组件自带动画: AnimatedList, AnimatedContainer, AnimatedPadding, AnimatedOpacity, AnimatedPositioned, AnimatedDefaultTextStyle 等
- AnimatedList 和 ListView 的功能大体相似,不同的是, AnimatedList 可以在列表中插入或删除节点时执行一个动画来提高用户体验
1 | // 隐式动画 |
Flutter基础案例
入口文件
- main01: lib/main.dart 入口文件
1 | import 'package:flutter/material.dart'; |
MaterialApp和StatelessWidget
- 使用 MaterialApp 和 Scaffold 进行装饰
- StatelessWidget 无状态组件, StatefulWidget 有状态组件
- main03
1 | // 代码块 importM |
Container容器和Text文本
- main04
1 | import 'package:flutter/material.dart'; |
Paddiing,SizedBox,AspectRatio组件
- EdgeInsetsGeometry, EdgeInsets, EdgeInsetsDirectional 处理内外边距
- EdgeInsetsGeometry 抽象类, 支持有方向和无方向, 如动画插值
- EdgeInsetsGeometry.lerp(EdgeInsets.zero, EdgeInsets.symmetric(horizontal: 16, vertical: 8), 0.5,) // 从 zero 插值到 水平16、垂直8 的内边距,动画进度/权重0.5 → 结果:horizontal=8,vertical=4
- EdgeInsets 为EdgeInsetsGeometry的实现类, 仅支持无方向
- EdgeInsets.zero, EdgeInsets.all(10), EdgeInsets.fromLTRB(0, 10, 0, 0), EdgeInsets.symmetric(horizontal: 16, vertical: 8), EdgeInsets.only(left: 10, bottom: 5)
- EdgeInsetsGeometry 抽象类, 支持有方向和无方向, 如动画插值
- Paddiing组件
1 | // 如果只是简单的 padding 需求, 建议使用 Padding 组件代替 Container(消耗资源更大) |
- SizedBox组件
1 | // 如果只是简单的定义宽高需求, 建议使用 SizedBox 组件代替 Container(消耗资源更大) |
- AspectRatio组件
1 | Widget build(BuildContext context) { |
Image图片使用
for file in ./ios/Runner/Assets.xcassets/AppIcon.appiconset/AppIcon-*.png; do cp ./assets/images/logo.png "$file"; done && echo "已用logo.png替换所有AppIcon图标文件"批量替换文件- main05
1 | import 'package:flutter/material.dart'; |
Icon图标使用及IconData自定义图标
- main06
1 | // =====> lib/main.dart |
ListView列表组件
- ListTile 可以在 ListView, Column 中
- main07


1 | import 'package:flutter/material.dart'; |
GridView网格组件
- 可以通过 GridView.count(固定每行个数), GridView.extent(固定每行每元素的最大宽度进行自适应) 实现网格布局; 通过 GridView.builder 实现动态网格布局
- main08

1 | import 'package:flutter/material.dart'; |
Row,Column,Wrap线性布局
- Row(水平布局, 从左到右排列) 和 Column(垂直布局, 从上到下排列) 都继承自 Flex
- Wrap可以实现流布局(如横向不够则自动换行),单行的Wrap跟Row表现几乎一致,单列的Wrap则跟Column表现几乎一致
- main09

1 | import 'package:flutter/material.dart'; |
Flex和Expanded弹性布局
- Row(水平布局, 从左到右排列) 和 Column(垂直布局, 从上到下排列) 都继承自 Flex
- Expanded 只能放到 Flex Row Column 内来实现弹性布局
- main10

1 | import 'package:flutter/material.dart'; |
Stack,Positioned,Align层叠布局
- Stack 层叠布局: 后面的默认会覆盖前面的(后面的在上面)
- Positioned 基于父容器进行定位, 如果父容器没有则基于主屏幕
- Center 为 Align 子组件, 也可以使用 Container.alignment 属性进行对齐
- main11

1 | import 'package:flutter/material.dart'; |
Card卡片
- main12

1 | import 'package:flutter/material.dart'; |
ElevatedButton等按钮组件
- 按钮组件: ElevatedButton, TextButton, OutlinedButton, IconButton
- 底部浮动按钮: 基于 Scaffold.floatingActionButton
- main13

1 | import 'package:flutter/material.dart'; |
StatelessWidget,StatefulWidget状态组件
- StatelessWidget 无状态组件, StatefulWidget 有状态组件
- main14
1 | import 'package:flutter/material.dart'; |
Scaffold骨架组件
- main15

- main.dart
1 | import 'package:flutter/material.dart'; |
- user.dart (home.dart 同理)
1 | import 'package:flutter/material.dart'; |
AppBar,TabBar导航栏
- 基于 TabBar 和 TabBarView 实现导航栏, 两个都需要定义 controller 属性
- main16

- main.dart
1 | import 'package:flutter/material.dart'; |
- home.dart
1 | import 'package:flutter/material.dart'; |
Dialog弹框
showDialog方法弹出弹窗Navigator.of(context).pop("ok");关闭弹框并返回参数- SimpleDialog 和 SimpleDialogOption 实现弹框选择器
showModalBottomSheet方法实现底部弹窗- 基于插件实现 toastr 轻提示
- 基于 fluttertoast 插件实现. https://pub.dev/packages/fluttertoast
- 支持 LINUX MACOS WEB WINDOWS 的另一个插件 https://pub.dev/packages/ftoast
- 自定义弹框: 继承 Dialog 进行组件渲染, 并通过 showDialog 弹出
- main18

- main.dart
1 | import 'package:flutter/material.dart'; |
- myDialog.dart
1 | import 'dart:async'; |
PageView上下左右滑页切换及轮播图组件
- main19/pageView5.dart
1 | import 'dart:async'; |
InkWell
- InkWell 通用包装组件, 实现点击事件
1 | InkWell( |
Flutter进阶案例
整合GetX
- GetX
- 双向绑定
1 | class TestController extends GetxController { |
- 依赖注入
1 | // 将实例注册到 GetX 的依赖管理器(GetInstance) 中,后续通过 Get.find<T>() 获取实例 |
- 路由
1 | // 进入页面 |
- 常见问题: Get.back 无法关闭页面
1 | // ***错误*** |
整合Firebase
- firebase使用参考: firebase.md
- firebase: 可实现谷歌等第三方登录, 作为数据库, 作为文件存储
- 依赖
1 | # firebase各模块版本需要兼容. Flutter 3.24.5 |
- 基础配置
- firebase配置: lib/firebase_options.dart
- main.dart 中初始化
Firebase.initializeApp
第三方登录
- 进入firebase项目 - 构建 - Authentication - 登录方法 - 启用Google登录 - 下载 GoogleService-Info.plist 文件放到 ios 目录(安卓可下载类似文件)
核心代码
1
2
3
4
5
6
7
8
9
10
11
12
13
14
15
16
17
18
19
20import 'package:google_sign_in/google_sign_in.dart';
import 'package:firebase_auth/firebase_auth.dart';
// 全局
final GoogleSignIn _googleSignIn = GoogleSignIn();
final FirebaseAuth _auth = FirebaseAuth.instance;
// 获取谷歌用户
final GoogleSignInAccount? googleUser = await _googleSignIn.signIn();
// firebase获取谷歌用户认证信息
final GoogleSignInAuthentication googleAuth = await googleUser.authentication;
final AuthCredential credential = GoogleAuthProvider.credential(
accessToken: googleAuth.accessToken,
idToken: googleAuth.idToken,
);
// 登录firebase
final UserCredential userCredential = await _auth.signInWithCredential(credential);
// 打印firebase登录用户信息
print(userCredential.user);
数据库读写
- 进入firebase项目 - 构建 - Firestore Database - 创建数据库(开始可以以测试环境模式创建)
代码案例
1
2
3
4
5
6
7
8
9
10
11
12
13
14
15
16
17
18import 'package:cloud_firestore/cloud_firestore.dart';
// 全局
final FirebaseFirestore _firestore = FirebaseFirestore.instance;
// 新增或更新用户数据(会自动创建 users 文档集)
String userId = '100000';
_firestore.collection('users').doc(userId).update({
'name': '张三',
'createdAt': FieldValue.serverTimestamp(),
});
// 查询
final docSnapshot = await _firestore.collection('users').doc(userId).get();
if (docSnapshot.exists) {
final data = docSnapshot.data() as Map<String, dynamic>;
return data;
}
整合Cloudflare-R2存储
- 直接在 Flutter 中使用 R2 存在安全问题(不应将 R2 的 API 密钥直接嵌入到 Flutter 应用中)
- 参考: Flutter 结合 Cloudflare Workers 上传图片至 R2 存储: https://blog.51cto.com/u_16638093/14104660
Flutter相关依赖库
- flutter_screenutil v5.9.0 屏幕适配/响应式缩放
- 屏幕适配, 如宽高及字体大小可使用 100.w, 100.h, 10.sp 等
- 物理像素 = 逻辑像素 * 设备像素比
- 如默认的字体尺寸 8.0 为逻辑像素(dp/pt),设计稿基于 375dp 宽度的手机,8.0dp 显示正常;平板(如 768dp 宽度)上,8.0dp 会显得极小
shared_preferences v2.5.3 本地存储
- 不同环境缓存机制不一
- Android: XML文件(基于android.content.SharedPreferences)
- iOS/macOS: plist(XML)文件(基于NSUserDefaults)
- Windows: 注册表
- Web: localStorage
- 核心通信方式是MethodChannel,所有操作异步且基于内存缓存,读写性能高
- 适合存储少量配置信息,存储复杂数据/大量数据/数据加密可采用 Hive(Dart实现的键值对存储)、SQFlite(结构化存储, Flutter下的SQLite插件) 本地存储方案
使用
1
2
3
4
5
6
7
8
9
10
11
12
13
14
15
16
17
18
19
20
21
22import 'package:shared_preferences/shared_preferences.dart';
// 存储数据. 对象数据读写需手动序列化/反序列化
Future<void> saveUserInfo() async {
// 获取SharedPreferences实例(底层会初始化原生缓存)
final prefs = await SharedPreferences.getInstance();
// 异步写入(先更缓存,再异步写文件)
await prefs.setString('token', 'abc123456');
await prefs.setInt('age', 25);
await prefs.setBool('isLogin', true);
}
// 读取数据
Future<void> getUserInfo() async {
final prefs = await SharedPreferences.getInstance();
// 从内存缓存读取,无需读文件
final token = prefs.getString('token');
final age = prefs.getInt('age') ?? 0;
final isLogin = prefs.getBool('isLogin') ?? false;
print('token: $token, age: $age, isLogin: $isLogin');
}
`
- 不同环境缓存机制不一
