基于Springboot和Vue前后分离

默认配置

  • 后端返回数据字段驼峰(如果通过ObjectMapper字段名转成下划线,前台做好下划线命名的字段映射后传回给后台,此时后台pojo都是驼峰,导致无法转换)
  • 前后台url都以/开头方便全局搜索
  • url地址和linux文件路径///效果是一样的;windows路径则必须是/或者\

Spring

  • 表单操作的dto应该基于业务模式进行解耦,不要耦合到一个dto中
    • 出错场景:使用dto(数据传输对象)接受前端数据后,并BeanUtils.copyProperties将dto复制到po(持久化对象)中,且前端有清除数据库部分字段的需求(此时dto中该字段传入的值为null,并使用mybatis生成的updateByPrimaryKey进行更新)。但是内部字段(一般不会让用户直接修改的)初始化后不应该置空。后来在修改某些需求时(如基于客户直接创建拜访),不小心简单将内部字段(创建拜访时会从客户中查询到CRM_ID并创建拜访记录)加入到dto中加入了部分其他字段导致,此时普通修改时前端并没有传入CRM_ID,导致将内部字段置空
  • 记录数据变动日志

Mybatis

  • 使用mybatis plus进行通用代码生成
  • Mybatis Generator生成通用代码
    • 可通过自定义Mapper继承生成的Mapper。(如UserMapperExt extend UserMapper, 可防止因修改生成代码导致无法再次生成)
    • 生成接口中selective含义:表示根据字段值判断,如果为空则不插入或更新
      • insert(不会考虑数据库默认值)、insertSelective(考虑数据库默认值)
      • updateByPrimaryKey(根据对象查询出来后全部按照传入对象更新,如果传入对象的值为空则会将数据库该字段置空)、updateByPrimaryKeySelective(如果出入对象值为空则不修改数据库该字段值)
  • 接口中使用@Select定义实现中,使用<if>代替<when>

Token相关

跨域和session

http/https

  • http进行访问无限制
  • https进行访问时,不能使用http,包括请求后台/获取静态资源/iframe-src
    • 主页面为http访问,主页面嵌入的iframe页面src为https(ip和端口同主页面),在iframe嵌入的系统内通过window.parent.frames['iframe-id']获取时,会产生跨域(因为iframe为主页面元素,在嵌入的系统内通过window.location.href获取的是浏览器地址)

同源政策

  • 网络协议(http/https)、ip、端口三者都相同就是同一个域(同源)
    • http://localhsothttp://localhsot:8080之间进行数据交互就存在跨域问题(localhost 和 127.0.0.1 不一样)
  • 浏览器”同源政策”限制(针对不同源情况) ^2
    • Cookie、LocalStorage 和 IndexDB 无法读取
    • DOM 无法获得
    • AJAX 请求不能发送

跨域通信

  • JSONP(只能发送GET请求)
  • CORS(服务器端进行设置即可)
  • WebSocket
  • postMessage

    • 可以实现页面和里面iframe页面之间的通讯
    • 可以实现窗口和通过window.open的窗口间的通讯
    • 可以实现窗口和通过a标签(<a href="B页面" target="_blank">新打开B页面</a>)新打开的窗口间的通讯
    • 示例:将b页面嵌入在a页面中

      1
      2
      3
      4
      5
      6
      7
      8
      9
      10
      11
      12
      13
      14
      15
      16
      17
      18
      19
      20
      21
      22
      23
      24
      25
      26
      27
      28
      29
      30
      31
      32
      33
      34
      35
      36
      37
      38
      39
      40
      41
      <!-- ======a给b发送消息send-from-a,然后b给a回复消息send-from-b======= -->
      <!-- a.html 其中onload表示iframe加载(iframe项目代码已经加载到浏览器)后执行,如果将iframe隐藏也不会影响其加载 -->
      <iframe src="http://localhost:4000/b.html" frameborder="0" id="iframe" onload="load()"></iframe>
      <script>
      /*
      someWindow.postMessage(message, targetOrigin, [transfer]);
      message: 将要发送到其他 window 的数据
      targetOrigin: 通过窗口的 origin 属性来指定哪些窗口能接收到消息事件,其值可以是字符串"*"(表示无限制)或者一个 URI。在发送消息的时候,如果目标窗口的协议、主机地址或端口这三者的任意一项不匹配 targetOrigin 提供的值,那么消息就不会被发送;只有三者完全匹配,消息才会被发送
      transfer(可选): 是一串和 message 同时传递的 Transferable 对象. 这些对象的所有权将被转移给消息的接收方,而发送一方将不再保有所有权
      */
      function load() {
      // 给子页面(嵌入的iframe)发送消息。此时targetOrigin为'http://localhost:4000'或者'*'均可,http://localhost:4000/ 也可以
      document.getElementById('iframe').contentWindow.postMessage({from: 'send-from-a', request: 'get-name'}, 'http://localhost:4000')

      // 接受数据
      window.onmessage = function(e) {
      console.log(e.data) // send-from-b
      }
      }
      </script>

      <!-- b.html -->
      <script>
      window.onmessage = function(e) {
      console.log(e.data) // send-from-a
      e.source.postMessage({from: 'send-from-b', response: 'get-name', name: 'smalle'}, e.origin) // 使用e.origin表示回复源窗口消息
      }
      // 或者监听事件
      /*
      e.data: 指的是从其他窗口发送过来的消息对象
      e.type: 指的是发送消息的类型
      e.source: 指的是发送消息的窗口对象
      e.origin 指的是发送消息的窗口的源
      */
      window.addEventListener("message", function(e) {
      console.log(e)
      }, false)

      // 主动给父页面发送消息
      window.parent.postMessage('hello...', '*')
      </script>
  • 架设服务器代理(浏览器请求同源服务器,再由后者请求外部服务)。如基于nginx做中转

1
2
3
4
5
6
7
8
9
10
11
12
13
14
15
16
17
18
19
20
21
server {
listen 80;
server_name localhost;

# 后端服务根端点
location /api/ {
proxy_set_header X-Forward-For $proxy_add_x_forwarded_for;
proxy_set_header Host $http_host;
proxy_redirect off;
if (!-f $request_filename) {
proxy_pass http://127.0.0.1:8080;
break;
}
}

# 前端
location / {
root D:/demo/vue/dist;
index index.html index.htm;
}
}

跨域资源共享(CORS, Cross-origin resource sharing) ^1

  • CORS需要浏览器和服务器同时支持。目前,所有浏览器都支持该功能,IE浏览器不能低于IE10。
  • 浏览器会自动完成CORS通信过程,开发只需配置服务器同源限制
    • 开发只需要将Access-Control-Allow-Origin字段添加到响应的头部中即可(如果响应头中无此参数,则说明存在跨域: 允许A访问则有此响应头,不允许B访问则访问后无此响应头)
    • 客户端 - nginx1 - nginx2 - java,此时2个nginx或者java任意一个写出响应头头即可(如果每级都写出则会重复,此时客户端也会报错)
    • JS测试let xhr = new XMLHttpRequest(); xhr.open('GET', 'https://www.baidu.com/sugrec'); xhr.send();
  • 如果CORS通信过程中,响应的头信息没有包含Access-Control-Allow-Origin字段,浏览器则认为无法请求,便会抛出异常被XHR的onerror捕获
  • Spring对CORS的支持cors-support-in-spring-framework
    • 可在方法级别进行控制,使用注解@CrossOrigin
    • 全局CORS配置,声明一个WebMvcConfigurer的bean
    • 基于Filter,声明一个CorsFilter的bean

springboot解决跨域

  • 使用了下列方法如果仍然出现跨域时
    • 如果是使用Filter解决跨域,检查是否在进入此跨域Filter之前,请求已经返回,从而没有将Access-Control-Allow-Origin字段加入到请求头中,导致前台浏览器报错跨域
    • 如果请求参数出现错误(如GET请求URL中包含[]等特殊字符),状态码返回400等情况(如果出现跨域,OPTIONS请求返回的应该是403),此时都还进入到Cros处理环节,从而没有将Access-Control-Allow-Origin字段加入到请求头中,导致前台浏览器报错跨域
1
2
3
4
5
6
7
8
9
10
11
12
13
14
15
16
17
18
19
20
21
22
23
24
25
26
27
28
29
30
31
32
33
34
35
36
37
38
39
40
41
42
43
44
45
46
47
48
49
50
51
52
53
54
55
56
57
58
// 法一
@Bean
public FilterRegistrationBean<?> filterRegistrationBean() {
CorsConfiguration configuration = new CorsConfiguration();
configuration.setAllowedOrigins(Arrays.asList("*"));
configuration.setAllowedMethods(Arrays.asList("*")); // GET, POST, HEAD, OPTIONS
configuration.setAllowedHeaders(Arrays.asList("*"));
// 接受cookie. 当前端设置了携带cookie,则需要后端配合加入下列代码(前端代码如: axios.defaults.withCredentials = true;)
configuration.setAllowCredentials(true);
// 设置可被客户端缓存时间(s),可不设置
configuration.setMaxAge(3600L);

UrlBasedCorsConfigurationSource source = new UrlBasedCorsConfigurationSource();
source.registerCorsConfiguration("/**", configuration);

FilterRegistrationBean<?> bean = new FilterRegistrationBean<>(new CorsFilter(source));
// 利用FilterRegistrationBean,将拦截器注册靠前,避免被其它拦截器首先执行
bean.setOrder(0);
return bean;
}
// 也可直接返回CorsConfigurationSource(但是容易出现被其他拦截器提前拦截的问题)
// public CorsConfigurationSource corsConfigurationSource() {
// return new UrlBasedCorsConfigurationSource;
// }

// 法二:基于 CorsFilter(控制过滤器的级别最高, 防止其他Filter已经返回了此请求)
@Order(Ordered.HIGHEST_PRECEDENCE)
@Bean
public Filter corsFilter() {
// org.springframework.web.cors
UrlBasedCorsConfigurationSource source = new UrlBasedCorsConfigurationSource();
CorsConfiguration config = new CorsConfiguration();
config.addAllowedOrigin("*");
config.addAllowedHeader("*");
config.addAllowedMethod("*");
config.setAllowCredentials(true);
source.registerCorsConfiguration("/**", config);
// org.springframework.web.filter.CorsFilter extends OncePerRequestFilter
return new CorsFilter(source);
}

// 法三(不推荐): 可能会被shiro等框架拦截;如果还实现了WebMvcConfigurer.addInterceptors方法,则也可能会失效
@Bean
public WebMvcConfigurer corsConfigurer() {
return new WebMvcConfigurerAdapter() {
@Override
public void addCorsMappings(CorsRegistry registry) {
registry.addMapping("/**")
.allowedHeaders("*")
.allowedMethods("*")
.allowedOrigins("*")
.allowCredentials(true);
}
};
}

// 法四:在@GetMapping处再增加下面注解
@CrossOrigin(origins = ["http://localhost:8080"])

spring security的cors配置 ^3

  • 开启cosr

    1
    2
    3
    4
    5
    6
    7
    8
    9
    10
    11
    12
    13
    14
    15
    16
    17
    18
    19
    20
    protected void configure(HttpSecurity http) throws Exception {
    http.csrf().disable(); // 开启cors需要关闭csrf
    http.cors();
    // ...
    }

    // 配置cors,或使用上文其他方式
    @Bean
    public CorsConfigurationSource corsConfigurationSource() {
    CorsConfiguration configuration = new CorsConfiguration();
    // configuration.setAllowedOrigins(Arrays.asList("*"));
    configuration.setAllowedOrigins(Arrays.asList("http://192.168.1.1:8088", "http://www.aezo.cn:80", "https://www.aezo.cn:80"));
    configuration.setAllowedMethods(Arrays.asList("*"));
    configuration.setAllowedHeaders(Arrays.asList("*"));
    configuration.setAllowCredentials(true);

    UrlBasedCorsConfigurationSource source = new UrlBasedCorsConfigurationSource();
    source.registerCorsConfiguration("/**", configuration);
    return source;
    }
    • CSRF 跨站请求伪造(Cross-Site Request Forgery). csrf

iframe相关问题

  • 父页面和iframe页面https关系

    1
    2
    3
    4
    5
    6
    7
    8
    page - iframe - status

    http - http - allowed
    http - https - allowed
    https- http - not allowed https嵌套http不支持
    https- https - allowed
    https - https - insecure scripts - not allowed
    https - https - inscure images - allowed but the browser will warn
  • iframe页面获取父页面地址

    • 如果iframe与父页面遵循同源策略(属于同一个域名),可通过parent.locationtop.location获取父页面url;如果不遵循同源策略,则无法获取
    • 不同源可使用document.referrer获取
1
2
3
4
5
6
7
8
9
10
function getParentUrl() {
var url = null; if (parent !== window) {
try {
url = parent.location.href;
} catch (e) {
url = document.referrer;
}
}
return url;
}
  • localStorage和sessionStorage
    • A项目通过iframe嵌入B项目,并将token拼接在url上。此时不管是否跨域,B项目可以获取到url中的参数,也可在B项目中操作localStorage保存数据到B项目所在域
    • 同一浏览器的非跨域(相同域名和端口)的不同页面间可以共享相同localStorage,但是不同页面间无法共享sessionStorage的信息;跨域则不能共享localStorage,跨域共享localStorage方案
      • postMessage和iframe相结合的方法,参考上文
        • 由于safari浏览器的默认限制,父页面无法向iframe里的跨域页面传递信息,此时可使用url传参
      • 用url传值的方法来实现跨域存储功能
        • url的长度极限是由两方面决定的,一个是浏览器本身的限制,另一个就是服务器的限制。safari浏览器可以支持超过64k个字符的长度,一般服务器默认支持2~3万个字符长度的url不成问题
  • cookie
    • A项目通过iframe嵌入B项目,并将token拼接在url上。此时如果跨域,B项目可以获取到url中的参数,但是在B项目无法操作cookie保存数据到B项目所在域

Http请求及响应

  • spring-security登录只能接受x-www-form-urlencoded(简单键值对)类型的数据,form-data(表单类型,可以含有文件)类型的请求获取不到参数值
  • 重定向问题:server.tomcat.use-relative-redirects=true 对于复杂的网络环境,如前置网关可能会导致前端重定向到内网地址,此时设置此参数,从而sendRedirect重定向时写入的Header Location响应头为相对路径
  • axios和qs使用参考js-tools.md#axios

文件上传案例

  • 用户上传文件后,没有上传表单数据,造成无效文件堆积问题
  • 请求类型必须是multipart/form-data,因此数据是在body体中,当通过拦截器拦截body时,不要拦截此类型的请求,否则后面controller将获取不到数据。参考spring.md#拦截response的数据
  • 相关配置
1
2
3
4
5
6
7
8
9
spring:
servlet: # http
# 也可以利用Bean实现
multipart:
#enabled: true # 启用http上传
max-file-size: 10MB # 设置支持的单个上传文件的大小限制,默认1M
max-request-size: 20MB # 设置最大的请求的文件大小,设置总体大小请求(多文件上传),默认10M
#file-size-threshold: 512KB # 当上传文件达到指定配置量的时候会将文件内容写入磁盘
#location: / # 设置上传的临时目录
  • 手动上传,和其他Bean字段一起提交
  • 前台代码(vue + iview)
1
2
3
4
5
6
7
8
9
10
11
12
13
14
15
16
17
18
19
20
21
22
23
24
25
26
27
28
29
30
31
32
33
34
35
36
37
38
39
40
41
42
43
44
45
46
47
48
49
50
51
52
53
54
55
56
57
58
59
60
61
62
63
64
65
66
67
68
69
70
71
72
73
74
75
76
77
78
79
80
81
82
83
84
85
86
87
88
89
90
91
92
93
94
95
96
97
98
99
100
101
102
103
104
105
106
107
108
109
110
111
112
113
114
115
116
117
118
119
120
121
122
123
124
125
126
127
128
129
130
<FormItem label="文件上传" prop="cvReceiptNo">
<Upload :before-upload="handleUpload" action="" :max-size="10*1024" style="display: inline-block;margin-right: 16px;"><a
href="javascript:;">{{ file && file.name ? file.name : '点击上传' }}</a></Upload>
<a v-if="editForm.filePath" target="_blank" :href="that.$staticPath + editForm.filePath">点击查看</a>
</FormItem>
<Button type="info" @click="doUpload">提交</Button>

<script lang="ts">
export default {
data: {}, // 省略
methods: {
handleUpload(file) {
var maxSize = 10 * (1024 * 1000)
if (file.size > maxSize) {
alert('当前文件超过10MB,不允许上传')
return false
}
this.file = file;
return false; // 返回false可防止Upload自定上传文件,此时可交由程序控制
},
doUpload() {
this.editForm = {
id: 1,
feeAmount: null,
createTm: '2000-01-01 00:00:00',
file: this.file, // 之后不能对 editForm 进行序列化,否则会丢失文件信息
items: [{itemId: 1},{itemId: 2}],
files: [this.file, this.file],
fileList: [this.file, this.file]
}
const formData = this.convertToFormData(this.editForm) // 将json格式转成FormData格式,见下文。或者使用 qs 插件格式化
formData.append("myFile", this.file)
formData.append("myFiles", this.file)
formData.append("myFileList", this.file)
// 这种方式后台无法通过普通的 MultipartFile 参数接受(但是如果Bean的字段类型是 MultipartFile, 则可以接受此格式)
// formData.append("myFiles[0]", this.file)
// formData.append("myFiles[1]", this.file)

/*
// 或重新定义一个axios实例,并挂载到Vue原型上。此处重新定义是防止使用项目中默认的axios实例(一般会通过axios.interceptors.request.use进行处理,而处理后的实例在上传时后台会报错:no multipart boundary was found,然而后台本身是没有问题)
export const uploadAxios = axios.create({
headers: {
'Content-Type': 'multipart/form-data',
'access_token': Cookies.get('access_token'),
}
})
this.$uploadAxios.post("http://localost:8080/order/upload", formData).then((resp) => {})
*/
this.$axios.post(url, param, { 'Content-Type': 'multipart/form-data' });
// 或
this.$axios({
url: "http://localost:8080/order/upload",
method: 'post',
// 全局定义的headers(access_token)最终也会注入
headers: {
'Content-Type': 'multipart/form-data'
},
data: formData
}).then((resp) => {})

/*
// 如果是multipart/form-data,请求参数会自动增加 boundary=...
// Content-Type: multipart/form-data; boundary=----WebKitFormBoundarybSHF77IaICmNerQk

// 请求时 formData 在chrome中格式化显示成
id: 1
feeAmount:
createTm: 2000-01-01 00:00:00
file: (binary)
items[0].itemId: 1
items[1].itemId: 2
files[0]: (binary)
files[1]: (binary)
fileList[0]: (binary)
fileList[1]: (binary)
myFile: (binary)
myFiles: (binary)
myFiles: (binary)
myFileList: (binary)

// 请求时 formData 在chrome中部分源码显示
------WebKitFormBoundarybSHF77IaICmNerQk
Content-Disposition: form-data; name="id"

1
------WebKitFormBoundarybSHF77IaICmNerQk
Content-Disposition: form-data; name="files[0]"


------WebKitFormBoundarybSHF77IaICmNerQk
Content-Disposition: form-data; name="files[1]"


------WebKitFormBoundarybSHF77IaICmNerQk
Content-Disposition: form-data; name="myFile"

null
------WebKitFormBoundarybSHF77IaICmNerQk
Content-Disposition: form-data; name="myFiles"

null
------WebKitFormBoundarybSHF77IaICmNerQk
Content-Disposition: form-data; name="myFiles"

null
*/
},
convertToFormData(data) {
function buildFormData(formData, data, parentKey) {
if (data && typeof data === 'object' && !(data instanceof Date) && !(data instanceof File)) {
Object.keys(data).forEach(key => {
const parentKeyFormat = parentKey ? (data instanceof Array ? `${parentKey}[${key}]` : `${parentKey}.${key}`) : key
buildFormData(formData, data[key], parentKeyFormat);
});
} else {
const value = data == null ? '' : data;
formData.append(parentKey, value);
}
}

const formData = new FormData();
buildFormData(formData, data);
return formData;
}
}
}
</script>
  • 后台代码
1
2
3
4
5
6
7
8
9
10
11
12
13
14
15
16
17
18
19
20
21
22
23
24
25
26
27
28
29
30
31
32
33
34
35
36
37
38
39
40
41
42
43
44
45
46
47
48
49
50
51
52
53
54
55
56
57
@RestController
@RequestMapping("/order")
public class OrderController {
// 以下参数全部可以获取到值。由于请求类型为 multipart/form-data(是基于@RequestParam的方式接受参数), ***因此无法通过 Map 来接受参数***
// 不能接收 List<Order>, 如果需要可将List<Order>包装到OrderWrapper等对象中. (会报错: `No primary or default constructor found for interface java.util.List`)
@RequestMapping("/upload")
public Result upload(MultipartFile myFile, MultipartFile[] myFiles, List<MultipartFile> myFileList, Order order) {
return Result.success();
}

// 扩展说明
// 1.效果同上。多文件上传时Layui会重复请求此接口多次. MultipartFile 并非 File对象,可通过 InputStream/OutputStream 将 MultipartFile 转换成 File
public String uploading(@RequestParam("file") MultipartFile file, String otherFiled) {}
// 2.使用`List<MultipartFile> files = ((MultipartHttpServletRequest) request).getFiles("file");`获取多个文件
// 此时User会根据前台参数和User类的set方法自动填充(调用的是User类的set方法),前端可以使用js对象FormData进行文件和普通参数的传输,请求类型仍然为 multipart/form-data
@RequestMapping(path = "/editUser", method = RequestMethod.POST)
public Map<String, Object> editUser(HttpServletRequest request, User user, @RequestParam("hello") String hello) {
Map<String, Object> result = new HashMap<>();

System.out.println("hello = " + hello); // hello world
System.out.println("user.getName() = " + user.getName()); // smalle

try {
// 为了获取文件项。或者使用Spring提供的MultipartFile进行文件接收
Collection<Part> parts = request.getParts();

// part中包含了所有数据(参数和文件)
for (Part part: parts) {
String originName = part.getSubmittedFileName(); // 上传文件对应的文件名
System.out.println("originName = " + originName);

if(null != originName) {
// 此part为文件
InputStream inputStream = part.getInputStream();
// ...
}
}
} catch (Exception e) {
e.printStackTrace();
}

return result;
}
}

// 必须要实现 Serializable 接口
@Data
public class Order implements Serializable {
private Long id;
private BigDecimal feeAmount;
private LocalDateTime createTm; // LocalDateTime格式化参考 [springboot.md#请求参数字段映射](/_posts/java/springboot.md#请求参数字段映射)
private MultipartFile file; // 也可获取到文件,下同
private String filePath; // 用于保存文件后,回传文件路径
List<OrderItem> items; // OrderItem 略
private MultipartFile[] files;
private List<MultipartFile> fileList;
}

文件下载案例

  • 前台代码
1
2
3
4
5
6
7
8
9
10
11
12
13
14
15
16
17
18
19
20
21
22
23
24
25
26
27
28
29
30
31
32
33
34
35
36
37
38
39
40
41
42
43
44
45
46
47
48
49
50
51
52
53
54
55
56
57
58
59
60
61
62
63
64
65
66
// 定义下载的axios实例,并附加到vue原型上
export const download = (url, params) => {
return axios.create({
baseURL: baseUrl,
timeout: 1000 * 60 * 3,
headers: {
'Authorization': getToken()
}
}).request({
url: url,
method: 'post',
data: params,
responseType: 'blob' // 后台返回数据格式为Blob对象(不可变的类文件对象): https://developer.mozilla.org/zh-CN/docs/Web/API/Blob
})
}

methods: {
exportData (row) {
if (!row.id) return
this.$download("/reportConfiguration/runExport/" + row.id, this.searchForm)
.then((resp) => {
this.downFile2(resp)

// 方式二
let res = resp.data
// 如果是普通文本文件则不需要设置type
const blob = new Blob([res], { type: 'application/vnd.openxmlformats-officedocument.spreadsheetml.sheet' })
this.downFile(blob, row.reportName + ".xlsx")
})
},
downFile (blob, fileName) {
if (window.navigator.msSaveOrOpenBlob) {
navigator.msSaveBlob(blob, fileName)
} else {
var link = document.createElement('a')
link.href = window.URL.createObjectURL(blob)
link.download = fileName
link.click()
window.URL.revokeObjectURL(link.href)
}
},
downFile2 (res) {
if (!res.headers['content-disposition']) {
var reader = new FileReader()
reader.onload = event => {
var content = reader.result
this.$Message.error(JSON.parse(content).metaMessage)
this.exportDocumentsLoading = false
}
reader.readAsText(res.data)
} else {
const fileName = res.headers['content-disposition'].split('=')[1]
const data = res.data
// 视情况
const url = window.URL.createObjectURL(new Blob([data], { type: 'application/zip' }))
const link = document.createElement('a')
link.style.display = 'none'
link.href = url
link.setAttribute('download', fileName)
document.body.appendChild(link)
link.click()
URL.revokeObjectURL(link.href)
document.body.removeChild(link)
}
}
}
  • 后端代码
1
2
3
4
5
6
7
8
9
10
11
12
13
14
15
16
17
18
19
@RequestMapping("/runExport/{id}")
public void runExport(@PathVariable("id") Integer id, @RequestBody Map<String, Object> params, HttpServletResponse response) {
String fileName = reportConfiguration.getReportName() + "_" + System.currentTimeMillis() + ".xls";
response.setContentType("application/vnd.openxmlformats-officedocument.spreadsheetml.sheet;charset=utf-8");
response.setHeader("Content-Disposition","attachment;filename="+ fileName +".xlsx");

OutputStream os = null;
try {
byte[] body = ...

os = response.getOutputStream();
os.write(body);
os.flush();
} finally {
if(os != null) {
os.close();
}
}
}

基于commons.fileupload上传文件

1
2
3
4
5
6
7
8
9
10
11
12
13
14
15
16
17
18
19
20
21
22
23
24
25
26
27
28
29
30
31
32
33
34
35
36
37
38
39
40
41
42
43
44
45
46
47
48
49
// 获取上传文件及表单其他字段
public static Map<String, Object> getData(HttpServletRequest request, HttpServletResponse response) throws IOException {
Map<String, Object> retMap = new HashMap<>();

// 判断enctype属性是否为multipart/form-data
// boolean isMultipart = ServletFileUpload.isMultipartContent(request);
// org.apache.commons.fileupload.disk.DiskFileItemFactory;
DiskFileItemFactory factory = new DiskFileItemFactory();

// 当上传文件太大时,因为虚拟机能使用的内存是有限的,所以此时要通过临时文件来实现上传文件的保存,此方法是设置是否使用临时文件的临界值(单位:字节)
factory.setSizeThreshold(1024*1024);
// 与上一个结合使用,设置临时文件的路径(绝对路径)
File tempFolderFile = new File("/tmp");
if(!tempFolderFile.isDirectory()) {
tempFolderFile.mkdirs();
}
factory.setRepository(tempFolderFile);

// org.apache.commons.fileupload.servlet.ServletFileUpload;
ServletFileUpload upload = new ServletFileUpload(factory);

// 设置上传内容的大小限制(单位:字节)
// upload.setSizeMax(yourMaxRequestSize);

try {
List<?> items = upload.parseRequest(request);
Iterator<?> iter = items.iterator();
while (iter.hasNext()) {
FileItem item = (FileItem) iter.next();

if (item.isFormField()) {
// 如果是普通表单字段
String name = item.getFieldName();
String value = item.getString();
retMap.put(name, value);
} else {
// 如果是文件字段/列名(可直接读流)
String fileName = item.getName();
File file1 = new File("/home/test/" + fileName);
item.write(file1);
retMap.put("file1", file1);
}
}
} catch (Exception e) {
e.printStackTrace();
}

return retMap;
}

模拟Form提交下载文件

1
2
3
4
5
6
7
8
9
10
11
12
13
14
submitForm (row) {
let form = document.createElement('form')
form.action = 'http://localhost:8080/test/download'
form.method = 'post'
let inputOne = document.createElement('input')
inputOne.type = 'hidden'
inputOne.name = 'id'
inputOne.value = row.id
// 多个参数可继续添加
form.appendChild(inputOne)
document.body.appendChild(form)
// 后台response设置ContentType,Header(Content-Disposition)将文件直接以流写出;此时提交后会自动下载文件
form.submit()
}

性能优化

用户浏览器缓存问题 ^5

  • 浏览器缓存包括强制缓存、协商缓存
  • 浏览器在请求某一资源时,会先获取该资源缓存的header信息,判断是否命中强缓存(Cache-controlexpires信息)
    • 若命中直接从缓存中获取资源信息,包括缓存header信息。本次请求根本就不会与服务器进行通信(显示200 OK (from disk/memory cache))
    • 若没有命中强缓存
      • 浏览器会发送请求到服务器,请求会携带第一次请求返回的有关缓存的header字段信息(Last-Modified/If-Modified-SinceEtag/If-None-Match),由服务器根据请求中的相关header信息来比对结果是否协商缓存命中
        • 若命中,则服务器返回新的响应header信息更新缓存中的对应header信息,但是并不返回资源内容,它会告知浏览器可以直接从缓存获取(状态码304)
        • 否则返回最新的资源内容(状态码200)
  • 强制缓存由ExpiresCache-Control控制
    • Pragma和Expires(HTTP 1.0) 控制缓存开关的字段有两个
      • Pragma的值为no-cache时,表示禁用缓存
      • Expires:response header里的过期时间,浏览器再次加载资源时,如果在这个过期时间内,则命中强缓存
    • Cache-Control(HTTP 1.1)
      • 当值设为max-age=300时,则代表在这个请求正确返回时间的5分钟内再次加载资源,就会命中强缓存
      • Cache-control其他常用的设置值(haeder中可包含多个Cache-control)
        • no-cache不使用本地缓存,但是需要使用协商缓存
        • no-store:直接禁止浏览器缓存数据,每次用户请求该资源,都会向服务器发送一个请求,每次都会下载完整的资源
        • public:可以被所有的用户缓存,包括终端用户和CDN等中间代理服务器
        • private:只能被终端用户的浏览器缓存,不允许CDN等中继缓存服务器对其缓存
    • Expiresmax-age
      • Expires = 时间,HTTP 1.0 版本,缓存的载止时间,允许客户端在这个时间之前不去检查(发请求)
      • Cache-Control: max-age = 秒,HTTP 1.1版本,资源在本地缓存多少秒,此时Expires = max-age + "每次下载时的当前的request时间"。主要解决Expires表示的是时间,但是服务器和客户端之前的时间可能相差很大
      • 如果max-age和Expires同时存在,则Expires被Cache-Control的max-age覆盖
  • 协商缓存由Etag/If-None-MatchLast-Modified/If-Modified-Since控制,流程及相关字段说明如下 ^9
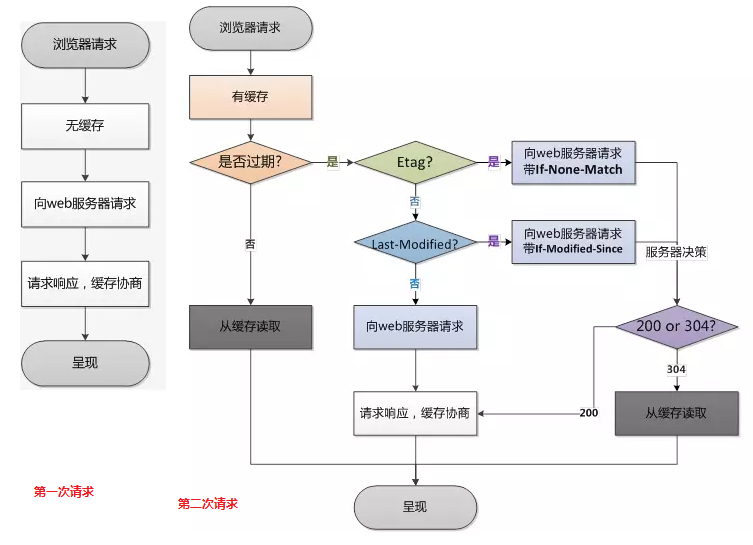
    web-cache

    • Last-Modified/If-Modified-Since
      • 当浏览器第一次请求一个url时,服务器端的返回状态码为200,同时HTTP响应头会有一个Last-Modified标记着文件在服务器端最后被修改的时间
      • 浏览器第二次请求上次请求过的url时,浏览器会在HTTP请求头添加一个If-Modified-Since的标记,用来询问服务器该时间之后文件是否被修改过
    • Etag/If-None-Match
      • 当浏览器第一次请求一个url时,服务器端的返回状态码为200,同时HTTP响应头会有一个Etag,存放着服务器端生成的一个序列值
      • 浏览器第二次请求上次请求过的url时,浏览器会在HTTP请求头添加一个If-None-Match的标记
    • Etag 主要为了解决 Last-Modified 无法解决的一些问题
      • Etag的值通常为文件内容的哈希值;而Last-Modified为最后修改的时间
      • Last-Modified只能精确到秒,秒之内的内容更新Etag才能检测
      • Etag每次服务端生成都需要进行读写操作,而Last-Modified只需要读取操作,Etag的消耗是更大的
  • 缓存特殊值说明
    • response no-cahce并不是表示无缓存,而是指使用缓存一定要先经过验证
    • response headerno-cachemax-age=0request headermax-age=0的作用是一样的:都要求在使用缓存之前进行验证
    • request headerno-cache,则表示要重新获取请求,其作用类似于no-store
  • 用户操作与缓存
    • 地址栏回车、页面链接跳转、新窗口打开、前进后退:Expires/Cache-Control、Last-Modified/Etag均可正常缓存
    • F5刷新:仅Expires/Cache-Control无法正常缓存
    • Ctrl+F5强制刷新:Expires/Cache-Control、Last-Modified/Etag均无法正常缓存
  • nginx 配置,让vue项目的index.html不缓存

    • vue-cli里的默认配置,css和js的名字都加了哈希值,所以新版本css、js和就旧版本的名字是不同的,只要index.html不被缓存,则css、js不会有缓存问题

      1
      2
      3
      4
      5
      6
      7
      8
      9
      # nginx 配置,让index.html不缓存。此处的路径不一定要是index.html,只要某路径A返回的是index.html文件,则此处匹配A路径即可
      location = /index.html {
      #- nginx的expires指令:`expires [time|epoch|max|off(默认)]`。可以控制 HTTP 应答中的Expires和Cache-Control的值
      # - time控制Cache-Control:负数表示no-cache,正数或零表示max-age=time
      # - epoch指定Expires的值为`1 January,1970,00:00:01 GMT`
      expires -1s; # 对于不支持http1.1的浏览器,还是需要expires来控制
      add_header Cache-Control "no-cache, no-store"; # 会加在 response headers
      # ...
      }
  • 设置页面A不进行缓存,直接浏览器访问页面A不会缓存;但是把此页面A以iframe方式嵌入到其他页面B时,A会进行缓存,且Request Header提示Provisional headers are shown

    1
    2
    3
    4
    5
    6
    7
    8
    9
    10
    11
    12
    <!-- 在A页面增加meta标签:可正常使用。但是如果之前无此标签,加上此标签后仍然无法让已经缓存的页面(无此meta标签)刷新。只会影响此html的缓存效果,不会影响页面js的 -->
    <head>
    <meta http-Equiv="Cache-Control" Content="no-cache" />
    <meta http-Equiv="Pragma" Content="no-cache" />
    <meta http-Equiv="Expires" Content="0" />
    </head>

    <!-- 解决方案:未测试成功 -->
    <script type="text/javascript">
    var _time = Math.floor(Math.random()*100000)
    document.write('<iframe src="http://localhost:8080/test.php?_time='+ _time +'"><iframe>')
    </script>
    • 出现Provisional headers are shown的常见情况
      • 跨域,请求被浏览器拦截
      • 请求被浏览器插件拦截
      • 服务器出错或者超时,没有真正的返回
      • 强缓存from disk cache或者from memory cache,此时也不会显示

压缩

  • 如果前端放在nginx上则需要开启nginx的压缩;如果中间通过了多个nginx,必需开启离用户最近(对外服务器)的服务器的压缩(后面的nginx无所谓);前后不分离时一般可通过tomcat进行页面压缩
1
2
3
4
5
6
7
8
9
10
11
12
server {
...

# 开启gzip压缩输出。**启用后响应头中会包含`Content-Encoding: gzip`**
gzip on;
# 压缩类型,默认就已经包含text/html(但是vue打包出来的js需要下列定义才会压缩)
gzip_types text/plain application/x-javascript application/javascript text/javascript text/css application/xml text/xml;
# 其优先级高于动态的gzip。可通过webapck插件 compression-webpack-plugin 提前将dist文件打包成 .gz 格式,从而减少服务器压缩
gzip_static on;

...
}
  • Vue首页加载慢问题,一般为main.js打包出来的体积太大,可以考虑减少main.js中的import包

后端其他

Bean名称冲突

  • 解决方法
    • @RestController("myBeanName")@Services("myBeanName")等方式
      • 默认是类名称首字母小写
      • @RequestMapping映射的URL路径也不能冲突
    • Mapper对应Bean是mybatis自动生成的(类无需注解@Repository)
      • 修改类名称,注入的变量也需要修改(默认bean名称为类名称首字母小写)

前端其他

  • 使用nginx导致部分地址直接浏览器访问报404(如基于quasar的项目)。可修改nginx配置如下
1
2
3
4
# 本地查找,如果没有就跳转到index.html(实际访问的还是源地址)
location / {
try_files $uri $uri/ /index.html;
}

Vue去掉#号

1
2
3
4
new Router({
mode: 'history', // H5新特性,需要浏览器支持:https://developer.mozilla.org/zh-CN/docs/Web/API/History
routes: []
})
  • 可配合nginx(后端),开发vue时的静态服务器默认支持去掉#
1
2
3
location / {
try_files $uri $uri/ /index.html;
}

Vue多项目配置

1
2
3
4
5
6
7
8
module.exports = {
baseUrl: process.env.NODE_ENV === 'production' ? '/' : '/',
// 表示index.html中引入的静态文件地址。如生成 `/my-app/js/app.28dc7003.js`
publicPath: '/my-app/', // 多环境配置时可自定义变量(VUE_APP_BASE_URL = /my-app/)到 .env.xxx 文件中,如:publicPath: process.env.VUE_APP_VUE_ROUTER_BASE
// 打包后的文件生成在此项目的my-app根文件夹。一般是把此文件夹下的文件(index.html和一些静态文件)放到服务器 www 目录,此时多项目需要放到 /www/my-app 目录下
outputDir: 'my-app-dist', // 也可以是其他命名,但是最终要把index.html放在服务器的 /www/my-app-dist 目录下
// ...
}
  • router/index.js (非必须)
1
2
3
4
5
6
new Router({
// 路由的基础路径,类似publicPath。只不过publicPath是针对静态文件,而此处是将<router-link>中的路径添加此基础路径
base: '/my-app/', // 多环境配置时可自定义变量(VUE_APP_BASE_URL = /my-app/)到 .env.xxx 文件中,如:publicPath: process.env.VUE_APP_VUE_ROUTER_BASE
// mode: 'history', // H5新特性,需要浏览器支持;***hash模式也支持多项目***
routes: []
})
  • nginx
1
2
3
4
5
6
7
8
9
10
11
12
13
14
15
16
17
18
19
20
# 此处的两个my-app需要和上文的base、publicPath保持一致
location = /my-app {
rewrite . http://$server_name/my-app/ break;
}
location ^~ /my-app/ {
# 在/www目录放项目文件夹my-app(index.html在此文件夹根目录)。只能用于 outputDir 和 publicPath 一致的情况
# root /www;

# 如果 outputDir 和 publicPath 不一致,则此处需使用alias;如果一致也可使用root
alias /www/my-app-dist/;

try_files $uri $uri/ /my-app/index.html;

# index index.html index.htm; # hash模式

# 禁止缓存index.html文件
if ($request_filename ~* .*\.(?:htm|html)$) {
add_header Cache-Control "private, no-store, no-cache, must-revalidate, proxy-revalidate";
}
}
  • 浏览器访问http://localhost/my-app/

https

  • 浏览器使用的协议(http/https)必须和请求后台的协议一致,否则Chrome进行拦截掉了
  • 静态资源使用//aezo.cn/xxx,它会判断当前的页面协议是http还是https来决定资源请求url的协议,可用于处理网站使用的协议和网页中请求的外网资源不一致的问题
1
2
3
4
5
6
7
8
9
10
11
<script src="//aezo.cn/images/jquery/jquery-1.10.2.min.js" type="text/javascript"></script>
<!-- <script src="/images/jquery/jquery-1.10.2.min.js" type="text/javascript"></script> -->
<link rel="stylesheet" href="//aezo.cn/umetro/maincss.css" type="text/css"/>
<!-- <link rel="stylesheet" href="/umetro/maincss.css" type="text/css"/> -->

<style>
.my-img {
background: url(//aezo.cn/images/smalle.jpg);
/* background: url(/images/smalle.jpg); */
}
</style>
  • js中使用//aezo.cn/api进行动态请求后端地址,会动态获取document的协议
  • 或者使用 window.location.protocol + '//aezo.cn/api' 得到完整地址,如微信网页授权需要将重定向地址当成参数传递,则应该传入完整地址

页面弹框管理

项目打包后动态修改配置文件

移动端其他

常用图片尺寸

  • 微信小程序分享图: 750*1334 (9:16)

前端常用插件

前端常见文件

1
2
3
4
5
6
7
8
9
10
11
12
13
babel.config.js     // 参考[js-tools.md#babel](/_posts/web/js-tools.md#babel)
.babelrc
.env.dev // 参考[vue.md#vue-cli](/_posts/web/vue.md#vue-cli)。vue-cli环境变量配置文件
.env.test
.postcssrc.js
tsconfig.json // 参考[typescript.md#tsconfig.json](/_posts/web/typescript.md#tsconfig.json)
jsconfig.json // https://www.jianshu.com/p/b0ec870ddfdf 、 https://www.cnblogs.com/leslie1943/p/13493829.html
vue.config.js // 参考[vue.md#vue-cli](/_posts/web/vue.md#vue-cli)
.eslintrc.js // 参考[js-tools.md#eslint格式化](/_posts/web/node-dev-tools.md#eslint格式化)
.eslintignore // 参考[js-tools.md#eslint格式化](/_posts/web/node-dev-tools.md#eslint格式化)
.editorconfig // 跨编辑器和IDE,保持一致的简单代码风格,就近原则(源码文件参考最近的此文件配置)。参考[js-tools.md#.editorconfig格式化](/_posts/web/node-dev-tools.md#.prettierrc/.jsbeautifyrc/.editorconfig格式化),下同
.prettierrc // 代码格式化,同上
.jsbeautifyrc // 代码格式化,同上

常用脚本

  • 通过脚本部署项目(deploy.sh)
1
2
3
4
5
6
7
8
9
10
11
12
13
14
15
16
17
18
19
20
21
22
23
24
25
26
27
28
29
30
31
32
33
34
35
36
37
#!/bin/bash

# 设置源服务器信息
host=$CORP_AL_JAVA_HOST
username=$CORP_AL_JAVA_USERNAME
ssh_file=$CORP_AL_JAVA_SSH_FILE
dir=$CORP_AL_JAVA_RT_DIR
now=`date +%Y%m%d%H%M%S`

# 打包
echo "=====> build docs..."
npm run build:docs

# 备份目录
echo "=====> backup file..."
expect<<-EOF
spawn ssh -i $ssh_file ${username}@${host}
expect "]$ "
send "cp -r $dir/dist $dir/dist.$now\r"
expect "]$ "
send "rm -rf $dir/dist\r"
expect "]$ "
send "exit\r"
expect eof
# 将命令行交还给用户
# interact
EOF

# 上传文件
echo "=====> upload file..."
scp -i $ssh_file -r docs/.vuepress/dist $username@$host:$dir

echo "=====> deploy end..."

:<<COMMENTBLOCK
echo '注释代码块,不会打印'
COMMENTBLOCK

浏览器

常见兼容性问题

  • Chrome和Firefox查看请求结果时preview和response显示数据不一致问题 ^6
    • 原因可能是因为数据为Long型,返回给浏览器以后,浏览器转换数据格式的时候出现问题。解决方案:在返回数据之前就将数据转换为字符串
  • Chrome 84默认启用了SameSite=Lax属性 ^11
    • SameSite 可取值:Strict(所有情况都不发送Cookies给第三方)、Lax(少部分情况发送)、None(发送,但是需要为HTTPS访问)
    • 如果A网页嵌入B网页时,用户打开A网页。如A与B属于同一域名,则B网站可在(前后端)对Cookies进行操作,也可传递Cookies给B;如果不是,则认为B网站为第三方页面,只对其开发部分情况(如a标签跳转、get类型的form提交)的Cookies传递

设计

思维

  • 由于某些原因,需对学生信息,复制出一条数据出来,并打上新数据的标记(在学生表中,同一学生,会有两条数据,除了ID和此标记,其他字段要求一致)。增删查改时,如何修改其中一条数据时,也同步另外一条数据
    • 解决:查询时根据学号将两个ID同时返回到前台,然后基于ID修改

接口设计原则

  • 假设A系统调用B系统
  • 全部是查询接口则很简单
  • 如果存在增删改数据,则一般需要有撤销接口/修改后结果查询
  • 解决执行超时/网络超时
    • 请求增加请求流水号参数
      • B系统(单机)
        • 进入方法,先判断内存中是否存在此流水号,存在则返回正在执行中
        • 不存在,则将流水号记录到内存
        • 再判断表中是否存在,存在则报错(不允许重复请求),不存在则正常执行
        • 执行完成后finally将流水号移除
        • 此执行最好设置成超时线程,一定时间没执行成功则报错,防止AB系统无限制调用
      • A系统
        • 请求设置超时时间,如果超时则用同一流水号继续请求,直到返回结果(成功 | 重复请求)
        • 如果返回正在执行,可考虑重复请求,或者调用查询接口是否请求操作成功
      • 此模式需要一直调用直到有结果,如何探知B系统是否还在继续执行,或者打断其执行
        • B系统设置执行超时机制

参考文章

ChatGPT开源小程序