介绍
- Greenwich 版中文文档、github
- Spring Cloud是基于Spring Boot的用于快速构建分布式系统工具集
- Spring Cloud特点:约定优于配置、开箱即用,快速启动、轻量级组件、组件丰富、选型中立
- 本文相关软件:JDK: 1.8,SpringCloud:
Dalston.SR1(如无特殊说明) - 历史版本,历史文档可以找网上的PDF资源(官网貌似没有)
- 本文相关源码
微服务构建
- 服务提供者、服务消费者
- 服务消费者中通过restTemp调用服务提供者提供的服务
- 如:
User user = this.restTemplate.getForObject("http://localhost:7900/simple/" + id, User.class);
- 如:
- maven依赖
1 | <!-- maven的parent是单继承,如果需要依赖多个父项目可以在dependencyManagement中添加依赖的scope为import --> |
Eureka服务发现
- 源码解析参考 Eureka源码解析
服务注册与发现
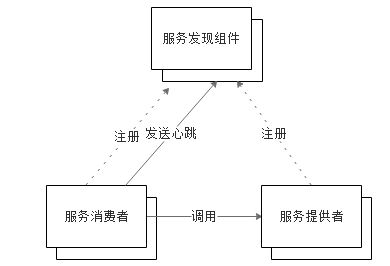
- 服务发现方式 ^2
- 客户端发现:Eureka、Zk
- 服务端发现:Consul + nginx
- 服务注册表是一个记录当前可用服务实例的网络信息的数据库,是服务发现机制的核心。服务注册表提供查询API和管理API,使用查询API获得可用的服务实例,使用管理API实现注册和注销
- 服务发现方式 ^2
简介:Eureka是
Netflix开发的服务发现框架,本身是一个基于REST的服务,主要用于定位运行在AWS域中的中间层服务,以达到负载均衡和中间层服务故障转移的目的。Spring Cloud将它集成在其子项目spring-cloud-netflix中,以实现Spring Cloud的服务发现功能架构图
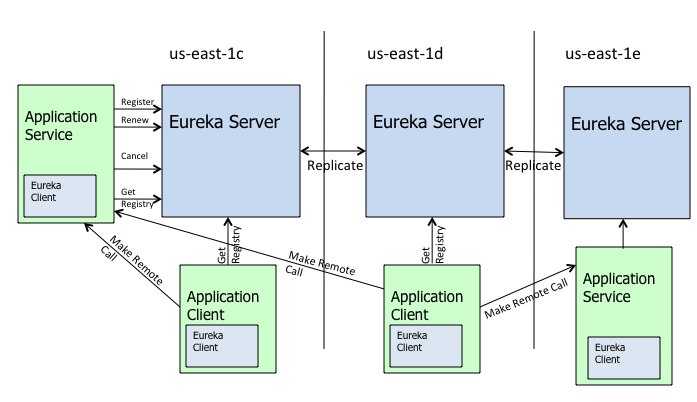
- AWS概念:us-east-1c、us-east-1d等是zone,它们都属于us-east-1这个region
- 在应用启动后,将会向Eureka Server发送心跳(默认周期为30秒)。如果Eureka Server在多个心跳周期内没有接收到某个节点的心跳,Eureka Server将会从服务注册表中把这个服务节点移除(默认90秒)
- Eureka还提供了客户端缓存的机制,即使所有的Eureka Server都挂掉,客户端依然可以利用缓存中的信息消费其他服务的API
- Eurka 工作流程
- Eureka Server 启动成功,等待服务端注册。在启动过程中如果配置了集群,集群之间定时通过 Replicate 同步注册表,每个 Eureka Server 都存在独立完整的服务注册表信息
- Eureka Client 启动时根据配置的 Eureka Server 地址去注册中心注册服务
- Eureka Client 会每 30s 向 Eureka Server 发送一次心跳请求,证明客户端服务正常
- 当 Eureka Server 90s 内没有收到 Eureka Client 的心跳,注册中心则认为该节点失效,会注销该实例
- 单位时间内 Eureka Server 统计到有大量的 Eureka Client 没有上送心跳,则认为可能为网络异常,进入自我保护机制,不再剔除没有上送心跳的客户端
- 当 Eureka Client 心跳请求恢复正常之后,Eureka Server 自动退出自我保护模式
- Eureka Client 定时全量或者增量从注册中心获取服务注册表,并缓存到本地
- 服务调用时,Eureka Client 会先从本地缓存找寻调取的服务;如果获取不到,则从注册中心刷新注册表,再同步到本地缓存
- Eureka Client 获取到目标服务器信息,发起服务调用
- Eureka Client 程序关闭时向 Eureka Server 发送取消请求,Eureka Server 将实例从注册表中删除
- Eureka参数配置:https://www.cnblogs.com/liukaifeng/p/10052594.html
- Eureka控制台介绍:https://blog.csdn.net/qq_25112523/article/details/83028529
eureka server
引入依赖
1
2
3
4
5
6
7
8
9
10<dependency>
<groupId>org.springframework.cloud</groupId>
<artifactId>spring-cloud-starter-eureka-server</artifactId>
</dependency>
<!-- 用于注册中心访问账号认证,非必须 -->
<dependency>
<groupId>org.springframework.boot</groupId>
<artifactId>spring-boot-starter-security</artifactId>
</dependency>在Application.java中加注解
@EnableEurekaServerapplication.yml配置
1
2
3
4
5
6
7
8
9
10
11
12
13
14
15
16
17
18
19
20
21
22
23
24
25
26
27
28
29
30
31
32
33
34
35
36
37server:
port: 8761
# 引入了spring-boot-starter-security则会默认开启认证
security:
basic:
enabled: true #开启eureka后台登录认证
# 不配置user,则默认的用户名为user,密码为自动生成(在控制台可查看)
user:
name: smalle
password: smalle
eureka:
# 会显示在System Status
environment: dev
# 会显示在System Status
datacenter: cloud
instance:
hostname: localhost
# instanceId: ${spring.application.name}:${spring.application.instance_id:${server.port}}
client:
# eureka server默认也是一个eureka client.以下两行仅将此App当成eureka server,不当成eureka client(由于是单点测试)
register-with-eureka: false
# 要不要去注册中心获取其他服务的地址, 默认为true。如果这是一个单点的 Eureka Server,则不需要同步其他节点的数据
fetch-registry: false
# 将eureka注册到哪个url
serviceUrl:
defaultZone: http://user:password@${eureka.instance.hostname}:${server.port}/eureka/
server:
# 是否开启自我保护机制(Eureka 会统计15分钟之内心跳失败的比例低于85%将会触发保护机制,不剔除服务提供者). 在开发阶段,需要频繁重启,关闭自我保护可以立即剔除不可用节点;生产环境建议开启。关闭保护机制,信息面板中会显示 THE SELF PRESERVATION MODE IS TURNED OFF
enable-self-preservation: false
# 清理间隔(单位毫秒,默认是60*1000),开发环境设置如下可快速移除不可用的服务
eviction-interval-timer-in-ms: 5000
# 控制台路径
dashboard:
path: /dashboard
enabled: true后台地址:
http://localhost:8761/dashboard
eureka client
引入依赖
1
2
3
4
5
6<dependency>
<groupId>org.springframework.cloud</groupId>
<artifactId>spring-cloud-starter-eureka</artifactId>
<!-- Edgware 版本开始,依赖名称改成下面的 artifactId -->
<!-- <artifactId>spring-cloud-starter-netflix-eureka-client</artifactId> -->
</dependency>在Application.java中加注解
@EnableEurekaClientapplication.yml配置
1
2
3
4
5
6
7
8
9
10
11
12
13
14
15
16
17
18
19
20spring:
cloud:
inetutils:
# 忽略虚拟网卡,防止开发环境客户端注册到服务器的地址为本地虚拟网卡地址
ignored-interfaces: VMware.*,VirtualBox.*,Hyper-V.*
# eureka客户端配置
eureka:
client:
serviceUrl:
defaultZone: http://smalle:smalle@localhost:8761/eureka/
instance:
# 启用ip访问eureka server(默认是使用主机名进行访问)
prefer-ip-address: true
# ip-address: 192.168.1.100 # 如果本地安装了虚拟网卡,也可以使用此配置强行指定注册到服务器的IP地址
# 实例id
instanceId: ${spring.application.name}:${spring.application.instance_id:${server.port}}
# 续约请求间隔(默认30秒),定期会向注册中心发送请求,证明此节点运行正常
lease-renewal-interval-in-seconds: 30
# 续约移除时间(默认90秒),如果90秒内没有响应,注册中心就会移除此节点
lease-expiration-duration-in-seconds: 90- 示例中使用H2数据库,IDEA连接方式:path:
mem:testdb, user:sa, password:空, url:jdbc:h2:mem:testdb, 使用Embedded或In-memory方式连接
- 示例中使用H2数据库,IDEA连接方式:path:
eureka server HA
1 | security: |
问题记录
- Edgware(.SR6)版本的Eureka客户端向Finchley(.SR2)版本的服务端注册时报错
Could not read JSON document: Unrecognized field "overriddenStatus" (class com.netflix.appinfo.InstanceInfo),解决如下
1 |
|
Ribbon客户端负载均衡
简介
- Ribbon是Netflix发布的云中间层服务开源项目,其主要功能是提供客户端侧负载均衡算法。Ribbon客户端组件提供一系列完善的配置项如连接超时,重试等。简单的说,Ribbon是一个客户端负载均衡器,我们可以在配置文件中列出Load Balancer后面所有的机器,Ribbon会自动基于某种规则(如简单轮询,随机连接等)去连接这些机器,我们也很容易使用Ribbon实现自定义的负载均衡算法。
Eureka与Ribbon连用
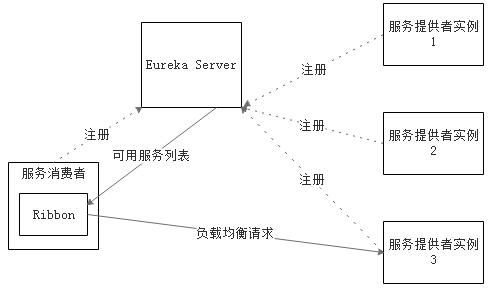
- Ribbon工作时分为两步:第一步先选择 Eureka Server, 它优先选择在同一个Zone且负载较少的Server;第二步再根据用户指定的策略,在从Server取到的服务注册列表中选择一个地址。其中Ribbon提供了多种策略,例如轮询round robin、随机Random、根据响应时间加权等
基本使用
- 引入依赖:group:
org.springframework.cloud,artifact id:spring-cloud-starter-ribbon- 如果引入了
spring-cloud-starter-eureka中默认引入了,此时可无需再引入
- 如果引入了
在restTemplate对应的Bean上注解
@LoadBalanced1
2
3
4
5
// 使用ribbon实现客户端负载均衡。使用此注解后,此RestTemplate实例将只能调用注册中心注册过的服务
public RestTemplate restTemplate() {
return new RestTemplate();
}备注:此时需要启动多个服务提供者进行测试,IDEA中:
- 可以先启动一个后再将端口改掉再启动另外一个
- (推荐)
Eidt Configurations再配置一个Spring boot的启动项,配置时将Spring Boot Settings-Override parameters添加一个参数server.port=8080(IDEA2018.1: 参数建议不要使用中划线,而是使用驼峰标识)
- 引入依赖:group:
自定义负载均衡策略
1
2
3
4
5# robbin负载均衡策略优先级:配置文件策略 > 代码级别策略 > ribbon默认策略(com.netflix.loadbalancer.ZoneAvoidanceRule)
provider-user:
ribbon:
# 当访问服务provider-user时采用随机策略RandomRule,此时访问其他服务时仍然为默认策略ZoneAvoidanceRule(复合判断server所在区域的性能和server的可用性选择server);还有WeightedResponseTimeRule响应时间加权策略等
NFLoadBalancerRuleClassName: com.netflix.loadbalancer.RandomRule脱离Eureka的配置,此时仍然可以运行Ribbon,但是不从eureka中获取服务地址,而是从配置文件中读取
1
2
3stores:
ribbon:
listOfServers: http://example.com,http://aezo.cn
Feign声明式服务调用
- 简介
- Spring Cloud默认已为Feign整合了Hystrix,只要Hystrix在项目的classpath中,Feign默认就会用断路器包裹所有方法
基本使用(服务消费者)
引入依赖
1
2
3
4
5<!--Feign声明式服务调用-->
<dependency>
<groupId>org.springframework.cloud</groupId>
<artifactId>spring-cloud-starter-feign</artifactId>
</dependency>启动类加注解
@EnableFeignClients定义FeignClient接口Bean
1
2
3
4
5
6
7
8
9
10// 此服务消费者需要调用的服务声明
("provider-user")
public interface UserFeignClient {
// Feign不支持@GetMapping, @PathVariable必须指明参数值
(method = RequestMethod.GET, value = "/simple/{id}")
User findById(@PathVariable("id") Long id, @RequestParam("q") String queryStr);
(method = RequestMethod.POST, value = "/feign-post")
User postFeignUser(@RequestBody User user);
}在controller中直接调用接口中方法(此时不直接调用restTemplate)
基于feign的hystrix熔断
配置
1
2# 默认为开启状态,此配置关闭feign的hystrix(使用hystrix会产生hystrix-ServiceName-N的子进程,从而导致类似CAT监控无法传递ThreadLocal上下文。建议开启hystrix)
# feign.hystrix.enabled: false使用
1
2
3
4
5
6
7
8
9
10
11
12
13
14
15
16
17
18
19
20
21
22
23
24
25
26
27
28
29
30
31
32
33
34
35
36
37// 1.熔断声明
(value = "sq-auth", fallbackFactory = SqAuthFeignFallback.class)
public interface SqAuthFeign {
(method = RequestMethod.POST, value = "/oauth/token")
Map<String, Object> oauthToken(@RequestParam("username") String username, @RequestParam("password") String password,
@RequestParam("grant_type") String grantType, @RequestParam("client_id") String clientId,
@RequestParam("client_secret") String clientSecret) throws Throwable;
(method = RequestMethod.GET, value = "/user/info/base")
Map<String, Object> userInfoBase(@RequestHeader("Authorization") String accessToken);
}
// 2.熔断后进行处理
public class SqAuthFeignFallback implements FallbackFactory<SqAuthFeign> {
private Logger logger = LoggerFactory.getLogger(SqAuthFeignFallback.class.getName());
public SqAuthFeign create(Throwable cause) {
logger.error("调用认证出错...", cause);
return new SqAuthFeign() {
public Map<String, Object> oauthToken(String username, String password, String grantType, String clientId, String clientSecret) {
logger.warn("获取token失败...");
throw cause;
}
public Map<String, Object> userInfoBase(String accessToken) {
logger.warn("获取用户信息失败...");
return null;
}
};
}
}
Hystrix服务容错保护(断路器)
Finchley.SR1
Hystrix使用
- 简介
基本使用(服务消费者)。引入依赖
1
2
3
4
5<!--服务容错保护(断路器) Hystrix-->
<dependency>
<groupId>org.springframework.cloud</groupId>
<artifactId>spring-cloud-starter-netflix-hystrix</artifactId>
</dependency>启动类加注解
@EnableCircuitBreaker(spring cloud注解)或者@EnableHystrix声明断路后回调函数
1
2
3
4
5
6
7
8
9
10
11(fallbackMethod = "findByIdFallBack")
public User findById(Long id) {
// virtual ip: 服务的spring.application.name
return this.restTemplate.getForObject("http://provider-user/simple/" + id, User.class);
}
// 当服务调用失败或者超时则回调此函数. 此函数参数和返回值必须和调用函数一致
public User findByIdFallBack(Long id) {
System.out.println(id + ", error[hystrix]");
return null;
}
1 | # 调用方配置,设置hystrix全局超时时间,默认是1秒 |
Hystrix Dashboard
- 是作为断路器状态的一个组件,提供了数据监控和友好的图形化界面(只能监控单个节点)
- 服务消费者引入
1 | <!-- 还需引入spring-boot-starter-actuator --> |
- 配置文件中加
1 | management: |
- 启动类加注解
@EnableHystrixDashboard - JSON格式查看。访问消费者URL
http://localhost:5555/actuator/hystrix.stream可看到一直显示ping:(Response, Content-Type: text/event-stream;charset=UTF-8),当访问服务提供者时,就会增加显示data:数据 - 界面查看。访问消费者URL
http://localhost:5555/hystrix出现界面,输入监控数据来源http://localhost:5555/actuator/hystrix.stream,点击Monitor Stream,再次访问服务提供者,状态图则会变化 界面参数说明
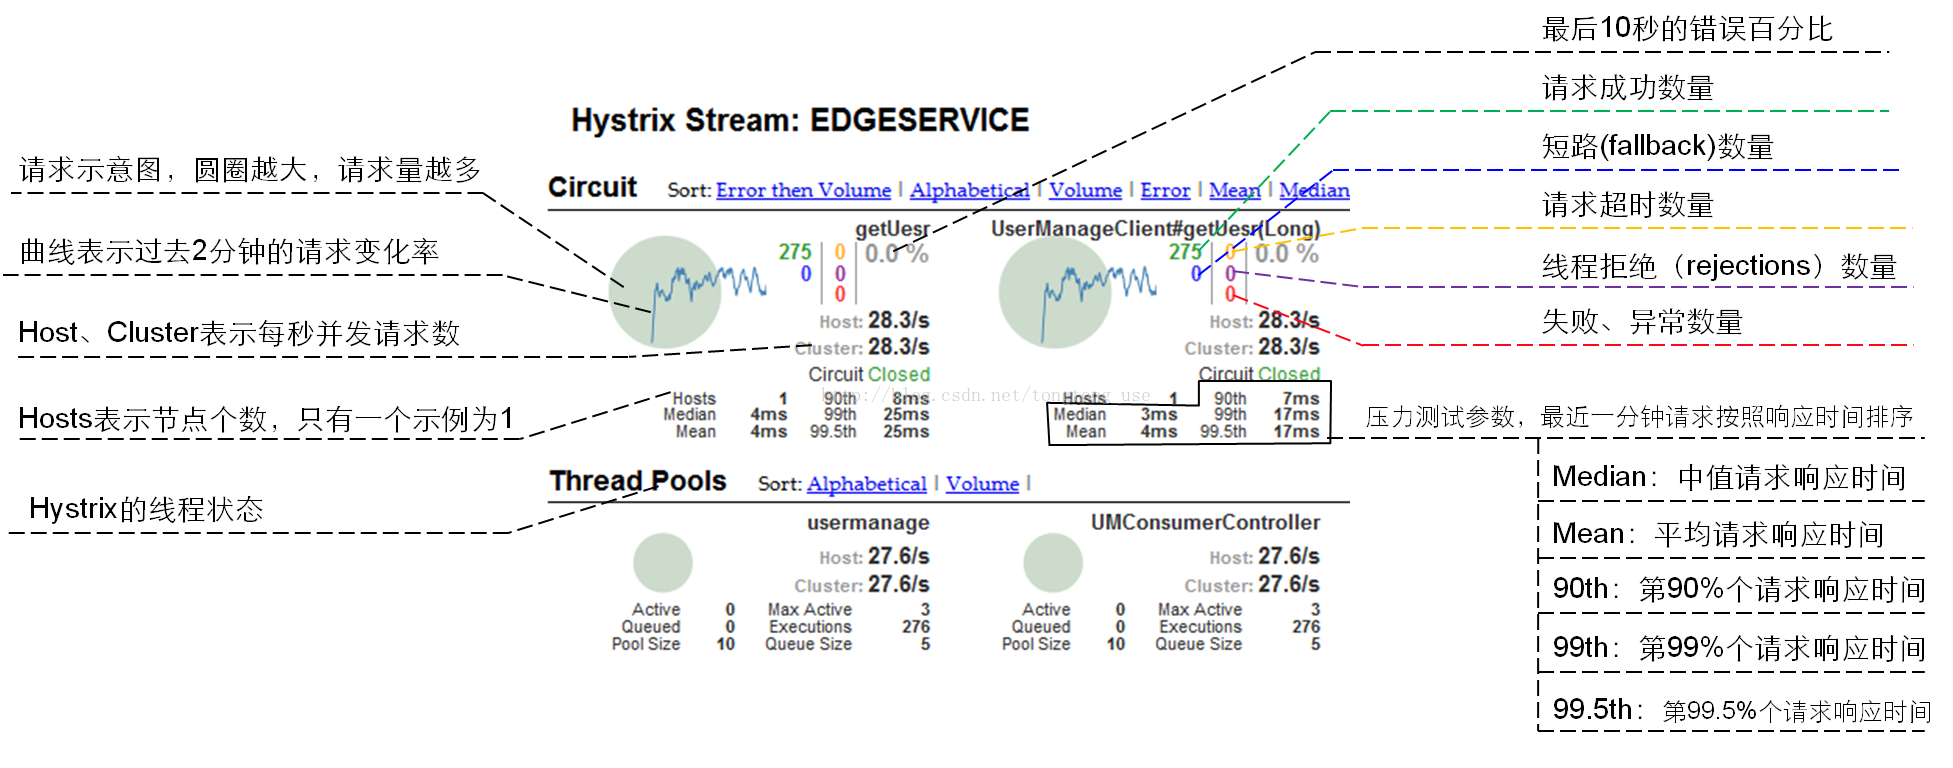
- 服务提供者出错或者超时都会体现在
Timed-out Request Count黄色数值中
- 服务提供者出错或者超时都会体现在
Turbine
- 发音:
/ˈtɜːrbaɪn/ - 基于Hystrix Dashboard之上,可以监控多个节点的数据(推荐)
- 需要添加依赖
1 | <dependency> |
- 启动类加注解
@EnableHystrixDashboard、@EnableTurbine - 配置
1 | turbine: |
- 访问Turbine程序对应Hystrix Dashboard URL
http://localhost:7010/hystrix出现界面,输入监控数据来源http://localhost:7010/turbine.stream,点击Monitor Stream,再次访问服务提供者。(查看所有监控集群 http://localhost:7010/clusters)
Turbine Stream
GateWay网关
SpringCloud Gateway
1 | spring: |
Zuul
- 推荐使用SpringCloud Gateway
基本使用
引入依赖
1
2
3
4
5<!-- API网关。包含actuator、hystrix、ribbon -->
<dependency>
<groupId>org.springframework.cloud</groupId>
<artifactId>spring-cloud-starter-zuul</artifactId>
</dependency>启动类声明
@EnableZuulProxy基础配置application.yml
1
2
3
4
5
6
7
8
9
10
11
12
13
14
15
16
17
18
19
20
21
22
23
24
25
26
27
28
29
30
31
32
33
34
35
36
37
38
39
40
41
42
43
44zuul:
# 忽略表达式。当遇到路径中有admin的不进行路由
# ignored-patterns: /**/admin/**
# 路由前缀
# prefix: /api
# zuul默认会过滤路由前缀(strip-prefix=true),此处是关闭此过滤(路由前缀将无效)
# strip-prefix: false
# zuul默认对转发的request,会把header清空,注意此处值为空,也可以单独基于路由配置。如spring security oauth2认证清空了Authorization会导致认证失败
sensitive-headers:
routes:
# 通配符(ant规范):? 代表一个任意字符,* 代表多个任意字符,** 代表多个任意字符且支持多级目录
# 此处路径在配置文件中越靠前的越优先(系统将所有路径放到 LinkedHashMap 中,当匹配到一个后就终止匹配)
# 现在可以同时访问http://localhost:5555/consumer-movie-ribbon/movie/1?accessToken=smalle 和 http://localhost:5555/api-movie/movie/1?accessToken=smalle (有熔断保护,可能会超时,多刷新几遍)
# api-movie为规则名, 可通过spring cloud config进行动态加载(覆盖)
api-movie:
# 匹配此路径则转发到对应serviceId上
path: /api-movie/**
# 从eureka中获取此服务(spring.application.name)的地址(面向服务的路由)
serviceId: consumer-movie-ribbon
api-user:
# 个性化定义敏感headers
custom-sensitive-headers: true
sensitive-headers: Cookie,Set-Cookie,Authorization # 单独配置敏感headers
path: /api-user/**
serviceId: provider-user
# 本地跳转(当访问/api-local/**的时候,则会转到当前应用的/local/**的地址)
# api-local:
# path: /api-local/**
# url: forward:/local
# 禁用过滤器:zuul.<FilterClassName>.<filterType>.disable=true
# AccessFilter:
# pre:
# disable: true
#host:
# 连接超时时间
#connect-timeout-millis: 2000
# 处理超时时间,The socket timeout in millis. Defaults to 10000
#socket-timeout-millis: 10000
# 每个路由的最大连接
#max-per-route-connections: 20
# 每个服务的http客户端连接池最大连接
#max-total-connections: 200
# 禁止通过服务列表使用服务名称直接访问
#ignored-services: "*"
自定义路由规则
1
2
3
4
5
6
7
public PatternServiceRouteMapper serviceRouteMapper() {
// 将serviceName-v1映射成/v1/serviceName. 未匹配到则按照原始的
return new PatternServiceRouteMapper(
"(?<name>^.+)-(?<version>v.+$)",
"${version}/${name}");
}过滤器
- Zuul过滤器核心处理器(
com.netflix.zuul.FilterProcessor) - 核心过滤器处理(对应包
org.springframework.cloud.netflix.zuul.filters) 自定义过滤器
1
2
3
4
5
6
7
8
9
10
11
12
13
14
15
16
17
18
19
20
21
22
23
24
25
26
27
28
29
30
31
32
33
34
35
36
37
38
39
40
41
42
43
44
45
46
47
48
49
50
51
52
53
54
55
56
57
public class AccessFilter extends ZuulFilter {
private static Logger logger = LoggerFactory.getLogger(AccessFilter.class);
// 过滤器类型,决定过滤器在请求的哪个生命周期中执行
// pre:表示请求在路由之前执行
// route:在路由请求时被执行(调用真实服务应用时)
// post:路由完成(服务调用完成)被执行
// error:出错时执行
public String filterType() {
return "pre";
}
// 多个过滤器时,控制过滤器的执行顺序(数值越小越优先)
public int filterOrder() {
return 0;
}
// 判断该过滤器是否需要被执行(true需要执行),可根据实际情况进行范围限定
public boolean shouldFilter() {
return true;
}
// 过滤器的具体逻辑
public Object run() {
RequestContext ctx = RequestContext.getCurrentContext();
HttpServletRequest request = ctx.getRequest();
logger.info("send {} request to {}", request.getMethod(), request.getRequestURL().toString()); // send GET request to http://localhost:5555/api-movie/movie/1
Object accessToken = request.getParameter("accessToken");
if(accessToken == null) {
logger.warn("access token is empty, add parameter like: accessToken=smalle");
ctx.setSendZuulResponse(false); // 令zuul忽略此请求,不进行路由(zuul本地方法无法过滤)
ctx.setResponseStatusCode(401);
ctx.setResponseBody("zuul filter");
return null;
} else {
ctx.addZuulRequestHeader("X-Token-Zuul", accessToken); // 往Header中加入数据
}
logger.info("access token ok");
// 测试异常过滤器(org.springframework.cloud.netflix.zuul.filters.post.SendErrorFilter)
// doSomteing();
return null; // Zuul目前对返回值不做处理
}
private void doSomteing() {
throw new RuntimeException("run error");
}
}
- Zuul过滤器核心处理器(
自定义异常信息:出现异常会forward到
/error的端点,/error端点的实现来源于Spring Boot的org.springframework.boot.autoconfigure.web.BasicErrorController1
2
3
4
5
6
7
8
9
10// 最好使用postman等工具测试
public class CustomErrorAttributes extends DefaultErrorAttributes {
public Map<String, Object> getErrorAttributes(RequestAttributes requestAttributes, boolean includeStackTrace) {
Map<String, Object> map = super.getErrorAttributes(requestAttributes, includeStackTrace);
map.remove("exception"); // 移除exception信息,客户端将看不到此信息
map.put("myAttr", "hello");
return map;
}
}动态路由(动态刷新配置):请见分布式配置中心(Config)部分
- 基于spring security oauth2进行认证,参考http://blog.aezo.cn/2017/10/22/java/springsecurity/。源码参考[https://github.com/oldinaction/springcloud/tree/master/demo11-oauth2]
Config 分布式配置中心(Spring Cloud Config)
配置中心(Config服务器端)
引入依赖
1
2
3
4
5
6
7
8
9
10
11
12
13
14
15
16
17<!-- 配置中心 -->
<dependency>
<groupId>org.springframework.cloud</groupId>
<artifactId>spring-cloud-config-server</artifactId>
</dependency>
<!-- 用于配置中心访问账号认证 -->
<dependency>
<groupId>org.springframework.boot</groupId>
<artifactId>spring-boot-starter-security</artifactId>
</dependency>
<!--向eureka注册,服务化配置中心-->
<dependency>
<groupId>org.springframework.cloud</groupId>
<artifactId>spring-cloud-starter-eureka</artifactId>
</dependency>启动类添加
@EnableConfigServer,开启服务发现则还要加@EnableDiscoveryClient配置文件
1
2
3
4
5
6
7
8
9
10
11
12
13
14
15
16
17
18
19
20
21
22
23
24
25
26
27
28spring:
cloud:
config:
server:
git:
# 可以使用占位符{application}、{profile}、{label}
uri: https://git.oschina.net/smalle/spring-cloud-config-test.git
# 搜索此git仓库的配置文件目录
search-paths: config-repo
username: smalle
password: aezocn
server:
port: 7000
security:
basic:
enabled: true # 开启权限验证(默认是false)
user:
name: smalle
password: smalle
# eureka客户端配置
eureka:
client:
serviceUrl:
defaultZone: http://smalle:smalle@localhost:8761/eureka/
instance:
# 启用ip访问
prefer-ip-address: true
instanceId: ${spring.application.name}:${spring.application.instance_id:${server.port}}在git仓库的config-repo目录下添加配置文件:
consumer-movie-ribbon.yml(写如配置如:from: git-default-1.0. 下同)、consumer-movie-ribbon-dev.yml、consumer-movie-ribbon-test.yml、consumer-movie-ribbon-prod.yml,并写入参数- 访问:
http://localhost:7000/consumer-movie-ribbon/prod/master即可获取应用为consumer-movie-ribbon,profile为prod,git分支为master的配置数据(/{application}/{profile}/{label})- 某application对应的配置命名必须为
{application}-{profile}.yml,其中{profile}和{label}可在对应的application的bootstrap.yml中指定 - 访问配置路径后,程序默认会将配置数据下载到本地,当git仓库不可用时则获取本地的缓存数据
- 支持git/svn/本地文件等
- 本地生成的仓库临时目录如
C:\Users\smalle\AppData\Local\Temp\config-repo-1469628134290927989。可删除这些文件夹,重启项目进行测试
- 某application对应的配置命名必须为
git仓库密码加密 ^5
- 下载jce扩展jar包(JDK1.8):将
local_policy.jar、US_export_policy.jar放入$JAVA_HOME/jre/lib/security(覆盖之前文件) - 生成秘钥对
- 命令行运行
keytool -genkeypair -alias config-server -keyalg RSA -keypass aezocn -keystore config-server.jks -storepass aezocn(一路回车,最后一个输入Y),会在命令的当前目录生成一个config-server.jks的文件 - 将
config-server.jks文件放在项目resources目录
- 命令行运行
bootstrap.yml中配置1
2
3
4
5
6
7encrypt:
key-store:
# file:${user.home}/config-server.jks
location: config-server.jks
alias: config-server
password: aezocn
secret: aezocn启动config服务后获取加密文本
curl localhost:7000/encrypt -d smalle_mypassword获取加密文本如AQCY22PkcuNZCfPS98zTv2TQD4Cgce4IzuDx7HmoxvVwqXl9IZAO/NbNAiqbtldZgf5TXpmscMueVkVdL1AcuIGzaiKSxhZwtgObnDuSijT8LWIjKPzN7cCUv8vh9i82CpOcYD80nXHKAWeqs/4PhGdRzaHujfceT0YHE4yk2bZsPWhNbFu+KBMsjsecnkwOHkamfz2Xeq9kqjoGFPMImtaCIhw7eX9wS81Mzn7YeG04iugz4Mh70h/5e7Ls9Q9OEz5zXfDYjpBbsXQRp+3JXBbIDyseQZHWh72ziKkGqPGvl9XSllpY/F2v5qKKHB/X2tmgMW81kwrm8hwjlqYfwEMw/H18LfrnYgBnZpHpKqMHtgJ22G993Zwkfqo3ULaveJ4=curl localhost:7000/decrypt -d AQCY22PkcuNZCfPS98zTv2TQD...解密得到smalle_mypassword(可进行反向解密)- config服务暴露的加密解密端点
/encrypt: 对POST请求的body内容进行加密的端点/decrypt:对POST请求body内容进行解密的端点
application.yml中配置1
2
3
4
5
6# spring.datasource.username={cipher}AQCY22PkcuNZCfPS98zTv2TQD...
spring:
datasource:
# 如果{cipher}类型密码错误可能会导致项目无法启动
username: '{cipher}AQCY22PkcuNZCfPS98zTv2TQD...'
password: '{cipher}...'去掉
bootstrap.yml中配置encrypt.key-store。通过环境变量(或者location改成类似file:${user.home}/config-server.jks)定义encrypt.key-store参数值。由于可通过/decrypt进行反向解密,此方式并不能完全隐藏密码。此安全策略主要用于开发组设置不同环境dev/prod的配置进行开发,最终交由运维组进行部署,prod中的加密密码可由运维提前给到开发组(config-server.jks秘钥文件由运维保管),部署时指定秘钥文件即可。encrypt.key-store对应的环境变量为:ENCRYPT_KEY_STORE_LOCATIONENCRYPT_KEY_STORE_ALIASENCRYPT_KEY_STORE_PASSWORDENCRYPT_KEY_STORE_SECRET- 测试环境变量没有生效,可以使用
encrypt.key-store.location=file:${user.home}/config-server.jks${user.home}只机器当前登录用户目录
- 测试环境变量没有生效,可以使用
客户端配置映射
引入依赖
1
2
3
4
5<!-- 配置中心客户端 -->
<dependency>
<groupId>org.springframework.cloud</groupId>
<artifactId>spring-cloud-starter-config</artifactId>
</dependency>添加
bootstrap.yml配置文件(不能放在application.yml中)1
2
3
4
5
6
7
8
9
10
11
12
13
14
15
16
17
18
19
20
21
22
23
24
25
26
27# bootstrap.yml其优先级高于application.yml
spring:
# application:
# name: consumer-movie-ribbon
cloud:
config:
# (1) config server地址
# uri: http://localhost:7000/
# (2) 配置中心实行服务化(向eureka注册了自己),此处要开启服务发现,并指明配置中心服务id
discovery:
enabled: true
service-id: config-server
profile: prod
label: master
# 如果配置中心开启了权限验证,此处填写相应的用户名和密码
username: smalle
password: smalle
# eureka客户端配置(使用了spring cloud config, 则eureka的配置必须写在bootstrap.yml中,否则报找不到config server )
eureka:
client:
serviceUrl:
defaultZone: http://smalle:smalle@localhost:8761/eureka/
instance:
# 启用ip访问
prefer-ip-address: true
instanceId: ${spring.application.name}:${spring.application.instance_id:${server.port}}测试程序
1
2
3
4
5
6
7
8
9
10
11
12// @RefreshScope // 之后刷新config后可重新注入值。参考下文动态刷新
public class ConfigController {
("${from:none}")
private String from;
// 测试从配置中心获取配置数据,访问http://localhost:9000/from
("/from")
public String from() {
return this.from; // 会从git仓库中读取配置数据
}
}config客户端重启会刷新配置(重新注入配置信息)
- 动态刷新配置(可获取最新配置信息的git提交)
- 在需要动态加载配置的Bean上加注解
@RefreshScope(如ConfigController中加入了此注解,则只有此类的配置可刷新,其他类的配置不会获取最新值) - 给 config client 加入权限验证依赖(
org.springframework.boot/spring-boot-starter-security),并在对应的application.yml中开启验证- 否则访问
/refresh端点会失败,报错:Consider adding Spring Security or set 'management.security.enabled' to false.(需要加入Spring Security或者关闭端点验证)
- 否则访问
POST请求http://localhost:9000/refresh(将Postman的Authorization选择Basic Auth和输入用户名/密码)- 再次访问config client的 http://localhost:9000/from 即可获取最新git提交的数据(由于开启了验证,所有端点都需要输入用户名密码)
- 得到如
["from"]的结果(from配置文件中改变的key)
- 得到如
- 在需要动态加载配置的Bean上加注解
动态加载网关配置
- 在
api-gateway-zuul服务中同上述一样加bootstrap.yml,并对eureka和config server进行配置 在
application.yml对1
2
3
4
5
6
7
8
9
10
11
12
13
14
15
16zuul:
routes:
api-movie:
path: /api-movie/**
serviceId: consumer-movie-ribbon
# 如果consumer-movie-ribbon服务开启了权限验证,则需要防止zuul将头信息(Cookie/Set-Cookie/Authorization)过滤掉了.(多用于API网关下的权限验证等服务)
# 此方法是对指定规则开启自定义敏感头. 还有一中解决方法是设置路由敏感头为空(则不会过滤任何头信息):zuul.routes.<route>.sensitiveHeaders=
customSensitiveHeaders: true
# 为了动态刷新配置(spring cloud config),执行/refresh端点(此端点需要加入Spring Security或者关闭端点验证)
security:
basic:
enabled: true
user:
name: smalle
password: smalle在git仓库中加入
api-gateway-zuul-prod.yml等配置文件,并加入配置1
2
3
4
5zuul:
routes:
api-movie:
path: /api-movie-config/**
serviceId: consumer-movie-ribbonPOST请求http://localhost:5555/refresh即可刷新api-gateway-zuul的配置,因此动态加载了路由规则zuul.routes.api-movie
- 在
Bus 消息总线(Spring Cloud Bus)
- 简介:使用轻量级的消息代理来构建一个公用的消息主题让系统中所有微服务都连接上来,由于该主题会被所有实例监听和消费所以称消息总线。各个实例都可以广播消息让其他实例消费。
- 是基于消息队列(如:ActiveMQ/Kafka/RabbitMQ/RocketMQ), Spring Cloud Bus暂时支持RabbitMQ和Kafka
以RabbitMQ为例
RabbitMQ是实现了高级消息队列协议(AMQP)的开源消息代理软件,也称为面向消息的中间件。后续操作需要先安装RabbitMQ服务。关于RabbitMQ在SpringBoot中的使用参考SpringBoot章节
在
config-server和consumer-movie-ribbon两个服务中加入bus依赖1
2
3
4
5<!-- 消息总线 -->
<dependency>
<groupId>org.springframework.cloud</groupId>
<artifactId>spring-cloud-starter-bus-amqp</artifactId>
</dependency>启动RabbitMQ服务(如果未修改默认配置,则SpringBoot会自动连接。自定义配置如下)
1
2
3
4
5
6
7# 这是springboot的默认配置,可根据实际情况修改
spring:
rabbitmq:
host: localhost
port: 5672
username: guest
password: guest启动一个
config-server和两个consumer-movie-ribbon(9000、9002)- 修改上述【分布式配置中心】的git管理的配置字段
from - 刷新
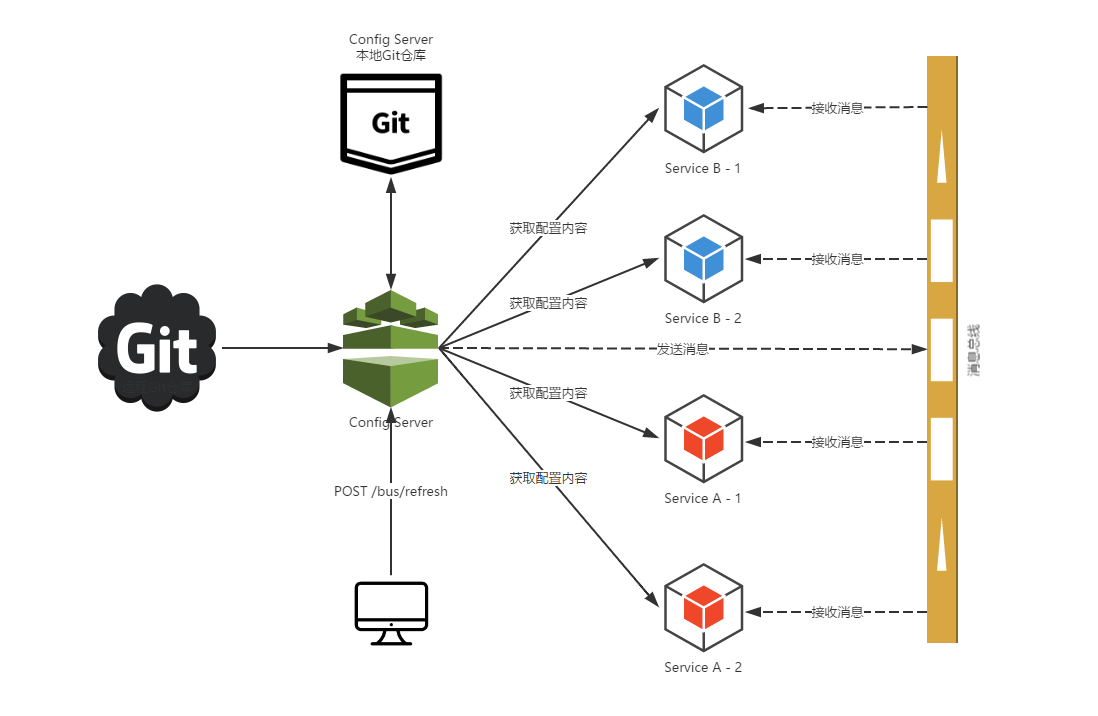
config-server:POST访问http://localhost:7000/bus/refreshPOST访问http://localhost:7000/refresh 只能刷新config-server本身POST访问http://localhost:7000/bus/refresh 可以刷新消息总线上所有的服务POST访问http://localhost:7000/bus/refresh?destination=consumer-movie-ribbon:9000 可以刷新的指定服务实例POST访问http://localhost:7000/bus/refresh?destination=consumer-movie-ribbon:** 可以刷新服务consumer-movie-ribbon下的所有实例- 刷新消息总线上的任何一个服务都可以到达此效果(消息总线上的其他服务会收到触发刷新服务的消息,进行同步刷新)
原理如下 ^3
以Kafka为例
Kafka是由LinkedIn开发的分布式消息系统,现由Apache维护,使用Scala实现。
更换依赖
1
2
3
4<dependency>
<groupId>org.springframework.cloud</groupId>
<artifactId>spring-cloud-starter-bus-kafka</artifactId>
</dependency>只需更换依赖,其他地方同rabbitmq即可(使用kafka默认配置时会产生一个Topic为)
- 启动kafka(包括zookeeper). 关于
Kafka使用可查看文章Kafka - 启动应用后会产生一个名为springCloudBus的Topic
Stream 消息驱动(Spring Cloud Stream)
- 简介
- Spring Cloud Stream本质上是整合了Spring Boot和Spring integration,主要包含发布-订阅、消息组、分区三个概念
- 其功能是为应用程序(Spring Boot)和消息中间件之间添加一个绑定器(Binder),只对应用程序提供统一的Channel通道,从而应用程序不需要考虑不同消息中间件的实现(调用规则)
- 暂时只支持RabbitMQ和Kafka的自动化配置
入门案例
引入依赖(以服务
consumer-movie-ribbon为例)1
2
3
4
5
6<!-- 消息驱动 -->
<!-- 基于rabbitmq(也可以引入spring-cloud-stream-binder-rabbit/kafka/redis) -->
<dependency>
<groupId>org.springframework.cloud</groupId>
<artifactId>spring-cloud-starter-stream-rabbit</artifactId>
</dependency>application.yml 部分配置(consumer-movie-ribbon)
1
2
3
4
5
6
7
8
9
10
11
12
13
14
15
16spring:
application:
name: consumer-movie-ribbon
cloud:
# Spring Cloud Stream配置
stream:
bindings:
# input为自定义的通道名称,可为其他(默认为input,使用@Input("input")时可省略input)
input:
# 通道数据传输类型
# content-type: text/plain # application/json
# 将此实例的某个Stream(input)定义为某个消费组(同一个消费组里面的实例只有其中一个对消息进行消费, 否则所有的实例都会消费, 建议定义)
group: group-movie
# 应用中监听的input通道对应中间件的主题(rabbitmq的Exchange, kafka的Topic)为xxx(默认是通道名称, 此时即input)
# destination: xxx
# ...此处省略其他通道配置...消息接受者(consumer-movie-ribbon)
1
2
3
4
5
6
7
8
9
10
11
12
13
14
15
16
17
18
19
20
21
22
23
24
25
26
27
28
29
30
31
32// 开启绑定,启动消息驱动。
// @EnableBinding属性value可指定多个关于消息通道的配置(类),表示需要加载的类,即根据这些类中的注解(@Input、@Output生成bean)
(value = {Processor.class, MyChannel.class})
public class SinkReceiver {
// 消息消费者监听的通道名称.
(Processor.INPUT)
public void receive(Object msg) {
System.out.println("msg = " + msg);
}
// @StreamListener可将收到的消息(json/xml数据格式)转换成具体的对象
(MyChannel.CHANNEL2_INPUT) // 接受rabbitmq的channel1_output
(MyChannel.CHANNEL2_OUTPUT) // 收到消息后进行反馈(给rabbitmq的channel1_input发送)
public Object receive2(User user) {
System.out.println("user.getUsername() ==> " + user.getUsername());
return "SinkReceiver.receive2 = " + user; // 将此数据返回给消息发送这或者其他服务
}
}
// 定义通道
public interface MyChannel {
// 输入输出通道名称最好不要相同
String CHANNEL2_INPUT = "channel2_input";
String CHANNEL2_OUTPUT = "channel2_output";
(MyChannel.CHANNEL2_INPUT)
SubscribableChannel channel2_input(); // 设置消息通道名称(默认使用方法名作为消息通道名),表示从该通道发送数据
(MyChannel.CHANNEL2_OUTPUT)
MessageChannel channel2_output();
}- 易错点:
- 在两个类中分别@EnableBinding绑定Processor,并同时监听@Input则报错 unknown.channel.name.(一个应用中不能绑定多个相同名称的@Input、@Output; 同理, Processor只能被一个类@EnableBinding绑定或者被两个类分别绑定@Input、@Output)
- 如果一个应用需要监听相同的主题(如:input),可以重新命名一个@Input(“xxx”), 然后通过spring.cloud.stream.bindings.xxx.destination=input来监听input主题。或者将监听程序写在一个类中
- 易错点:
消息发送者(provider-user)
1
2
3
4
5
6
7
8
9
10
11
12
13
14
15
16
17
18
19
20
21
22
23
24
25
26
27
28
29
30
31
32
33
34
35
36
37
38
39
40
41
42
43
44
45
46
47
48
49
50
51
52
53
54
55
56
57
58(MyChannel.class)
public class SinkSender {
// 法一:注入绑定接口
private MyChannel myChannel;
// 法二:注入消息通道
("input") // 此时有多个MessageChannel(根据SinkSender中@Output注入的), 需要指明
private MessageChannel channel;
private MessageChannel channel1_output;
// 也可以这样注入
public SinkSender(@Qualifier("channel1_output") MessageChannel channel) {
this.channel1_output = channel;
}
// 测试基本的消息发送和接受
public void sendMessage() {
// 此条消息会在测试程序中打印
myChannel.channel().send(MessageBuilder.withPayload("hello stream [from provider-user]").build());
// 此条消息会在消息消费者中显示
channel.send(MessageBuilder.withPayload("hello channel [from provider-user]").build());
}
// 测试@StreamListener对消息自动转换和消息反馈
public void msgTransform() {
channel1_output.send(MessageBuilder.withPayload("{\"id\": 1, \"username\": \"smalle\"}").build());
}
}
// 用于接受反馈消息
(value = {MyChannel.class})
public class ChannelReceiver {
// 接受反馈的消息
(MyChannel.CHANNEL1_INPUT)
public void receiveSendTo(Object msg) {
System.out.println("ChannelReceiver.receiveSendTo ==> " + msg);
}
}
// 定义通道
public interface MyChannel {
String CHANNEL = "input";
String CHANNEL1_INPUT = "channel1_input";
String CHANNEL1_OUTPUT = "channel1_output";
(MyChannel.CHANNEL1_INPUT)
SubscribableChannel channel1_input();
(MyChannel.CHANNEL)
MessageChannel channel();
(MyChannel.CHANNEL1_OUTPUT)
MessageChannel channel1_output();
}
Spring integration原生支持(了解,Spring Cloud Stream是基于它实现的)
消息消费者(consumer-movie-ribbon)
1
2
3
4
5
6
7
8
9
10
11
12
13(value = {MyChannel.class}) // 收发消息的通道不能使用同一个MessageChannel
public class MyReceiver {
(inputChannel = MyChannel.POLLER_INPUT) // 收发消息的通道不能使用同一个MessageChannel
public void receive(Object msg) {
System.out.println("MyReceiver: msg = " + msg);
}
// 消息转换(也可放在MySender中),@ServiceActivator本身不具备消息转换功能(如:json/xml转成具体的对象)
(inputChannel = MyChannel.POLLER_INPUT, outputChannel = MyChannel.POLLER_OUTPUT)
public Object transform(Date msg) {
return new SimpleDateFormat("yyyy/MM/dd HH:mm:ss").format(msg);
}
}消息生产者(provider-user)
1
2
3
4
5
6
7
8
9(value = {MyChannel.class})
public class MySender {
// 项目启动后便会执行
(value = MyChannel.POLLER_OUTPUT, poller = (fixedDelay = "5000")) // 对MyChannel.POLLER_OUTPUT通道进行输出. poller表示轮询,此时为每5秒执行一次方法
public MessageSource<Date> timeMsgSource() {
return () -> new GenericMessage<>(new Date());
}
}
消息分区(未测试)
1
2
3
4
5
6
7
8
9
10
11
12
13
14# 消费者配置
# 当前消费者的总实例数量(消息分区需要设置)
spring.cloud.stream.instanceCount=2
# 当前实例的索引号(消息分区需要设置,最大为instance-count - 1)
spring.cloud.stream.instanceIndex=0
# 开启消费者分区功能
spring.cloud.stream.bindings.input.consumer.partitioned=true
# 生产者配置
spring.cloud.stream.bindings.output.destination=input
# 可根据实际消息规则配置SpEL表达式生成分区键用于分配出站数据, 用于消息分区
spring.cloud.stream.bindings.output.producer.partitionKeyExpression=payload
# 分区数量
spring.cloud.stream.bindings.output.producer.partitionCount=2绑定器SPI
- 绑定器是将程序(SpringBoot)中的输入/输出通道和消息中间件的输入输出做绑定
- Spring Cloud Stream暂时只实现了RabbitMQ和Kafka的绑定其,因此只支持此二者的自动化配置
可自己实现其他消息中间件的绑定器
- 一个实现Binder接口的类
- 一个Spring配置加载类,用来连接中间件
一个或多个能够在classpath下找到META-INF/spring.binders定义绑定器定的文件。如:
1
2rabbit:\
org.springframework.cloud.stream.binder.rabbit.config.RabbitServiceAutoConfiguration
绑定器配置
1
2
3
4
5
6
7
8
9
10
11
12
13
14# 默认的绑定器为rabbit(名字是META-INF/spring.binders中定义的)
spring.cloud.stream.defaultBinder=rabbit
# 定义某个通道(input)的绑定器
spring.cloud.stream.bindings.input.binder=kafka
# 为不同通道定义同一类型不同环境的绑定器
spring.cloud.stream.bindings.input.binder=rabbit1
spring.cloud.stream.bindings.output.binder=rabbit2
# 定义rabbit1的类型和环境(此处省略rabbit2的配置)
spring.cloud.stream.binders.rabbit1.type=rabbit1
spring.cloud.stream.binders.rabbit1.environment.spring.rabbitmq.host=127.0.0.1
spring.cloud.stream.binders.rabbit1.environment.spring.rabbitmq.port=5672
spring.cloud.stream.binders.rabbit1.environment.spring.rabbitmq.username=guest
spring.cloud.stream.binders.rabbit1.environment.spring.rabbitmq.password=guest
Sleuth 分布式服务跟踪(Spring Cloud Sleuth)
- 简介
- 用来跟踪每个请求在全链路调用的过程,可快速发现每条链路上的性能瓶颈
- 构建后会自动监控RabbitMQ/Kafka传递的请求、Zuul代理传递的请求、RestTemplate发起的请求
入门案例
引入依赖(在生产者和消费者中都引入)
1
2
3
4
5<!-- 服务跟踪 -->
<dependency>
<groupId>org.springframework.cloud</groupId>
<artifactId>spring-cloud-starter-sleuth</artifactId>
</dependency>访问生产者
http://localhost:8000/simple/1,控制台输出类似TRACE [provider-user,0ec3c3b4ee83efd5,0ec3c3b4ee83efd5,false]的信息,信息中括号的值分别代表:应用名称、Trace ID(一个请求链路的唯一标识)、Span ID(一个基本工作单元,如一个Http请求)、是否将信息收集到Zipkin等服务中来收集和展示- 添加配置
logging.level.org.springframework.web.servlet.DispatcherServlet=DEBUG可打印更多信息
- 请求头信息:
org.springframework.cloud.sleuth.Span 抽样收集
- Spring Cloud Sleuth收集策略通过Sampler接口实现(通过isSampled返回boolean判断是否收集),默认会使用PercentageBasedSampler实现的抽样策略
spring.sleuth.sampler.percentage=0.1代表收集10%的请求跟踪信息可收集请求头信息中包含某个tag的样品
1
2
3
4
5
6
7
8
9
10
11
12public class TagSampler implements Sampler {
private String tag;
public TagSampler(String tag) {
this.tag = tag;
}
public boolean isSampled(Span span) {
return span.tags().get(tag) != null;
}
}
与Zipkin整合(推荐)
建立zipkin server
- 新建服务
zipkin-server 引入依赖
1
2
3
4
5
6
7
8
9
10
11
12
13
14
15
16
17
18
19
20
21
22
23
24
25
26
27
28
29
30
31
32
33<!-- eureka客户端 -->
<dependency>
<groupId>org.springframework.cloud</groupId>
<artifactId>spring-cloud-starter-eureka</artifactId>
</dependency>
<!-- Zipkin创建sleuth主题的stream -->
<dependency>
<groupId>org.springframework.cloud</groupId>
<artifactId>spring-cloud-starter-stream-rabbit</artifactId>
</dependency>
<!--包含Zipkin服务的核心依赖(zipkin-server)、消息中间件的核心依赖、扩展数据存依赖等. 不包含Zipkin前端界面依赖-->
<dependency>
<groupId>org.springframework.cloud</groupId>
<artifactId>spring-cloud-sleuth-zipkin-stream</artifactId>
</dependency>
<!-- Zipkin前端界面依赖 -->
<dependency>
<groupId>io.zipkin.java</groupId>
<artifactId>zipkin-autoconfigure-ui</artifactId>
<scope>runtime</scope>
</dependency>
<!-- 存储Zipkin跟踪信息到mysql(可选. 使用mysql后, Zipkin前端界面显示的数据是通过Restful API从数据库中获取的. 不使用数据存储在Zipkin内部) -->
<dependency>
<groupId>org.springframework.boot</groupId>
<artifactId>spring-boot-starter-data-jpa</artifactId>
</dependency>
<dependency>
<groupId>mysql</groupId>
<artifactId>mysql-connector-java</artifactId>
</dependency>启动类加注解
@EnableEurekaClient、@EnableZipkinStreamServer(用stream方式启动,包含常规启动@EnableZipkinServer和创建sleuth的stream主题)application.yml配置
1
2
3
4
5
6
7
8
9
10
11
12
13
14
15
16
17
18
19
20
21
22server:
port: 9411
spring:
application:
name: zipkin-server
datasource:
# 建表语句, 用来新建zipkin跟踪信息相关表(zipkin_spans、zipkin_annotations、zipkin_dependencies), 文件在Maven:io.zipkin.java:zipkin.storage.mysql目录下
schema: classpath:/mysql.sql
url: jdbc:mysql://localhost:3306/test
username: root
password: root
initialize: true
continue-on-error: true
# 不对此服务开启跟踪
sleuth:
enabled: false
# 改变zipkin日志跟踪信息存储方式为mysql(测试也可不使用mysql存储)
zipkin:
storage:
type: mysql
- 新建服务
被跟踪的应用(在生产者和消费者中都引入)
引入依赖
1
2
3
4
5<!--服务跟踪与Zipkin整合(可选)-->
<dependency>
<groupId>org.springframework.cloud</groupId>
<artifactId>spring-cloud-starter-zipkin</artifactId>
</dependency>如果zipkin没有使用eureka, 则需要在application.yml中添加
spring.zipkin.base-url: http://localhost:9411/(zipkin server地址)
- 进入到zipkin server后台界面查看跟踪信息:http://localhost:9411/ (跟踪信息可能会有延迟)
整合ELK日志分析系统
- ELK平台包含:ElasticSerch(分布式搜索引擎)、Logstash(日志收集-过滤-存储)、Kibana(界面展现)三个开源工具。(与Zipkin类似,二者不建议同时使用)
引入依赖
1
2
3
4
5
6<!--服务跟踪与ELK日志分析平台整合(可选,此包用于Logstash收集日志)-->
<dependency>
<groupId>net.logstash.logback</groupId>
<artifactId>logstash-logback-encoder</artifactId>
<version>4.6</version>
</dependency>将spring.application.name配置到bootstrap.yml中
- 在resources目录加logback-spring.xml文件(请看源码)
基于docker运行
参考:http://blog.aezo.cn/2017-06-25/arch/docker/
版本 Finchley.SR1
- 版本要求:
jdk 1.8、springboot 2.0.1.RELEASE - 组件依赖
1 | <!-- Eureka Server --> |
Eureka
- 依赖变化参考上述组件依赖
Eureka Server、Eureka Client - application.yml中spring security配置
1 | spring: |
- 启动类
1 |
|
Config
客户端配置刷新
加端点依赖
1
2
3
4<dependency>
<groupId>org.springframework.boot</groupId>
<artifactId>spring-boot-starter-actuator</artifactId>
</dependency>application.yml
management.endpoints.web.exposure.include: refresh- 访问:http://localhost:9000/actuator/refresh
Zuul
- 自定义异常信息
1 | import org.springframework.boot.web.servlet.error.DefaultErrorAttributes; // springboot 2.0 发生改变 |
- Ribbon/Hystrix异常捕获
1 |
|
- SendErrorFilter执行时机
1 | // 测试异常过滤器(org.springframework.cloud.netflix.zuul.filters.post.SendErrorFilter) |
- 通过spring cloud config动态加载路由配置
1 |
|
Sleuth ^4
- 关于 Zipkin 的服务端,在使用 Spring Boot 2.x 版本后,官方就不推荐自行定制编译了,反而是直接提供了编译好的 jar 包。官方提供了一键脚本
1 | # jar提供的详细配置:https://github.com/openzipkin/zipkin/blob/master/zipkin-server/src/main/resources/zipkin-server-shared.yml |
- Zipkin 的 Client 端,也就是微服务应用,加入依赖
spring-cloud-starter-zipkin,配置如下
1 | spring: |
springboot 2.0.1
参考http://blog.aezo.cn/2017/07/23/java/springboot/中【springboot 2.0.1 改动】
其他错误
引入了jpa的模块启动报错
The dependencies of some of the beans in the application context form a cycle1
2
3
4
5
6
7# 解决办法
spring:
cloud:
refresh:
# Dalston.SR1 -> Finchley.SR1. 报错:The dependencies of some of the beans in the application context form a cycle:(dataSource和DataSourceInitializerInvoker相互依赖)
# 解决办法:https://github.com/spring-cloud/spring-cloud-commons/issues/355
refreshable: none
参考文章
