Spring

介绍

  • Spring项目官网:https://spring.io/projects ,其中的spring-framework即是spring框架内容
  • 历史:(1) spring 1.x,xml配置时代 (2) spring 2.x,注解时代 (3) spring 3.x,java配置
  • Spring模块(每个模块有个jar包):
    • 核心容器:spring-core, spring-beans, spring-context(运行时spring容器), spring-context-support(spring对第三方包的集成支持), spring-expression(使用表达式语言在运行时查询和操作对象)
    • AOP:spring-aop, spring-aspects
    • 消息:spring-messaging
    • 数据访问:spring-jdbc, spring-tx(提供编程式和声明明式事物支持), spring-orm, spring-oxm(提供对对象/xml映射技术支持), spring-jms(提供jms支持)
    • Web: spring-web(在web项目中提供spring容器), spring-webmvc(基于Servlet的SpringMVC), spring-websocket, spring-webmvc-portlet
  • Spring生态:Spring Boot(使用默认开发配置来快速开发)、Spring Cloud(为分布式系统开发提供工具集)等
  • 本文档基于Spring4.3.8

HelloWorld

  • maven依赖

    1
    2
    3
    4
    5
    6
    <dependency>
    <groupId>org.springframework</groupId>
    <!--包含spring-core、spring-beans、spring-aop、spring-expression、spring-instrument-->
    <artifactId>spring-context</artifactId>
    <version>4.3.8.RELEASE</version>
    </dependency>
  • 调用

    1
    2
    3
    4
    5
    // ApplicationContext context = new ClassPathXmlApplicationContext("beans.xml");
    ApplicationContext context = new AnnotationConfigApplicationContext(AppConfig.class); // AppConfig为定义的java配置类

    Hello hello = context.getBean("hello", Hello.class);
    hello.hello();

常见注解

往容器中注册Bean(组件)

组件注解+包扫描

  • 组件注解(下面几个注解效果一样)
    • @Component 没有明确的角色,或@Component(“sq”)定义别名
    • @Service 在业务逻辑层(cn.aezo.spring.aop_spel.service)使用
    • @Repository 在数据访问层(cn.aezo.spring.aop_spel.dao)使用
    • @Controller 在展现层使用
  • 包扫描@ComponetScan("cn.aezo")
    • @ComponentScan(basePackages = {“cn.aezo.sqbiz”, “cn.aezo.utils”})
    • 定义需要扫描的包名,并将里面的@Component@Service@Repository@Controller注解的类注册为Bean
1
2
3
4
5
6
7
8
9
10
11
12
13
14
15
// java8 @Repeatable表示可重复注解 excludeFilters不扫描过滤,includeFilters扫描过滤(需设置useDefaultFilters=false)
@ComponentScan(value = "cn.aezo.demo", excludeFilters = {
// 基于注解
@ComponentScan.Filter(type = FilterType.ANNOTATION, classes = {Controller.class})
// 基于类全名
@ComponentScan.Filter(type = FilterType.ASSIGNABLE_TYPE, classes = {cn.aezo.demo.MyTest})
// 基于自定义规则(实现FilterType接口)
@ComponentScan.Filter(type = FilterType.CUSTOM, classes = {MyFilterType.class})
})
@ComponentScan(value = "cn.aezo.demo", includeFilters = {
@ComponentScan.Filter(type = FilterType.REGEX, pattern = "cn\\.aezo\\.test.*")
}, useDefaultFilters = false)

// java8之前可使用@ComponentScans
@ComponentScans({@ComponentScan()})

@Bean导入第三方包里面的组件

  • @Bean
    • 注解配置类中的方法,表示当前方法的返回值是一个Bean,Bean的名称(id)默认是方法名
    • @Bean("newBeanName") 自定义Bean名称
    • Springboot项目,将@Bean加入在test的代码中时无法注入

@Import给容器导入一个组件

  • @Import("cn.aezo.test.MyBean")
    • Spring Boot中大量的EnableXXX都使用了@Import注解
    • 可以导入普通的POJO类或带有@Configuration注解的配置类,或导入实现了ImportSelector/ImportBeanDefinitionRegistrar/DeferredImportSelector接口的返回的类。功能类似XML配置用来导入配置类
      • DeferredImportSelector 为 ImportSelector 的子接口。区别是他会在所有的@Configuration类加载完成之后再加载返回的配置类,而ImportSelector会在当前Configuration类加载之前去加载返回的配置类
      • 可以使用@Order注解或者Ordered接口来指定DeferredImportSelector的加载顺序
    • @ImportResource 和@Import类似,区别就是@ImportResource导入的是配置文件。其属性default和locations作用相同,都是用来指定配置文件的位置;reader属性则用来指定配置文件解析器,内置XmlBeanDefinitionReader和GroovyBeanDefinitionReader,也可自定义。Spring还是推荐使用@Import而不是@ImportResource
  • @Import结合ImportSelector
1
2
3
4
5
6
7
8
9
10
11
12
13
14
15
16
17
18
19
20
21
22
23
24
25
// ### 基于导入选择器
public class MyImportSelector implements ImportSelector {
// AnnotationMetadata可获取当前注解@Import类的所有注解信息
@Override
public String[] selectImports(AnnotationMetadata importingClassMetadata) {
// 返回需要的导入的Bean类全名(可以不用是真实类名)
return new String[] {"cn.aezo.smjava.javaee.spring5.bean.demo2.MyImportSelectorBean", MyImportSelectorBean.class.getName()};
}
}

// ### 使用
@Import({MyImportSelector.class})
@SpringBootApplication
public class AppImport {
public static void main( String[] args ) {
AnnotationConfigApplicationContext ctx = new AnnotationConfigApplicationContext(AppImport.class);

System.out.println(ctx.getBean(MyImportSelectorBean.class));

String[] names = ctx.getBeanDefinitionNames();
for (String name : names) {
System.out.println(name);
}
}
}
  • @Import结合ImportBeanDefinitionRegistrar
1
2
3
4
5
6
7
8
9
10
11
12
13
14
15
16
17
18
19
20
// ### 基于ImportBeanDefinitionRegistrar
public class SmImportBeanDefinitionRegistrar implements ImportBeanDefinitionRegistrar {
/**
* @param annotationMetadata 当前类的注解信息
* @param beanDefinitionRegistry BeanDefinition注册类
*/
@Override
public void registerBeanDefinitions(AnnotationMetadata annotationMetadata, BeanDefinitionRegistry beanDefinitionRegistry) {
BeanDefinitionBuilder beanDefinitionBuilder = BeanDefinitionBuilder.genericBeanDefinition(MyBean.class);
beanDefinitionBuilder.addPropertyValue("name", "ImportBeanDefinitionRegistrar#registerBeanDefinitions");

GenericBeanDefinition genericBeanDefinition = (GenericBeanDefinition) beanDefinitionBuilder.getBeanDefinition();

beanDefinitionRegistry.registerBeanDefinition("myBean", genericBeanDefinition);
}
}

// ### 使用
@Import(SmImportBeanDefinitionRegistrar.class)
public class AppConfig {}
  • 可对Import进一步封装
1
2
3
4
5
6
7
8
9
10
11
12
@Target({ElementType.TYPE})
@Retention(RetentionPolicy.RUNTIME)
@Documented
@Inherited
@Import({MyImportSelector.class})
public@interface EnableMyImportSelector {
}

// 使用
@EnableMyImportSelector
@SpringBootApplication
public class Application {}

使用Spring提供的FactoryBean(工厂Bean)

  • 通过id(name)获取的是FactoryBean的getObject返回的对象。使用&name可获取FactoryBean本身
  • BeanFactoryFactoryBean区别 https://www.cnblogs.com/aspirant/p/9082858.html
  • 模拟mybatis参考源码smjava -> javaee -> springArch -> spring5 -> demo3
1
2
3
4
5
6
7
8
9
10
11
12
13
14
15
16
17
18
19
20
21
22
23
24
25
26
27
28
29
30
31
32
33
34
// ### 实现FactoryBean
@Component
public class MyFactoryBean implements FactoryBean {
@Override
public MyBean getObject() throws Exception {
return new MyBean();
}

@Override
public Class<?> getObjectType() {
return MyBean.class;
}

// JDK8可提供isSingleton默认实现
}

// ### 使用
public class App {
public static void main( String[] args ) {
AnnotationConfigApplicationContext ctx = new AnnotationConfigApplicationContext(App.class);

// 获取的是FactoryBean中getObject返回的对象
MyBean myBean = (MyBean) ctx.getBean("myFactoryBean");
System.out.println(myBean);

// 获取的是FactoryBean本身
MyFactoryBean myFactoryBean = (MyFactoryBean) ctx.getBean("&myFactoryBean");
}

@Bean
public MyFactoryBean myFactoryBean() {
return new MyFactoryBean();
}
}

基于Springboot的EnableAutoConfiguration

  • 第三方类(不在ComponentScan的扫描范围)
1
2
3
4
5
@Component
public class ThdClass {}

// 在 META-INF/spring.factories 增加自动配置类
org.springframework.boot.autoconfigure.EnableAutoConfiguration=cn.aezo.test.thd.ThdClass

自动装配(取出Bean赋值给当前类属性)

  • @Autowired Spring提供
    • 默认按ByType(根据类型),如果根据类型找到多个再按照ByName(变量名称)注入(如果此时名称不存在则报错)
      • 如果想用by name,Bean定义时如@Bean(name="my-bean-name"),再联合使用@Qualifier(“my-bean-name”)对于默认的Bean可通过添加@Primary(使用时则按照单数据源注入)
    • 可以对方法、字段、构造器、参数使用
    • 注入集合方式
      • @Autowired List<Monitor> monitors; 也可以注入集合
        • 注意:如果当前类实现了Monitor接口,则注入到集合中会排除当前类(即要注入的类不能是类本身,会触发无限递归注入)
        • 如果元素增加@Order注解,在注入时会自动进行排序。也可使用 list.sort(AnnotationAwareOrderComparator.INSTANCE) 手动排序list(用于非注入的场景,元素也需要增加 @Order 注解)。值越小越优先,可以为负值
      • @Autowired Map<String, Monitor> monitorMap; 注入到Map中,此时将 Bean 的 name 作为 key
  • @Resource JSR-250提供(常用)
    • 先按ByName名称查找(当然类型也必须匹配),如果找不到再按ByType类型查找(如果根据类型找到多个则报错)
    • 只能对方法、字段使用
  • @Inject JSR-330提供,类似@Autowired
  • @Autowired和@Resource推荐用法
    • 根据使用场景:@Resource倾向于确定性的单一资源,@Autowired为类型去匹配符合此类型所有资源
    • 使用@Autowired时,推荐使用构造函数注入和set方法注入
    • 参考:https://zhuanlan.zhihu.com/p/615487137
  • 各种DI方式的优缺点
    • 构造器注入:强依赖性 (即必须使用此依赖),不变性(各依赖不会经常变动)
    • Setter注入:可选(没有此依赖也可以工作),可变(依赖会经常变动)
    • Field注入:大多数情况下尽量少使用字段注入,一定要使用的话,@Resource相对@Autowired 对IoC容器的耦合更低
      • Field注入的优点
        • 使用方便(优先敏捷度再考虑松耦合)
      • Field注入的缺点
        • 不能像构造器那样注入不可变的对象
        • 依赖对外部不可见 ,外界可以看到构造器和setter,但无法看到私有字段,自然无法了解所需依赖
        • 会导致组件与IoC容器紧耦合 (这是最重要的原因,离开了IoC容器去使用组件,在注入依赖时就会十分困难)
        • 导致单元测试也必须使用IoC容器 ,原因同上
        • 依赖过多时不够明显 ,比如我需要10个依赖,用构造器注入就会显得庞大,这时候应该考虑一下此组件是不是违反了单一职责原则

获取Bean

  • 自动注入 ^5
1
2
3
4
5
6
@Autowired
private ApplicationContext applicationContext;

public void test() {
Mytest mytest = applicationContext.getBean(Mytest.class);
}
  • 实现ApplicationContextAware接口,参考下文ApplicationContext:SpringU
    • 下列工具相当于把ApplicationContext存储在属性中,其他类对象可通过此对象属性获取ApplicationContext
    • 上述其他类对象,如自行new的对象中需要注入其他Bean,此时当前类没有被Spring托管,则可通过SpringU中间缓存获取

@Autowired注入给静态属性示例

1
2
3
4
5
6
7
8
9
10
11
12
13
14
@Component
public class BaseController {
private static Logger logger = LoggerFactory.getLogger(BaseController.class);

private static CustomObjectMapper customObjectMapper;

public BaseController() {}


@Autowired // 类加载时调用此构造方法并赋值给静态属性
public BaseController(CustomObjectMapper customObjectMapper) {
BaseController.customObjectMapper = customObjectMapper;
}
}

条件注解@Conditional

  • 根据满足某一特定条件来创建某个特定的Bean. 如某个Bean创建后才会创建另一个Bean(Spring 4.x)
  • 类似的如@Profile("dev")标识仅在开发环境才会注入此Bean
  • 内置条件

    • @ConditionalOnProperty 要求配置属性匹配条件
      • havingValue 表示对应参数值。注解中如果省略此属性,则此参数为false时,条件结果才为false
      • matchIfMissing 表示缺少该配置属性时是否可以加载。如果为true,即表示没有该配置属性时也会正常加载;反之则不会生效
      • eg:@ConditionalOnProperty(value = {“feign.compression.response.enabled”}, matchIfMissing = false) 、@ConditionalOnProperty(name = “zuul.use-filter”, havingValue = “true”, matchIfMissing = false)
    • @ConditionalOnMissingBean 当给定的类型/类名/注解在beanFactory中不存在时返回true,各类型间是or的关系(不填参数则表示没有@Bean返回的对象类型时生效)

      • 只能对@Bean生效,如直接注解在@Bean的方法上,或注解在含有@Bean方法的类上;对@Service等类不生效,需要设置成@Bean模式

        1
        2
        3
        4
        5
        6
        7
        8
        9
        10
        11
        12
        13
        14
        15
        16
        17
        18
        19
        20
        21
        22
        23
        24
        // eg:@ConditionalOnMissingBean(type = {"okhttp3.OkHttpClient"})

        //可以标注在类和方法上
        @Target({ElementType.TYPE, ElementType.METHOD})
        @Retention(RetentionPolicy.RUNTIME)
        @Documented
        //使用了@Conditional注解,条件类是OnBeanCondition(逻辑实现)
        @Conditional({OnBeanCondition.class})
        public @interface ConditionalOnMissingBean {
        // 需要检查的 bean 的 class 类型。如: @ConditionalOnMissingBean(value = MyService.class)
        Class<?>[] value() default {};
        // 需要检查的 bean 的 class 类型名称。默认。@ConditionalOnMissingBean(type = "MyService") == @ConditionalOnMissingBean
        String[] type() default {};
        // 识别匹配 bean 时,可以被忽略的 bean 的 class 类型
        Class<?>[] ignored() default {};
        // 识别匹配 bean 时,可以被忽略的 bean 的 class 类型名称
        String[] ignoredType() default {};
        // 当 ApplicationContext 不包含带有这些注解的 bean 时条件匹配。如:@ConditionalOnMissingBean(annotation = MyServiceAnno.class)
        Class<? extends Annotation>[] annotation() default {};
        // 需要检查的 bean 的 name。如: @ConditionalOnMissingBean(name = "myService")
        String[] name() default {};
        // 搜索容器层级:当前容器/父容器/所有(默认)
        SearchStrategy search() default SearchStrategy.ALL;
        }
    • @ConditionalOnBean 与上相反,在存在某个bean的时候

      • eg:@ConditionalOnBean({Client.class})
    • @ConditionalOnMissingClass 当前classpath不可以找到某个类型的类时,各类型间是and的关系
    • @ConditionalOnClass 与上相反,当前classpath可以找到某个类型的类时
      • eg:@ConditionalOnClass({Feign.class})、@ConditionalOnClass(name = {“feign.hystrix.HystrixFeign”})
    • @ConditionalOnResource 当前classpath是否存在某个资源文件
    • @ConditionalOnWebApplication 当前spring context是否是web应用程序
    • @ConditionalOnNotWebApplication web环境不存在时
    • @ConditionalOnExpression spel表达式执行为true
    • @ConditionalOnSingleCandidate 当给定类型的bean存在并且指定为Primary的给定类型存在时返回true
    • @ConditionalOnCloudPlatform 当所配置的CloudPlatform为激活时返回true
    • @ConditionalOnJava 运行时的java版本号是否包含给定的版本号,如果包含返回匹配,否则返回不匹配
    • @ConditionalOnJndi 给定的jndi的Location 必须存在一个,否则返回不匹配
  • 自定义条件
1
2
3
4
5
6
7
8
9
10
11
12
13
14
15
16
17
18
19
20
21
22
23
24
25
26
27
28
29
30
31
32
33
34
// ## 条件判断
@Conditional({MyWindowsCondition.class}) // 必须符合所有的条件才会注入此Bean(可以注解在类或方法上)
@Bean("myBean3")
public MyBean myBean3() {
return new MyBean();
}

// ## 条件
public class MyWindowsCondition implements Condition {
/**
* 判断是否符合条件
* @param context 判断条件能使用的上下文
* @param metadata 注解信息
* @return
*/
@Override
public boolean matches(ConditionContext context, AnnotatedTypeMetadata metadata) {
// 1.可以获取到IOC使用的BeanFactory
ConfigurableListableBeanFactory ctx = context.getBeanFactory();
// 2.可以获取类加载器
ClassLoader classLoader = context.getClassLoader();
// 3.可以获取当前环境信息
Environment environment = context.getEnvironment();
// 4.可以获取Bean定义注册类
BeanDefinitionRegistry registry = context.getRegistry();
ResourceLoader resourceLoader = context.getResourceLoader();

if(environment.getProperty("os.name").contains("Windows")) {
return true;
}

return false;
}
}

属性赋值(@Value)

Spring中使用属性赋值

  • @Value 在其中输入EL表达式(Spring-EL)。可对资源进行注入
  • @PropertySource 注入外部配置文件值
1
2
3
4
5
6
7
8
9
10
11
12
13
14
15
16
17
18
19
20
21
22
23
24
25
26
27
28
29
30
31
32
33
34
35
36
37
38
39
40
41
42
43
44
45
46
47
48
49
50
51
52
53
54
55
56
57
58
59
60
61
62
63
64
65
66
67
68
69
70
71
72
73
74
75
76
77
78
79
// @ComponentScan("cn.aezo.spring.base.annotation.el")
@Configuration
@PropertySource("classpath:cn/aezo/spring/base/annotation/el/el.properties") // 注入配置文件
public class ELConfig {
@Value("I Love You") // 基本数值赋值
private String normal;

@Value("${site.url:www.aezo.cn}/index.html") // 读取配置文件(需要注入配置文件),使用$而不是#。冒号后面是缺省值. `${site.url:}`无则为"",防止未定义此参数值(特别是通过命令行传入的参数)
private String siteUrl;

// 对于普通的Boolean(值不要加引号)、Integer、Long、Float、Double均可使用${xxx}直接导入
@Value("#{${site.time}}") // site.time=24*7,此处进行了计算
private Long siteTime;

@Value("${site.tags:${site.tags2:}}") // @Value注入的默认值只能通过:指定,不能直接给属性赋值
private String[] tags; // 获取数组,yml中可定义site.tags=a,b,c # 默认会基于`,`分割。(yml中使用`-`则需要定义配置类实体)

@Value("#{'${test.array}'.split(',')}") // test.array=1,2,3
private String[] testArray;

@Value("#{'${test.list}'.split(',')}") // test.list=1,2,3
private List<String> testList;

@Value("#{'${test.set}'.split(',')}") // test.set=1,2,3
private Set<String> testSet;

@Value("#{${test.map:{}}}") // test.map={name:"张三", age:18},注意是#取值,yml中只定义成字符串(可以用''包裹换行),且map的值不能包含数组
private Map<String, Object> testMap;

@Value("#{systemProperties['os.name']}") // 获取系统名称. SpEL: @Value("#{20-2}") => 18
private String osName;

@Value("#{T(java.lang.Math).random() * 100.0}") // 支持调用静态方法,不支持调用对象方法(会当成map取对象属性)
private String randomNumber;

@Value("#{demoService.another}") // 读取其他类属性的@Value注解值
private String fromAnother;

@Value("classpath:cn/aezo/spring/base/annotation/el/test.txt")
private Resource testFile;

@Value("http://www.baidu.com")
private Resource testUrl;

@Autowired
private Environment environment; // org.springframework.core.env.Environment

// 静态熟悉赋值
public static String staticKey;

@Value("${site.staticKey}")
public void setStaticKey(String staticKey) {
ELConfig.staticKey = staticKey;
}

public void outputResource() {
System.out.println("normal = " + normal);
System.out.println("osName = " + osName);
System.out.println("randomNumber = " + randomNumber);
System.out.println("siteUrl = " + siteUrl);
System.out.println("fromAnother = " + fromAnother);
// 配置文件中的值默认全部赋值到了环境变量中了。也支持多环境配置
System.out.println("environment = " + environment.getProperty("site.url"));

// 解析yml的map, 未测试
Map<String, String> map = environment.getProperty("my-map", Map.class);
Map<String, Integer> map2 = environment.getProperty("my-map2", Map.class, Integer.class);

try {
System.out.println("testFile = " + IOUtils.toString(testFile.getInputStream(), "UTF-8"));
System.out.println("testUrl = " + IOUtils.toString(testUrl.getInputStream(), "UTF-8"));
} catch (IOException e) {
e.printStackTrace();
}
}
}

// el.properties
site.url=www.aezo.cn

SpringBoot中使用属性赋值

  • @PropertySource 在springboot应用中注入外部配置文件值,支持如下两种配置方式,如果注入application配置则@PropertySource可省略
    • @PropertySource + @Value
    • @PropertySource + @ConfigurationProperties
  • springboot v2.0.1之后,定义自定义参数(MyValue.java)要么写到Application.java同目录,要么加下列依赖。这个依赖会把配置文件的值注入到@Value里面,也可以通过@PropertySource(“classpath:application.yml”)注入

    1
    2
    3
    4
    5
    <dependency>
    <groupId>org.springframework.boot</groupId>
    <artifactId>spring-boot-configuration-processor</artifactId>
    <optional>true</optional>
    </dependency>
  • 定义/调用

    • 优先级:命令行参数 > application.properties > JavaBean
    • 说明:命令行参数设置了此属性配置,但属性的值为空,此时可以覆盖application.properties的初始值,但是不会覆盖JavaBean的初始值
1
2
3
4
5
6
7
8
9
10
11
12
13
14
15
16
17
18
19
20
21
22
23
24
25
26
27
28
29
30
31
// ### 方法一
// 设值:在application.properties中设置`myValue.val`的值

// 取值
@Value("${myValue.val")
private String val = "smalle"; // 默认值。在命令行参数给此属性传入空时,此初始值不会被覆盖

private static String hello;

@Value("${myValue.hello}")
public void setHello(String h) {
hello = h;
}

// 方法二:定义JavaBean
@Configuration
@ConfigurationProperties(prefix = "myValue")
public class MyValue {
// ...Model:所有的属性、get、set方法
// myField, my-field, my_field等都能识别绑定到myField上
// 可以给字段设定默认值
private String val = "default";

private String hello;

private Map<String, Object> extMap; // 如 myValue.extMap.a=1 和 myValue.extMap.b=2 可注入进来
}

// 取值
@Autowired
private MyValue myValue;

@PropertySource分环境读取配置

1
2
3
4
5
6
7
8
9
10
11
12
13
14
15
16
17
18
19
20
21
22
23
24
25
26
27
28
29
30
31
32
33
34
35
36
37
38
39
40
41
42
43
44
45
46
47
48
49
50
51
52
53
54
55
56
57
58
59
60
61
62
63
64
65
66
67
68
69
70
// 创建 minions.yml、minions-dev.yml 等配置文件。可根据环境读取,且支持覆盖
@Data
@ToString
@Configuration
@ConfigurationProperties(prefix = "minions")
@PropertySource(name="minions.yml", value = "classpath:minions-${spring.profiles.active:}.yml", factory = SqPropertySourceFactory.class)
public class MinionsProp {
private String projectCode;

private DataProp data = new DataProp();

@Data
public class DataProp {
private String rootPath;
}
}

public class SqPropertySourceFactory extends DefaultPropertySourceFactory {
@Override
public PropertySource<?> createPropertySource(String name, EncodedResource resource) throws IOException {
Properties mainProperties = new Properties();
if(ValidU.isNotEmpty(name)) {
if(!name.contains(".")) {
name += ".properties";
}
mainProperties = loadProp(name, resource.getEncoding());
}

Properties envProperties = null;
if(resource != null) {
String sourceName = resource.getResource().getFilename();
if(ValidU.isNotEmpty(sourceName) && resource.getResource().exists()) {
envProperties = loadProp(sourceName, resource);
name = sourceName;
}
}
if(envProperties != null) {
mainProperties.putAll(envProperties);
}
return new PropertiesPropertySource(name, mainProperties);
}

private Properties loadProp(String sourceName, String encoding) throws IOException {
Resource resource = new ClassPathResource(sourceName);
EncodedResource encodedResource = new EncodedResource(resource, encoding);

if (!encodedResource.getResource().exists()) {
return new Properties();
} else if (sourceName.endsWith(".yml") || sourceName.endsWith(".yaml")) {
return loadYml(encodedResource);
} else {
return PropertiesLoaderUtils.loadProperties(resource);
}
}

private Properties loadProp(String sourceName, EncodedResource resource) throws IOException {
if (sourceName.endsWith(".yml") || sourceName.endsWith(".yaml")) {
return loadYml(resource);
} else {
return PropertiesLoaderUtils.loadProperties(resource);
}
}

private Properties loadYml(EncodedResource resource) throws IOException {
YamlPropertiesFactoryBean factory = new YamlPropertiesFactoryBean();
factory.setResources(resource.getResource());
factory.afterPropertiesSet();
return factory.getObject();
}
}

组合注解和元注解

  • 元注解是指可以注解到其他注解上的注解,被元注解注解之后的注解称之为组合注解
  • @Configuration是包含@Component的组合注解,@Component为元注解
  • 示例,将@Configuration@ComponentScan组合成一个注解

    1
    2
    3
    4
    5
    6
    7
    8
    @Target(ElementType.TYPE)
    @Retention(RetentionPolicy.RUNTIME)
    @Documented
    @Configuration
    @ComponentScan
    public @interface WiselyConfiguration {
    String[] value() default {};
    }

其他注解

  • Http相关
    • @Controller 注解在类上
    • @RestController 注解在类上
    • @GetMapping
    • @PostMapping
    • @RequestMapping 同时支持GET/POST
    • @PathVariable 读取URL路径参数(/api/user/{id})
    • @RequestParam 读取URL地址参数,默认为必传,可配置可选
    • @PathParam 类似@RequestParam,默认不必填
    • @RequestBody 读取POST数据体

Bean

作用域@Scope

  • @Scope("prototype") 注解类(配置Bean的作用域,可和@Bean联合使用)
    • singleton 整个容器共享一个实例(默认配置). IOC容器启动(new AnnotationConfigApplicationContext()),就会创建所有的Bean(@Lazy懒加载,仅用于单例模式,只有在第一次获取Bean时才创建此Bean)
    • prototype 每次调用新建一个实例. IOC容器启动,不会创建Bean,只有在获取的时候创建Bean
      • 此对象@Autowired注入几次就会产生几个对象,和调用此对象方法无关
      • beanFactory.getBeansOfType 等API获取Bean也会创建
      • 如果此类型Bean含有有状态字段,则也容易产生并发问题,prototype并不能解决
    • request Web项目中,每一个HttpRequest新建一个实例
    • session Web项目中,同一个session创建一个实例
    • globalSession 用于portal应用
  • SpringBoot的作用域如:@RequestScope@SessionScope@ApplicationScope(@Component等默认是singleton)

Bean生命周期

  • 初始化和销毁方法实现方式
    • 指定@Bean初始化和销毁方法属性:initMethod, destroyMethod
    • 实现InitializingBean, DisposableBean(org.springframework.beans.factory.DisposableBean)
    • 使用JSR250:@PostConstruct Bean创建完成并完成属性赋值后调用, @PreDestroy(javax.annotation.PreDestroy) 销毁Bean前调用
  • 后置处理器BeanPostProcessor (org.springframework.beans.factory.config.BeanPostProcessor)
    • postProcessBeforeInitialization 在Bean创建完成并完成属性赋值后,且在初始化方法调用之前调用
    • postProcessAfterInitialization 在初始化之后调用
    • @Autowired是基于BeanPostProcessor实现的
1
2
3
4
5
6
7
8
9
10
11
12
13
14
15
16
17
18
19
20
21
22
23
24
25
26
27
28
29
30
31
32
33
34
35
36
37
38
39
40
41
42
43
44
45
46
47
48
49
50
51
52
53
54
55
56
57
58
59
60
61
62
63
public class App {
public static void main( String[] args ) {
/*
constructor MyBean2...
postProcessBeforeInitialization...
init MyBean2...(afterPropertiesSet...)
postProcessAfterInitialization...
创建IOC完成...
destroy MyBean2...
*/
AnnotationConfigApplicationContext ctx = new AnnotationConfigApplicationContext(App.class);
System.out.println("创建IOC完成...");

ctx.close(); // 容器关闭调用destroyMethod
}

@Bean(initMethod = "init", destroyMethod = "destroy")
public MyBean2 myBean2() {
return new MyBean2();
}

@Bean
public MyBean3 myBean3() {
return new MyBean3();
}

// MyBeanPostProcessor需要实现BeanPostProcessor后置处理器
@Bean
public MyBeanPostProcessor myBeanPostProcessor() {
return new MyBeanPostProcessor();
}
}

// ###
public class MyBean2 {
public MyBean2() {
System.out.println("constructor MyBean2...");
}

// @PostConstruct // Bean创建完成并完成属性赋值后调用(使用JSR250方式需要的代码)
public void init() {
System.out.println("init MyBean2...");
}

// @PreDestroy
public void destroy() {
System.out.println("destroy MyBean2...");
}
}

// ### 基于接口实现
public class MyBean3 implements InitializingBean, DisposableBean {
// Bean创建完成,且属性赋值完成后调用
@Override
public void afterPropertiesSet() throws Exception {
System.out.println("InitializingBean afterPropertiesSet MyBean3...");
}

@Override
public void destroy() throws Exception {
System.out.println("DisposableBean destroy MyBean3...");
}
}

加载优先级

  • 同一个类中加载顺序
    • Constructor > @Autowired > @PostConstruct > @Bean/@Component/setApplicationContext等
  • @DependsOn控制顺序
    • @DepondensOn("springU") 如在@PostConstuct方法中使用SpringU等工具类会报空指针。因为@PostConstuct修饰的方法在Spring容器启动时会先于该工具类的setApplicationContext()方法运行。解决方法参考下文 BeanPostProcessor
    • 控制 bean 之间的实例顺序,需要注意的是 bean 的初始化方法调用顺序无法保证
  • BeanPostProcessor 扩展优先于其他Bean,参考ApplicationContext:SpringU
  • @Lazy 和@Autowired结合使用,当两个Bean发生循环依赖时,可将其中一个Bean的注入设置成懒加载
  • SpringBoot下可使用@AutoConfigureAfter@AutoConfigureBefore@AutoConfigureOrder 控制自动配置类加载优先级
    • 自定义配置类: 使用@Configuration等注解的类
    • 自动配置类: META-INF下/spring.factories文件中定义的配置类; 此文件一般用于第三方包,也可用于主项目
    • SpringBoot会优先加载自定义配置类,再加载自动配置类
    • 上述3个注解只有在自动配置类下才会生效;如果一个配置类是通过@Configuration扫描加载,那么上述3个注解将无效

AOP

  • 说明
    • Spring AOP的底层原理就是动态代理,因此局限于方法拦截
    • Spring AOP默认是使用JDK动态代理,如果代理的类没有接口则会使用CGLib代理
    • JDK动态代理是需要实现某个接口了,而我们类未必全部会有接口,于是CGLib代理就有了,CGLib代理其生成的动态代理对象是目标类的子类。如果是单例的我们最好使用CGLib代理,如果是多例的我们最好使用JDK代理(JDK在创建代理对象时的性能要高于CGLib代理,而生成代理对象的运行性能却比CGLib的低)
    • 自调用导致@Transactional失效问题,参考上文事物支持
  • 相关注解
    • @Aspect 声明一个切面
    • @Before@After@Around@AfterReturning@AfterThrowing 定义建言(advice)
    • @DeclareParents 引介增强
  • 切点表达式
    • args()、this()、target()
    • @annotation() 、args()、@args()、target()、@within()、@target()、this()
  • 案例
    • 基于注解切面判断用户权限
  • maven依赖

    1
    2
    3
    4
    5
    6
    7
    8
    9
    10
    11
    12
    <!-- 基于xml实现aop只需要spring-context,如果基于annotation使用aop则额外需要此依赖 -->
    <dependency>
    <groupId>org.aspectj</groupId>
    <artifactId>aspectjweaver</artifactId>
    <version>1.8.10</version>
    </dependency>

    <!-- springboot项目依赖 -->
    <dependency>
    <groupId>org.springframework.boot</groupId>
    <artifactId>spring-boot-starter-aop</artifactId>
    </dependency>
  • 编写切面(基于xml的参考源码)

    1
    2
    3
    4
    5
    6
    7
    8
    9
    10
    11
    12
    13
    14
    15
    16
    17
    18
    19
    20
    21
    22
    23
    24
    25
    26
    27
    28
    29
    30
    31
    32
    33
    34
    35
    36
    37
    38
    39
    40
    41
    42
    43
    44
    45
    46
    47
    48
    49
    50
    51
    52
    53
    54
    55
    56
    57
    58
    59
    60
    61
    62
    63
    64
    65
    66
    67
    68
    69
    70
    71
    72
    73
    74
    75
    76
    77
    78
    79
    80
    81
    82
    83
    84
    85
    86
    87
    88
    89
    90
    91
    92
    93
    94
    95
    96
    97
    98
    99
    100
    101
    102
    103
    104
    105
    106
    107
    108
    109
    110
    111
    112
    // 示例一(直接使用execution指定切面)
    @Aspect // 声明一个切面
    @Component
    public class LogAspect {
    // 此接口/类中方法
    @Before("execution(* cn.aezo.spring.base.annotation.aop.DemoMethodService.*(..)) || execution(* cn.aezo.spring.base.annotation.aop.DemoMethodService2.*(..))")
    // execution(* cn.aezo.spring.base.annotation.aop.*.*(..)) // 此包中方法(第一个*代替了public void;此表达式也会拦截含throws的方法)
    // execution(public * cn.aezo.spring.base.annotation.aop..*.*(..)) // 此包或者子包中public类型的方法

    // this:方法是在那个类中被调用的;target:目标对象是否是某种类型;within:当前执行代码是否属于某个类(静态植入)
    // within(cn.aezo.spring.base.*) // 任何此包中的方法
    // within(cn.aezo.spring.base..*) // 任何此包或其子包中的方法
    // target(org.springframework.web.client.RestTemplate) // 任何目标对象实现了此接口的方法。**如果使用 execution(* org.springframework.web.client.RestTemplate.execute(..))是无法拦截到的,RestTemplate本身是由代理执行的**
    // this(cn.aezo.spring.base.annotation.aop.DemoMethodService) // 实现了此接口中的方法
    // args(java.io.Serializable) // 有且只有一个Serializable参数

    // @within(org.springframework.transaction.annotation.Transactional) // 任何一个目标对象声明的类型有一个 @Transactional 注解的连接点
    // @target(org.springframework.transaction.annotation.Transactional) // 目标对象中有一个 @Transactional 注解的任意连接点
    // @annotation(org.springframework.transaction.annotation.Transactional) // 任何一个执行的方法有一个 @Transactional 注解的连接点
    // @args(org.springframework.transaction.annotation.Transactional) // 有且仅有一个参数并且参数上类型上有@Transactional注解(注意是参数类型上有@Transactional注解,而不是方法的参数上有注解)

    // bean(simpleSay) // bean名字为simpleSay中的所有方法
    // bean(*Impl) // bean名字匹配*Impl的bean中的所有方法
    public void before(JoinPoint joinPoint) {
    MethodSignature methodSignature = (MethodSignature) joinPoint.getSignature();
    Method method = methodSignature.getMethod();
    System.out.println("方法规则式拦截[@Before-execution]:" + method.getName());
    }
    }

    // 示例二(使用@Pointcut指定切面)
    @Aspect
    @Component
    public class LogIntercept {
    @Pointcut("execution(public * cn.aezo.spring.base.annotation.aop..*.*(..))")
    public void pointcut() {}

    // @annotation(sysLog) 中的 sysLog 指下面函数参数变量名
    @Pointcut("@annotation(sysLog)")
    public void pointcut2(SysLog sysLog) {}

    @Before("pointcut()")
    public void before(JoinPoint joinPoint) {
    this.printLog("execution方法执行前");
    }

    @Around("pointcut()")
    public Object around(ProceedingJoinPoint pjp) throws Throwable {
    Object[] args = pjp.getArgs(); // 获取被切入方法参数值

    this.printLog("execution方法执行前");
    Object retObj = pjp.proceed();
    this.printLog("execution方法执行后");

    return retObj;
    }

    @Around(value = "pointCut2(sysLog)", argNames = "pjp,sysLog")
    public Object around2(ProceedingJoinPoint pjp, SysLog sysLog) throws Throwable {

    }

    @After("recordLog()")
    public void after() {
    this.printLog("execution方法执行后");
    }

    // returning属性指定一个形参名,用于表示Advice方法中可定义与此同名的形参,该形参可用于访问目标方法的返回值
    @AfterReturning(value = "pointcut()", returning = "result")
    public void afterReturning(JoinPoint joinPoint, Object result) {
    Object[] args = joinPoint.getArgs(); // 获取被切入方法参数值
    System.out.println("afterReturning...");
    }

    @AfterThrowing(value = "pointcut() && @annotation(myExecption)", throwing = "ex")
    public void afterThrowing(JoinPoint joinPoint, MyException myExecption, Exception ex){
    String methodName = joinPoint.getSignature().getName();
    System.out.println("afterThrowing...");
    }
    }

    // 示例三
    @Aspect
    @Component
    public class OptimisticCheckAspect {
    @Value("sq.tableName:ds_test")
    private String tableName;

    private List<String> tableList;

    public JdbcTemplateAspect() {
    tableList = new ArrayList<>();
    if(tableName != null) {
    tableList.addAll(Arrays.asList(tableName.split(",")));
    }
    }

    // 检查通过 JdbcTemplate 执行的sql语句是否携带session字段
    @Before("execution(* org.springframework.jdbc.core.JdbcTemplate.update(..)) " +
    " || execution(* org.springframework.jdbc.core.JdbcTemplate.batchUpdate(..))")
    public void before(JoinPoint joinPoint) {
    Object[] args = joinPoint.getArgs();
    if(args != null && args.length > 0 && args[0] instanceof String) {
    String sql = ((String) args[0]).trim();
    if(sql.toLowerCase().startsWith("insert") || sql.toLowerCase().startsWith("update")) {
    if(!sql.matches("(.*)\\s+((?i)version)\\s*=(.*)")) {
    throw new RuntimeException("修改此实体需要基于乐观锁实现");
    }
    }
    }
    }
    }
  • 调用service

Profile

  • 不同的环境读取不同的配置文件:dev/prod

ApplicationEvent

  • 事件:一个Bean(A)完成某个任务后,可以给另外一个Bean(B)发送事件,前提是B对A进行了监听
  • 方法:

    • 继承ApplicationEvent 进行事件定义

      1
      2
      3
      4
      5
      6
      7
      8
      9
      10
      11
      12
      13
      14
      15
      16
      public class DemoEvent extends ApplicationEvent {
      private String message;

      public DemoEvent(Object source, String message) {
      super(source);
      this.message = message;
      }

      public String getMessage() {
      return message;
      }

      public void setMessage(String message) {
      this.message = message;
      }
      }
    • 实现ApplicationListener 进行事件监听

      1
      2
      3
      4
      5
      6
      7
      8
      @Component
      public class DemoListener implements ApplicationListener<DemoEvent> {
      @Override
      public void onApplicationEvent(DemoEvent demoEvent) {
      String message = demoEvent.getMessage();
      System.out.println("DemoListener.onApplicationEvent==" + message);
      }
      }
    • applicationContext.publishEvent(new DemoEvent(this, message)); 发布事件

      1
      2
      3
      4
      5
      6
      7
      8
      9
      @Component
      public class DemoPublisher {
      @Autowired
      ApplicationContext applicationContext;

      public void publish(String message) {
      applicationContext.publishEvent(new DemoEvent(this, message));
      }
      }

SpringAware

  • Spring依赖注入最大的亮点就是你所有的Bean对Spring容器的存在是无意识的。即你可以将容器换成其他容器,如Google Guice,这是Bean之间的耦合度很低。
  • Spring Aware可以让你的Bean调用Spring提供的资源,缺点是Bean会和Spring框架耦合。
  • 相关接口
    • BeanNameAware 获得容器中Bean的名称
    • BeanFactoryAware 获得当前BeanFactory,这样就有可以调用容器服务
    • ApplicationContextAware 获得当前ApplicationContext,这样就有可以调用容器服务
    • MessageSourceAware 获得当前MessageSource,可以获得文本信息
    • ApplicationEventPublisherAware 应用事件发布器,可以发布事件
    • ResourceLoaderAware 获得资源加载器,可以获取外部资源
  • 实例
1
2
3
4
5
6
7
8
9
10
11
12
13
14
15
16
17
18
19
20
21
22
23
24
25
26
@Component
public class AwareService implements BeanNameAware, ResourceLoaderAware {
private String beanName;
private ResourceLoader loader;

@Override
public void setBeanName(String s) {
this.beanName = s;
}

@Override
public void setResourceLoader(ResourceLoader resourceLoader) {
this.loader = resourceLoader;
}

public void outputResult() {
System.out.println("beanName = " + beanName);
Resource resource = loader.getResource("classpath:cn/aezo/spring/base/annotation/springaware/test.txt");
try {
String test = IOUtils.toString(resource.getInputStream(), "UTF-8");
System.out.println("test = " + test);
} catch (IOException e) {
e.printStackTrace();
}
}
}

ApplicationContext

1
2
3
4
5
6
7
8
9
10
11
12
13
14
15
16
17
18
19
20
21
22
23
24
25
26
27
28
29
30
31
32
33
34
35
36
37
38
39
40
41
42
43
44
45
46
47
48
49
50
51
52
53
@Component
public class SpringU implements ApplicationContextAware {

private static ApplicationContext applicationContext;

@Override
public void setApplicationContext(ApplicationContext applicationContext) throws BeansException {
if(SpringU.applicationContext == null) {
SpringU.applicationContext = applicationContext;
}
}

public static Object getBean(String name){
return getApplicationContext().getBean(name);
}

// 向 ApplicationContext 注册一个 Bean
public static void registerBean(String beanName, Object singletonObject) {
GenericApplicationContext genericApplicationContext = (GenericApplicationContext) applicationContext;
DefaultListableBeanFactory defaultListableBeanFactory = genericApplicationContext.getDefaultListableBeanFactory();
defaultListableBeanFactory.registerSingleton(beanName, singletonObject);
}
}

public class SpringUBeanPostProcessor extends InstantiationAwareBeanPostProcessorAdapter implements BeanFactoryAware {
private ConfigurableListableBeanFactory beanFactory;

@Override
public void setBeanFactory(BeanFactory beanFactory) {
if (!(beanFactory instanceof ConfigurableListableBeanFactory)) {
throw new IllegalArgumentException(
"AutowiredAnnotationBeanPostProcessor requires a ConfigurableListableBeanFactory: " + beanFactory);
}
this.beanFactory = (ConfigurableListableBeanFactory) beanFactory;
// 实现InstantiationAwareBeanPostProcessor接口的类会优先于 Bean 被实例
// 手动触发 bean 的实例
beanFactory.getBean(SpringU.class);
}
}

@Target({ElementType.TYPE})
@Retention(RetentionPolicy.RUNTIME)
@Documented
@Inherited
@Import({SpringUBeanPostProcessor.class})
public @interface EnableSqU {
}

// 在启动类上增加此配置
@EnableSqU
@ComponentScan({"cn.aezo.demo", "cn.aezo.utils.ext.spring"})
@SpringBootApplication
public class Application {}

多线程@EnableAsync

  • Spring通过任务执行器(TaskExecutor)来实现多线程和并发编程。使用ThreadPoolTaskExecutor可实现一个基于线程池的TaskExecutor。
  • @EnableAsync 可开启对异步任务的支持。需要对应的配置类实现
  • @Async 注解执行异步任务的方法
  • 示例

    1
    2
    3
    4
    5
    6
    7
    8
    9
    10
    11
    12
    13
    14
    15
    16
    17
    18
    19
    20
    21
    22
    23
    24
    25
    26
    27
    28
    29
    30
    31
    32
    33
    34
    // 获取线程池
    @Configuration
    @ComponentScan("cn.aezo.spring.base.annotation.thread")
    @EnableAsync // 开启异步任务支持
    public class TaskExecutorConfig implements AsyncConfigurer {
    @Override
    public Executor getAsyncExecutor() {
    ThreadPoolTaskExecutor taskExecutor = new ThreadPoolTaskExecutor();
    taskExecutor.setCorePoolSize(5);
    taskExecutor.setMaxPoolSize(10);
    taskExecutor.setQueueCapacity(25);
    taskExecutor.initialize();
    return taskExecutor;
    }

    @Override
    public AsyncUncaughtExceptionHandler getAsyncUncaughtExceptionHandler() {
    return null;
    }
    }

    // 定义异步方法
    @Service
    public class AsyncTaskService {
    @Async
    public void executeAsyncTask(Integer i) {
    System.out.println("i = " + i);
    }

    @Async
    public void executeAsyncTaskPlus(Integer i) {
    System.out.println("i+1 = " + (i+1));
    }
    }

计划任务@Scheduled

  • @EnableScheduling 开启定时任务
  • @Scheduled 执行任务的方法

    1
    2
    3
    4
    5
    6
    7
    8
    9
    10
    11
    12
    13
    14
    15
    16
    17
    18
    19
    20
    21
    22
    23
    24
    25
    26
    27
    28
    @Configuration
    @ComponentScan("cn.aezo.spring.base.annotation.scheduled") // springboot无需扫描@Scheduled所在包
    @EnableScheduling
    public class TaskScheduledConfig {
    // 默认同一时刻只会运行一个@Scheduled修饰的方法,时间太长会阻塞其他定时
    // 此时定义成5个线程并发(**被@Scheduled修饰的不同方法可以并发执行,同一个方法不会产生并发**)
    @Bean
    public Executor taskScheduler() { // java.util.concurrent.Executor
    return Executors.newScheduledThreadPool(5);
    }
    }

    @Service
    public class ScheduledTaskService {
    private static final SimpleDateFormat dateFormat = new SimpleDateFormat("HH:mm:ss");

    // 方法访问权限必须为protected或以下
    @Scheduled(fixedRate = 5000) // 5000毫秒. fixedRate每隔固定时间执行
    public void reportCurrentTime() {
    System.out.println("每隔5秒执行一次:" + dateFormat.format(new Date()));
    }

    @Scheduled(cron = "0 50 14 ? * *") // 每天14.50执行。程序启动并不会立即运行,比如 14:45 启动,只有等到 14:50 才会第一次运行
    // @Scheduled(cron = "${myVal.cron}") // springboot只需再yml里面定义配置即可,无需创建JavaBean配置
    public void fixTimeException() {
    System.out.println("在指定时间执行:" + dateFormat.format(new Date()));
    }
    }
  • cron配置说明 ^1

    • {秒} {分} {时} {日} {月} {周} {年(可选)}
      • Seconds/Minutes 有效范围为0-59的整数
      • Hours 有效范围为0-23的整数
    • 符号说明
      • * 代表所有值,每隔1秒/分/时触发
      • ? 表示不指定值
        • 如:要在每月的10号触发一个操作,但不关心是周几,所以需要周位置的那个字段设置为”?”,具体设置为0 0 0 10 * ?
        • 如:每周一执行,此时一般不关心”日”,案例如0 0 9 ? * 2
      • / 代表触发步进(step)
        • “/“前面的值代表初始值(“*“等同”0”),后面的值代表偏移量。比如”0/25”或者”*/25”代表从0秒/分/时开始,每隔25秒/分/时触发1次
      • , 代表在指定的秒/分/时触发
        • 比如”10,20,40”代表10秒/分/时、20秒/分/时和40秒/分/时时触发任务
      • - 代表在指定的范围内触发
        • 比如”5-30”代表从5秒/分/时开始触发到30秒/分/时结束触 发,每隔1秒/分/时触发
    • cron在线生成
    • 常用定时配置

      1
      2
      3
      4
      5
      6
      7
      8
      9
      10
      11
      12
      13
      14
      15
      16
      17
      18
      19
      20
      21
      22
      23
      24
      25
      26
      "0/10 * * * * ?" 每10秒触发(程序启动后/任务添加后,第一次触发为0/10/20/30/40/50秒中离当前时间最近的时刻。下同) 
      "0 0/5 * * * ?" **每5分钟执行一次(注意第一个为0)**
      "* 0/5 * * * ?" 每5分钟连续执行60秒,这60秒期间每秒执行一次
      "0 5 * * * ?" 表示每个小时的第5分钟执行
      "0 0 12 * * ?" 每天中午12点触发
      "0 0 0/12 * * ?" 每12个小时触发一次
      "0 15 10 ? * *" 每天上午10:15触发
      "0 15 10 * * ?" 每天上午10:15触发
      "0 15 10 * * ? *" 每天上午10:15触发
      "0 0 10,14,16 * * ?" 每天上午10点,下午2点,4点
      "0 0/30 9-17 * * ?" 朝九晚五工作时间内每半小时
      "0 0 9 ? * 2" 表示每个星期一上午9点(1表示这周的第一天,即周日;2则表示周一)
      "0 0 9 ? * MON"
      "0 15 10 * * ? 2005" 2005年的每天上午10:15触发

      "0 * 14 * * ?" 在每天下午2点到下午2:59期间的每1分钟触发
      "0 0/5 14 * * ?" 在每天下午2点到下午2:55期间的每5分钟触发
      "0 0/5 14,18 * * ?" 在每天下午2点到2:55期间和下午6点到6:55期间的每5分钟触发
      "0 0-5 14 * * ?" 在每天下午2点到下午2:05期间的每1分钟触发
      "0 10,44 14 ? 3 WED" 每年三月的星期三的下午2:10和2:44触发
      "0 15 10 ? * MON-FRI" 周一至周五的上午10:15触发
      "0 15 10 15 * ?" 每月15日上午10:15触发
      "0 15 10 L * ?" 每月最后一日的上午10:15触发
      "0 15 10 ? * 6L" 每月的最后一个星期五上午10:15触发(6代表一周中的第6天,即周五)
      "0 15 10 ? * 6L 2002-2005" 2002年至2005年的每月的最后一个星期五上午10:15触发
      "0 15 10 ? * 6#3" 每月的第三个星期五上午10:15触发
  • 手动启动任务和停止任务(基于springboot v2.0.1测试)

1
2
3
4
5
6
7
8
9
10
11
12
13
14
15
16
17
18
19
20
21
22
23
24
25
26
27
28
29
30
31
32
33
34
35
36
37
38
39
40
41
42
43
44
45
46
47
48
49
50
51
52
53
54
55
56
57
58
59
60
61
62
63
64
65
66
67
68
69
70
71
72
73
74
75
76
77
78
// ## Job接口
@Data
public class Job {
private String jobCode;
private String jobName;
private String cron;
private boolean enable;
@JsonIgnore
private Runnable runnable;
@JsonIgnore
private ScheduledFuture<?> future;
}

// ## Job管理器
@Component
public class JobManager {
@Lazy
@Qualifier("jobManagerThreadPoolTaskScheduler")
@Autowired
private ThreadPoolTaskScheduler jobManagerThreadPoolTaskScheduler;

@Bean(name = "jobManagerThreadPoolTaskScheduler")
public ThreadPoolTaskScheduler jobManagerThreadPoolTaskScheduler() {
ThreadPoolTaskScheduler scheduler = new ThreadPoolTaskScheduler();
scheduler.setThreadNamePrefix("job-manager-");
scheduler.setPoolSize(5);
return scheduler;
}

@Getter
private Map<String, Job> jobMap = new ConcurrentHashMap<>();

/**
* 初始化定时任务
* @param job
* @param start 是否立即启动任务
*/
public void addJob(Job job, boolean start) {
job.setEnable(false);
jobMap.put(job.getJobCode(), job);
if(start) {
startJob(job.getJobCode());
}
}

public void startJob(String jobCode) {
Assert.notNull(jobCode, "jobCode can not be null");
Job job = jobMap.get(jobCode);
if(job == null) {
throw new RuntimeException("job not found");
}
job.setEnable(true);
ScheduledFuture<?> future = jobManagerThreadPoolTaskScheduler.schedule(job.getRunnable(), new CronTrigger(job.getCron()));
job.setFuture(future);
}

public void stopJob(String jobCode) {
Assert.notNull(jobCode, "jobCode can not be null");
Job job = jobMap.get(jobCode);
if(job == null) {
throw new RuntimeException("job not found");
}
if(job.getFuture() == null) {
throw new RuntimeException("job not start");
}
job.getFuture().cancel(true);
job.setEnable(false);
}

public void removeJob(String jobCode) {
Assert.notNull(jobCode, "jobCode can not be null");
Job job = jobMap.get(jobCode);
if(job != null && job.getFuture() != null) {
stopJob(jobCode);
}
jobMap.remove(jobCode);
}
}

事物支持

事物

  • 在Spring中,事务有两种实现方式
    • 编程式事务管理:使用TransactionTemplate可实现更细粒度的事务控制
    • 申明式事务管理:基于Spring AOP实现。常用
  • Spring事务管理是基于接口代理或动态字节码技术,通过AOP实施事务增强的
    • 事物生命周期是从AOP调用的目标方法开始的,到该方法执行完成事物环境即消失
      • 不一定非要有接口实现,普通Bean只要通过AOP调用即可
    • @Transactional注解只能被应用到 public 可见度的方法上或注解到类上,注解到类上则该类的所有public方法再进行AOP调用时都存在事物
    • 默认遇到运行期异常(RuntimeException)会回滚,遇到捕获异常(Exception)时不回滚
      • @Transactional(rollbackFor=Exception.class) 指定回滚,遇到(声明上throws出来的)捕获异常Exception时也回滚
      • @Transactional(noRollbackFor=RuntimeException.class) 指定不回滚
    • 一个带事物的方法调用了另外一个事物方法,第二个方法的事物默认无效(Propagation.REQUIRED),具体见下文事物传播行为
    • 如果事物比较复杂,如当涉及到多个数据源,可使用@Transactional(value="transactionManagerPrimary")定义个事物管理器transactionManagerPrimary
  • 常见问题
    • 自调用导致@Transactional失效问题
      • 同一个类中的方法相互调用,发起方法无@Transactional,则被调用的方法@Transactional无效 ^3
      • 原因:由于@Transactional的实现原理是AOP,AOP的实现原理是动态代理,自调用时不存在代理对象的调用,这时不会产生注解@Transactional配置的参数,因此无效
      • 通过SpringU.getBean(UserService.class);解决(不需要设置exposeProxy属性)
      • 通过AopContext解决
    • 捕获嵌套事物异常导致报错Transaction rolled back because it has been marked as rollback-only(事务已经被标记为回滚,无法提交)
    • 服务内部捕获异常Exception/RuntimeException,统一返回错误结果对象,如自定义Result,此时无法回滚事物,解决方案如下
      • TransactionAspectSupport.currentTransactionStatus().setRollbackOnly(); 程序内部手动回滚(手动回滚必须当前执行环境有Transactional配置,而不是执行此语句的方法有@Transactional注解就可以回滚,具体见下文示例)。Debug过程中,发现有问题,可通过执行此语句进行手动回滚。调试时很好用
      • 或者手动抛出RuntimeException
      • 或者基于自定义注解统一回滚
  • 手动回滚方式(前提是当前有事物)
1
2
3
4
5
6
7
8
// 回滚整个方法
TransactionAspectSupport.currentTransactionStatus().setRollbackOnly();

// 回滚指定的一段操作
// 设置回滚点
Object savePoint = TransactionAspectSupport.currentTransactionStatus().createSavepoint();
// 回滚到回滚点
TransactionAspectSupport.currentTransactionStatus().rollbackToSavepoint(savePoint);
  • 完全手动管理事物
1
2
3
4
5
6
7
8
9
10
11
12
@Autowired
private PlatformTransactionManager transactionManager;

// 新发起一个事务
DefaultTransactionDefinition def = new DefaultTransactionDefinition();
def.setPropagationBehavior(TransactionDefinition.PROPAGATION_REQUIRES_NEW);
// 获得事务状态
TransactionStatus transactionStatus = transactionManager.getTransaction(def);
// 手动提交事务
transactionManager.commit(transactionStatus);
// 手动回滚事物
transactionManager.rollback(transactionStatus);

隔离级别

  • 隔离级别 @Transactional(isolation = Isolation.DEFAULT)org.springframework.transaction.annotation.Isolation枚举类中定义了五个表示隔离级别的值。脏读取、重复读、幻读 ^2
    • DEFAULT
      • 这是默认值,表示使用底层数据库的默认隔离级别。对大部分数据库而言,通常这值就是READ_COMMITTED;然而mysql的默认值是REPEATABLE_READ
    • READ_UNCOMMITTED
      • 该隔离级别表示一个事务可以读取另一个事务修改但还没有提交的数据
      • 读操作不加S锁
      • 该级别不能防止脏读、不可重复读、幻读。因此很少使用该隔离级别
      • 比如,事务1修改一行,事务2在事务1提交之前读取了这一行。如果事务1回滚,事务2就读取了一行没有提交的数据(读取数据不需要加S锁,这样就不会跟被修改的数据上的X锁冲突)
    • READ_COMMITTED
      • 该隔离级别表示一个事务只能读取另一个事务已经提交的数据
      • 读操作需要加S锁,但是在语句执行完以后释放S锁
      • 该级别可以防止脏读,可能会出现不可重复读、幻读。这也是大多数情况下的推荐值
      • Sql Server、Oracle默认为此级别
      • 比如,事务1读取了一行,事务2修改或者删除这一行并且提交。如果事务1想再一次读取这一行,它将获得修改后的数据或者发现这一样已经被删除,因此事务的第二次读取结果与第一次读取结果不同,因此也叫不可重复读
    • REPEATABLE_READ
      • 该隔离级别表示一个事务在整个过程中可以多次重复执行某个查询,并且每次返回的记录都相同。即使在多次查询之间有新增的数据满足该查询,这些新增的记录也会被忽略
      • 读操作需要加S锁,语句执行完并不会释放S锁,必须等待事务执行完毕以后才释放S锁
      • 该级别可以防止脏读、不可重复读,可能出现幻读
      • MySQL默认为此级别
      • 比如,事务1读取了一行,事务2想修改或者删除这一行并且提交,但是因为事务1尚未提交,数据行中有事务1的锁,事务2无法进行更新操作,因此事务2阻塞。如果这时候事务1想再一次读取这一行,它读取结果与第一次读取结果相同,因此叫可重复读
    • SERIALIZABLE
      • 所有的事务依次逐个执行,这样事务之间就完全不可能产生干扰
      • 会在Repeatable Read级别的基础上,添加一个范围锁
      • 该级别可以防止脏读、不可重复读、幻读。但是这将严重影响程序的性能,通常情况下也不会用到该级别
  • 幻读
    • 一般出现在事务不是独立执行时发生,如使用REQUIRES_NEW时容易出现(业务逻辑导致)
    • 如:事务A首先根据条件索引得到10条数据,然后事务B改变了数据库一条数据,导致也符合事务A当时的搜索条件,这样事务A再次搜索发现有9条(B删除了一条)或11条数据(B新增了一条),就产生了幻读
  • 数据真正入库
    • 入库事务有spring事务,数据库事务,只有当这两个事务都结束,才代表数据真正可查

传播行为

  • 传播行为 @Transactional(propagation = Propagation.REQUIRED):所谓事务的传播行为是指,如果在开始当前事务之前,一个事务上下文已经存在,此时有若干选项可以指定一个事务性方法的执行行为。org.springframework.transaction.annotation.Propagation枚举类中定义了6个表示传播行为的枚举值
    • REQUIRED:这是默认值,如果当前存在事务,则加入该事务;如果当前没有事务,则创建一个新的事务
    • REQUIRES_NEW:创建一个新的事务,如果当前存在事务,则把当前事务挂起
    • SUPPORTS:如果当前存在事务,则加入该事务;如果当前没有事务,则以非事务的方式继续运行
    • NOT_SUPPORTED:以非事务方式运行,如果当前存在事务,则把当前事务挂起
    • MANDATORY:如果当前存在事务,则加入该事务;如果当前没有事务,则抛出异常
    • NEVER:以非事务方式运行,如果当前存在事务,则抛出异常
    • NESTED:(适合总分总结构) 如果当前存在事务,则创建一个事务作为当前事务的嵌套事务来运行;如果当前没有事务,则该取值等价于REQUIRED
  • REQUIRES_NEW 和 NESTED的区别

    • REQUIRES_NEW 执行到B时,A事物被挂起,B会新开了一个事务进行执行。B发生异常后,B中的修改都会回滚,然后外部事物继续执行;B正常执行提交后,则数据已经持久化了,可能产生脏读,且A如果之后失败回滚时,B是不会回滚的
    • NESTED 执行到B时,会创建一个savePoint,如果B中执行失败,会将数据回滚到这个savePoint,A可以继续提交;如果B正常执行,此时B中的修改并不会立即提交,而是在A提交时一并提交,如果A失败,则A和B都会回滚(适合总分总结构)
    • 示例(https://www.jianshu.com/p/339d59f1ecd9)

      1
      2
      3
      4
      5
      6
      7
      8
      9
      10
      11
      12
      13
      14
      15
      16
      17
      18
      19
      20
      /*
      NESTED
      (1) B、C为A的子事务,可以读取A未提交的数据。但是REQUIRES_NEW却不行,除非B、C的隔离级别是Read Uncommitted
      (2) 如果A事务在B/C执行完后,还有更改数据库的操作,如果更改失败,那么B/C是要回滚的,但是REQUIRES_NEW则B/C不会回滚,B/C事务已提交
      (3) A与B/C方法中,可以修改同一条数据。但是对于REQUIRES_NEW会造成死锁
      REQUIRES_NEW
      (1) B/C作为内部事务,提交后可以被修改,这会造成A的脏读(A读取了金额为100, 然后java代码中+10, 之后B把金额改成0并提交, A最后把计算的金额110进行保存, 从而脏读. 按照顺序此时A应该重新读取B提交的数据则为0, 再进行加10操作)
      */
      @Transactional
      A.service() {
      insert();
      try {
      // PROPAGATION_NESTED
      B.service();
      } catch(Exception e) {
      // PROPAGATION_NESTED
      C.service();
      }
      update();
      }

事物示例

1
2
3
4
5
6
7
8
9
10
11
12
13
14
15
16
17
18
19
20
21
22
23
24
25
26
27
28
29
30
31
32
33
34
35
36
37
38
39
40
41
42
43
44
45
46
47
48
49
50
51
52
53
54
55
56
57
58
59
60
61
62
63
64
65
66
67
68
69
70
71
72
73
74
75
76
77
78
79
80
81
82
83
84
85
86
87
88
89
90
91
92
93
94
95
96
97
98
99
100
101
102
103
104
105
106
107
108
109
110
111
112
113
114
115
116
117
118
119
120
121
122
123
124
125
126
127
128
129
130
131
132
133
134
135
136
137
138
139
140
// 1.## 在Test测试程序中,通过此Controller相关Bean调用该方法时,正常回滚
// Controller1.java
@Transactional
@RequestMapping("/addTest")
public Result addTest() {
User user1 = new User();
user1.setId("1");
user1.setUsername("user1");
userMapper.insert(user1);
// userService.save(user1); // 同样会回滚
System.out.println("user1.getId() = " + user1.getId());

// 此处报错,会出现回滚
Long.valueOf("abc");
return null;
}
// Test.java(下同)
@Test
public void contextLoads() {
controller1.addTest();
}

// 2.## 通过此Controller相关Bean调用该方法时,不会出现回滚(浏览器直接访问也不会回滚)
// Controller1.java
@Transactional
// @Transactional(rollbackFor=Exception.class) // 加此注解可正常回滚(浏览器访问也会回滚)
@RequestMapping("/addTest")
public Result addTest() throws Exception {
User user1 = new User();
user1.setId("1");
user1.setUsername("user1");
userMapper.insert(user1);
System.out.println("user1.getId() = " + user1.getId());

// Long.valueOf("abc"); // 属于RuntimeException
if(1 == 1) {
// 此处报错,不会出现回滚
throw new Exception("..."); // 属于Exception
}

return null;
}

// 3.## 在Test测试程序中通过此Controller相关Bean调用该方法和浏览器直接访问,都无法正常回滚
// Controller1.java
@RequestMapping("/addTest")
public Result addTest() {
// Spring的@Transactional自我调用问题:同一个类中的方法相互调用,发起方法无`@Transactional`,被调用的方法`@Transactional`无效
return addTestTransactional();
}
@Transactional
public Result addTestTransactional() {
// 此时没有事物环境(由于是直接调用)
User user1 = new User();
user1.setId("2");
user1.setUsername("user1");
userMapper.insert(user1);
System.out.println("user1.getId() = " + user1.getId());

try {
Long.valueOf("abc");
} catch (Exception e) {
e.printStackTrace();
// 因为没有事物环境,此时手动回滚不会生效,并且会报:org.springframework.transaction.NoTransactionException: No transaction aspect-managed TransactionStatus in scope。*****Debug过程中,发现有问题,可通过执行此语句进行手动回滚。调试时很好用****
TransactionAspectSupport.currentTransactionStatus().setRollbackOnly();
}

// 此处报错,也不会回滚
Long.valueOf("abc");

return null;
}

// 4.## 事物生命周期是从AOP调用开始的
// Controller1.java
@RequestMapping("/addTest")
public Result addTest() {
User user1 = new User();
user1.setId("1");
user1.setUsername("user1");
userMapper.insert(user1);

try {
// 此处没有事物环境
controller2.addTestTransactional(); // 此时为AOP调用,在调用方法里面才存在事物环境
// 此处也没有事物环境
} catch (Exception e) {
e.printStackTrace();
// 由于此处没有事物环境,因此执行会报错。上面user1也不会正常回滚
TransactionAspectSupport.currentTransactionStatus().setRollbackOnly();
}
return null;
}
// Controller2.java
@Transactional
public Result addTestTransactional() {
// 此时有事物环境
User user2 = new User();
user2.setId("2");
user2.setUsername("user2");
userMapper.insert(user2);
System.out.println("user2.getId() = " + user2.getId());

// 此处报错,会回滚user2(user1不会回滚)
Long.valueOf("abc");
return null;
}

// ## 5.NESTED
bean.run(); // 开启事物

@Transactional(rollbackFor = Exception.class)
@Override
public Result run() {
// ======>A
Long a = Long.valueOf("1");
// Long a = Long.valueOf("a"); // 此处报错则直接回滚

// ======>B
for (Map<String, Object> item : list) {
MyBean bean = SpirngU.getBean(MyBean.class);
// 开启内部事物
// bean.runItem(item); // 当前item回滚,B之前的数据也会回滚(由于此处异常直接往外抛出了)
try {
bean.runItem(item); // 当前item回滚,B之前的数据不会回滚
} catch(Exception e) {
log.error("", e);
}
}

// ======>C
Long c = Long.valueOf("1");
// Long c = Long.valueOf("c"); // 此处报错则会全部回滚(A、B、C)
}

@Transactional(propagation = Propagation.NESTED, rollbackFor = Exception.class)
@Override
public Result runItem(Map<String, Object> item) {
throw new RuntimeException();
}

自调用导致@Transactional失效问题

1
2
3
4
5
6
7
8
9
10
11
12
13
14
15
16
17
18
19
20
21
22
23
24
25
26
27
28
29
30
31
32
33
34
// 假设UserController调用UserService
userService.run();
System.out.println(AopContext.currentProxy()); // IllegalStateException 此处没有AOP上下文

public class UserServiceImpl implements UserService {
@Override
public void run() {
for(params : list) {
try {
// this.updateByMap(params); // 无法实现事物

// 法一(简单)
SpringU.getBean(UserService.class).updateByMap(params); // 可实现事物,即可保证list里面的部分条目可提交成功

// 法二
// springboot启动项增加注解:@EnableAspectJAutoProxy(exposeProxy = true)开启AOP切面,且支持proxy
UserService userService = (UserService) AopContext.currentProxy();
userService.updateByMap(params); // 可实现事物
} catch (Exception e) {
// 此处catch无所谓的
System.out.println("error...");
}
}
}

@Override
@Transactional(rollbackFor = Exception.class)
public void updateByMap(params) {
if(params.get("name") == null) {
throw new RuntimeException("invalid");
}
jdbcTemplate.update("update t_user set sex = 1 where name = ?", params.get("name"));
}
}

捕获嵌套事物异常导致报错

1
2
3
4
5
6
7
8
9
10
11
12
13
14
15
16
17
18
19
20
21
22
23
24
Class ServiceA {
@Resource(name = "serviceB")
private ServiceB b;

@Transactional
public void a() {
try {
b.b();
// 此处editById对应AOP执行完成,由于报错已经将事物标记为回滚状态
// 且此嵌套事物用的是一个事物,因此addPerson尚未执行完,事物还不会提交,需等addPerson执行完之后再提交
} catch (Exception ignore) {
}
// 返回后报错:Transaction rolled back because it has been marked as rollback-only
// 当addPerson执行完之后,AOP结束,Spring会提交事物
// 而上文将editById异常捕获掉了,Spring未发现异常因此会提交事物,而上文editById已经将事物标记为回滚状态,从而报错
}
}

Class ServiceB {
@Transactional
public void b() {
throw new RuntimeException();
}
}
  • 解决方案如下
    • 业务允许情况下减少嵌套事物出现,如去掉某一个方法中的@Transactional
    • 如果希望内层事务抛出异常时中断程序执行,直接在外层事务的catch代码块中抛出e(这样整个事物也不会提交,即a中的不会保存)
      • 在catch语句中增加TransactionAspectSupport.currentTransactionStatus().setRollbackOnly();语句,手动回滚。此时a中是否能保存成功?
    • 将嵌套事物开启成新事物,如editById注解成@Transactional(propagation = Propagation.REQUIRES_NEW)
    • 如果希望内层事务回滚,但不影响外层事务提交,需要将内层事务的传播方式指定为PROPAGATION_NESTED
      • 注:PROPAGATION_NESTED基于数据库savepoint实现的嵌套事务,外层事务的提交和回滚能够控制嵌内层事务,而内层事务报错时,可以返回原始savepoint,外层事务可以继续提交

在事物中提前关闭了连接

1
2
3
4
5
6
7
8
9
10
11
12
13
14
15
16
17
18
19
20
21
22
23
24
25
26
27
28
29
30
31
32
33
34
35
36
37
38
39
40
41
@Transactional(rollbackFor = Exception.class)
@Override
public void test() {
this.runSql(...);
jdbcTemplate.update(...); // 此处会报错:SQL state [null]; error code [0];
}

public List<Map<String, Object>> runSql(String sql, Map<String, Object> parameters) {
SqlSession sqlSession = sqlSessionFactory.openSession(); // org.apache.ibatis.session.SqlSession
Connection connection = sqlSession.getConnection();
ResultSet rs = null;
try {
PreparedStatement ps = connection.prepareStatement(sql);
setParameters(ps, boundSql, parameters, configuration);
rs = ps.executeQuery();
return resultSetToList(rs);
} catch (Exception e) {
throw new RuntimeException(e);
} finally {
// rs可以关闭
if(rs != null) {
try {
rs.close();
} catch (SQLException e) {
e.printStackTrace();
}
}

//不能直接关闭连接,如果存在事物则有问题。此处只释放连接
//try {
// connection.close();
//} catch (SQLException e) {
// e.printStackTrace();
//}
DataSource dataSource = SpringUtil.getBean(DataSource.class);
DataSourceUtils.releaseConnection(connection, dataSource);

// sqlSession也可以关闭
sqlSession.close();
}
}

Spring-XML配置

1
2
3
4
5
6
7
8
9
10
11
12
13
14
15
16
17
18
19
20
21
22
23
24
25
26
27
28
29
30
31
32
33
34
35
36
37
38
39
40
41
42
43
<?xml version="1.0" encoding="UTF-8"?>
<beans xmlns="http://www.springframework.org/schema/beans"
xmlns:xsi="http://www.w3.org/2001/XMLSchema-instance"
xmlns:aop="http://www.springframework.org/schema/aop"
xmlns:p="http://www.springframework.org/schema/p"
xsi:schemaLocation="http://www.springframework.org/schema/beans
http://www.springframework.org/schema/beans/spring-beans.xsd">

<!-- scope默认singleton -->
<bean id="p1" class="cn.aezo.test.spring.Person" scope="singleton" lazy-init="true" init-method="init" destroy-method="over">
<!-- 构造方法注入 -->
<constructor-arg name="name" value="smalle"></constructor-arg>

<!-- set方法注入 -->
<property name="country" value="CN"></property>

<!-- list/set/map/properties -->
<property name="arrs">
<list><!-- 或为set -->
<!-- 如果集合内是简单类型,使用value子标签,如果是POJO类型,则使用bean标签 -->
<value>张三</value>
<value>李四</value>
<!-- <bean></bean> -->
</list>
</property>
<property name="map">
<map>
<entry key="name" value="test"/>
<entry key="age" value="18"/>
</map>
</property>
<property name="pro">
<props>
<prop key="uname">root</prop>
<prop key="pass">123</prop>
</props>
</property>
</bean>

<!-- p空间名称注入时需要引入 xmlns:p 声明 -->
<bean id="address" class="cn.aezo.test.spring.Address" p:country="CN" p:city="SH"></bean>
<bean id="person" class="cn.aezo.test.spring.Person" p:name="smalle" p:age="18" p:address-ref="address"/>
</beans>

SPEL

自定义注解结合EL表达式

SpringMVC

  • 关键类:DispatcherServlet#doDispatch
  • SpringMVC 的整个请求流程

springmvc-flow

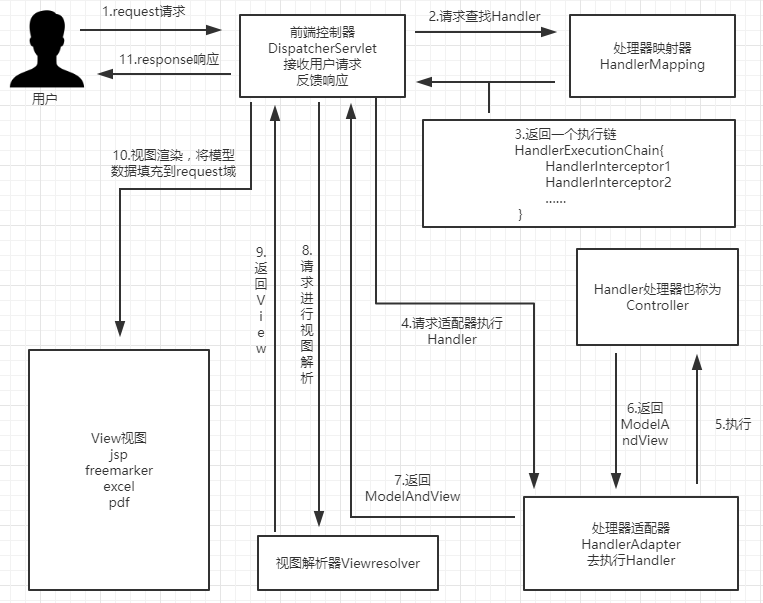
  • 前端控制器 - 处理映射器 - 处理适配器 - 处理器 - 视图解析器 - 视图渲染

映射处理器HandlerMapping

  • 映射处理器:就是实现了HandlerMapping接口,处理url到bean的映射
  • 常见的
    • RequestMappingHandlerMapping 处理@RequestMapping
    • BeanNameUrlHandlerMapping 将bean的name作为url进行查找,需要在配置Handler时指定bean name,且必须以 / 开头
    • SimpleUrlHandlerMapping 可以通过内部参数去配置请求的 url 和 handler 之间的映射关系。springboot中使用此类进行映射的地方(调用其setUrlMap进行注入)
      • ResourceHandlerRegistry
      • ViewControllerRegistry
      • WebMvcAutoConfiguration.FaviconConfiguration
      • DefaultServletHandlerConfigurer 默认没有设置handle,可基于WebMvcConfigurer实现配置(仅使用默认DefaultServletHandlerConfigurer,无法注入自定义的Interceptor,可自定义默认ServletHandler解决)
  • 自定义HandlerMapping ^4
1
2
3
4
5
6
7
8
9
10
11
12
13
14
15
16
17
18
19
20
21
22
23
24
25
@Slf4j
public class AuthUserInfoHandlerMapping extends SimpleUrlHandlerMapping implements HttpRequestHandler {
private AuthManager authManager;
private int order = Ordered.LOWEST_PRECEDENCE - 1;

public void init(AuthManager authManager) {
this.authManager = authManager;
this.setOrder(order);
this.setUrlMap(MiscU.toMap("/core/user/info", this)); // 拦截路径
}

@Override
public void handleRequest(HttpServletRequest request, HttpServletResponse response) throws ServletException, IOException {
// ...类似 controller 进行处理
SqAuthUserInfo sqAuthUserInfo = authManager.getUserInfo();
BaseRequest.writeSuccess(response, sqAuthUserInfo);
}
}

@Bean
public AuthUserInfoHandlerMapping mySimpleUrlHandlerMapping(AuthManager authManager) {
AuthUserInfoHandlerMapping auim = new AuthUserInfoHandlerMapping();
auim.init(authManager);
return auim;
}

拦截器

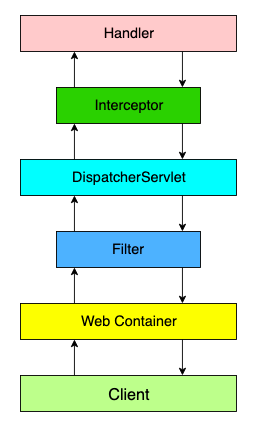
  • Filter 与 Interceptor 区别

    • Filter作用在 DispatcherServlet 调用前,Interceptor作用在调用后
    • Filter 由 Servlet 标准定义,要求 Filter 需要在 Servlet 被调用之前调用,作用顾名思义,就是用来过滤请求。在 Spring Web 应用中,DispatcherServlet 就是唯一默认的 Servlet 实现
    • Interceptor 由 Spring 自己定义,由 DispatcherServlet 调用,可以定义在 Handler 调用前后的行为。这里的 Handler ,在多数情况下,就是我们的 Controller 中对应的方法

      • 参考 DispatcherServlet#doDispatch -> mappedHandler.applyPreHandle -> interceptor.preHandle(只有URL匹配到了对应的Handler,才会调用preHandle方法)
      • 默认/**路径会被 SimpleUrlHandlerMapping 拦截(静态资源映射使用的类),因此如果重写了spring.mvc.static-path-pattern则可能有些路径找不到对应Handler,从而不执行preHandle

      Filter-Interceptor.png

  • 实现方式
    • 实现 Filter 或继承 OncePerRequestFilter,并增加注解@Component
    • 往 FilterRegistrationBean 中注册Filter,可指定拦截某路径。可以创建多个FilterRegistrationBean对象,优先级按照Order属性值来(小的优先)
    • 实现 WebMvcConfigurer,并加入自定义的HandlerInterceptor,可指定拦截路径和设定Order顺序

基于Filter进行拦截

1
2
3
4
5
6
7
8
9
10
11
12
13
14
15
16
17
18
19
// 暴露即可注入到拦截链中(如果要指定拦截路径,需要手动判断)
@Component
public class AuthFilter implements Filter {} // javax.servlet.Filter

@Component
public class AuthFilter2 extends OncePerRequestFilter {}

// 往FilterRegistrationBean中注册,可以创建多个FilterRegistrationBean对象(可指定拦截路径)
@Bean
public FilterRegistrationBean<AuthFilter> indexFilterRegistration() {
FilterRegistrationBean<AuthFilter> registrationBean = new FilterRegistrationBean<>();
// 一个registrationBean只能设置一个Filter
registrationBean.setFilter(new AuthFilter()); // 此时Filter无需增加@Component
registrationBean.setUrlPatterns("/*"); // 过滤所有路径(只有一个*)
// Filter的init方法中可获取到此参数值:exclusions = filterConfig.getInitParameter("exclusions");
registrationBean.addInitParameter("exclusions", "*.js,*.gif,*.jpg,*.png,*.css,*.ico");
registrationBean.setOrder(1);
return registrationBean;
}

基于HandlerInterceptor/WebRequestInterceptor进行拦截

1
2
3
4
5
6
7
8
9
10
11
12
13
14
15
16
17
18
19
20
21
22
23
24
25
26
27
28
29
30
31
32
33
34
35
36
37
38
39
40
41
42
43
44
45
46
47
48
// 定义拦截器(且需如下文注入到 WebMvcConfigurer)
// @Component
public class MyInterceptor implements HandlerInterceptor {
// **如果需要存放额外参数可使用 ThreadLocal**
private static final ThreadLocal<Long> startTimeThreadLocal = new NamedThreadLocal<Long>("ThreadLocal StartTime");

@Override
public boolean preHandle(HttpServletRequest request, HttpServletResponse response, Object handler)
throws Exception {
System.out.println(">>>>>>>>>>在请求处理之前进行调用(Controller方法调用之前)");
return true; // 只有返回true才会继续向下执行,**返回false取消当前请求**
}

/**
* 这个方法只会在当前这个Interceptor的preHandle方法返回值为true的时候才会执行。
* postHandle是进行处理器拦截用的,它的执行时间是在处理器进行处理之后,也就是在Controller的方法调用之后执行,但是它会在DispatcherServlet进行视图的渲染之前执行,也就是说在这个方法中你可以对ModelAndView进行操作。
* 这个方法的链式结构跟正常访问的方向是相反的,也就是说先声明的Interceptor拦截器,该方法反而会后调用
*/
@Override
public void postHandle(HttpServletRequest request, HttpServletResponse response, Object handler,
ModelAndView modelAndView) throws Exception {
System.out.println(">>>>>>>>>>请求处理之后进行调用(Controller方法调用之后),但是在视图被渲染之前");
System.out.println(response.getStatus()); // 请求状态
}

/**
* 该方法也是需要当前对应的Interceptor的preHandle方法的返回值为true时才会执行。
* 该方法将在整个请求完成之后,也就是DispatcherServlet渲染了视图执行
* 这个方法的主要作用是用于清理资源的,当然这个方法也只能在当前这个Interceptor的preHandle方法的返回值为true时才会执行。
*/
@Override
public void afterCompletion(HttpServletRequest request, HttpServletResponse response, Object handler, Exception ex)
throws Exception {
System.out.println(">>>>>>>>>>在整个请求结束之后被调用,也就是在DispatcherServlet 渲染了对应的视图之后执行(主要是用于进行资源清理工作)");
}
}

// WebMvcConfigurer 可显示拦截器注入、静态资源映射注入、CROS配置、数据格式转换配置等
@Configuration
public class CustomerWebMvcConfig implements WebMvcConfigurer {
// 往InterceptorRegistry中注册。或者继承 WebMvcConfigurerAdapter减少不必要接口的实现(Spring5已经废弃,因为 JDK8提供了默认接口)
@Override
public void addInterceptors(InterceptorRegistry registry) {
// 可添加多个组成一个拦截器链;addPathPatterns 用于添加拦截规则,excludePathPatterns 用于排除拦截
// 此处路径最终会加上spirng.context的值,才是真正的拦截完整路径
registry.addInterceptor(new MyInterceptor()).addPathPatterns("/**");
}
}

拦截request的body数据

  • 通过request的body数据(request.getParameter无法获取body)只能通过InputStream获取,而且只能获取一次
  • 常见问题:可能出现自定义Filter中使用了body,导致Controller中无法再使用@RequestBody获取数据
    • request.setAttribute("body", body); 灵活度不高,会影响其他Filter
    • 如果需要多次获取可以使用HttpServletRequestWrapper进行缓存
    • application/x-www-form-urlencoded 请求类型时,数据会以a=1&b=2的形式保存在body里面。当执行request.getParameterMap()时,会将数据从body中取出进行缓存
1
2
3
4
5
6
7
8
9
10
11
12
13
14
15
16
17
18
19
20
21
22
23
24
25
26
27
28
29
30
31
32
33
34
35
36
37
38
39
40
41
42
43
44
45
46
47
48
49
50
51
52
53
54
55
56
57
58
59
60
61
62
63
64
65
66
67
68
69
70
71
72
73
74
75
76
77
78
79
80
81
82
83
84
85
86
87
88
89
90
91
92
93
94
95
public class CustomerHttpServletRequestWrapper extends HttpServletRequestWrapper {
private final byte[] body;
private final ObjectMapper objectMapper;
private static final ThreadLocal<Map> MAP_THREAD_LOCAL = new ThreadLocal<>();

public WarningRequestWrapper(HttpServletRequest request, ObjectMapper objectMapper) throws IOException {
super(request);
body = StreamUtils.copyToByteArray(request.getInputStream());
this.objectMapper = objectMapper;
setBodyMap(this.parseBodyMap());
}

@Override
public BufferedReader getReader() throws IOException {
return new BufferedReader(new InputStreamReader(getInputStream()));
}

@Override
public ServletInputStream getInputStream() throws IOException {
final ByteArrayInputStream bais = new ByteArrayInputStream(body);
return new ServletInputStream() {
@Override
public boolean isFinished() {
return false;
}

@Override
public boolean isReady() {
return false;
}

@Override
public void setReadListener(ReadListener readListener) {

}

@Override
public int read() throws IOException {
return bais.read();
}
};
}

public Map parseBodyMap() {
Map<String, Object> map = new HashMap<>();
if(body != null) {
if(body.length != 0) {
try {
return objectMapper.readValue(body, Map.class);
} catch (IOException e) {
// do nothing. eg: multipart/form-data
}
}

map.put("_SQ_BODY", new String(body, Charset.forName("UTF-8")));
}

return map;
}

public static void setBodyMap(Map map) {
MAP_THREAD_LOCAL.set(map);
}
public static Map getBodyMap() {
return MAP_THREAD_LOCAL.get();
}
public static void removerBodyMap() {
MAP_THREAD_LOCAL.remove();
}
}

// 通过filter进行下发(实现 Filter,或继承 OncePerRequestFilter)
CustomerHttpServletRequestWrapper warpper = null;
boolean multipart = false;
String contentType = request.getContentType();
if (contentType != null) {
if(request.getContentType().contains(MediaType.MULTIPART_FORM_DATA_VALUE)) {
multipart = true;
} else if(request.getContentType().contains(MediaType.APPLICATION_FORM_URLENCODED_VALUE)) {
// 如果是 application/x-www-form-urlencoded, 参数值在request body中以 a=1&b=2&c=3...形式存在
// 若直接构造 BodyReaderHttpServletRequestWrapper, 在将流读取并存到copy字节数组里之后, request.getParameterMap()将返回空值
// 若运行一下 request.getParameterMap(), 则会将body中的数据缓存, 并清空body中数据
// 所以两者是互斥的. https://www.jianshu.com/p/f7f8237861e7
request.getParameterMap();
}
}
if(multipart){
// 文件上传类型,不做控制
} else {
wrapper = new CustomerHttpServletRequestWrapper(request, objectMapper);
}
filterChain.doFilter(warpper, servletResponse);

// 之后获取
Map body = warpper.getBodyMap();

拦截response的数据

1
2
3
4
5
6
7
8
9
10
11
12
13
14
15
16
17
@ControllerAdvice
public class InterceptResponse implements ResponseBodyAdvice<Object>{
@Override
public boolean supports(MethodParameter methodParameter, Class aClass) {
// 返回true则表示进行拦截
return true;
}

@Override
public Object beforeBodyWrite(Object o, MethodParameter methodParameter, MediaType mediaType, Class aClass, ServerHttpRequest serverHttpRequest, ServerHttpResponse serverHttpResponse) {
ServletServerHttpRequest req = (ServletServerHttpRequest) serverHttpRequest;
HttpServletRequest servletRequest = req.getServletRequest();
// o 即为返回值,此处临时保存。可结合 HandlerInterceptor,在其 postHandle 方法中再次使用
servletRequest.setAttribute("_resultBodyObject", o);
return o;
}
}

WebMvcConfigurer

1
2
3
4
5
6
7
8
9
10
11
12
13
14
15
16
17
18
19
@Configuration
public class CustomerWebMvcConfig implements WebMvcConfigurer {

@Override
public void configurePathMatch(PathMatchConfigurer configurer) {
// setUseSuffixPatternMatch: 是否启用后缀模式匹配,如 /user 是否匹配 /user.*,默认真即匹配。如果需要完全匹配 /user、/user.html,则设置成false
// setUseTrailingSlashMatch: 是否自动后缀路径模式匹配,如 /user 是否匹配 /user/,默认真即匹配
configurer.setUseSuffixPatternMatch(true)
.setUseTrailingSlashMatch(true);
}

// 往InterceptorRegistry中注册。或者继承 WebMvcConfigurerAdapter减少不必要接口的实现(Spring5已经废弃,因为 JDK8提供了默认接口)
@Override
public void addInterceptors(InterceptorRegistry registry) {
// 可添加多个组成一个拦截器链;addPathPatterns 用于添加拦截规则,excludePathPatterns 用于排除拦截
// 此处路径最终会加上spirng.context的值,才是真正的拦截完整路径
registry.addInterceptor(myInterceptor).addPathPatterns("/**");
}
}

异常处理

Spring相关类/接口说明

org.springframework.context

  • annotation
    • @Import 导入Bean,具体见上文
    • @ImportResource
    • ImportSelector
    • DeferredImportSelector
    • ImportBeanDefinitionRegistrar

org.springframework.boot

  • context.properties
    • @ConfigurationProperties 将properties配置文件中的属性对应到类上,需要和@EnableConfigurationProperties或@Component等结合使用
    • @EnableConfigurationProperties 使使用@ConfigurationProperties注解的类生效,可在任何配置类上定义
      • 如果一个配置类只配置@ConfigurationProperties注解,而没有使用@Component,那么在IOC容器中是获取不到properties配置文件转化的bean(但是可以通过@Value直接获取properties的值)。说白了@EnableConfigurationProperties相当于把使用@ConfigurationProperties的类进行了一次注入。如:@EnableConfigurationProperties({FeignClientEncodingProperties.class})
  • autoconfigure
    • @AutoConfigureBefore
    • @AutoConfigureAfter 在加载某配置的类之后再加载当前类。如:@AutoConfigureAfter({FeignAutoConfiguration.class})

org.springframework.util

  • AntPathMatcher 路径通配符匹配

  • 示例

1
2
3
4
// AntPathMatcher
String url = "/blog/detail/get.do";
AntPathMatcher matcher = new AntPathMatcher();
matcher.match("/blog/**/*.do", url); // true

参考文章

ChatGPT开源小程序