nginx介绍
- nginx(“engine x”) 是一个高性能的 HTTP 和 反向代理 服务器,也是一个 IMAP/POP3/SMTP 代理服务器
- 轻量级,同样起web服务,比
apache占用更少的内存及资源,抗并发,nginx 处理请求是异步非阻塞的,而apache则是阻塞型的。最核心的区别在于apache是同步多进程模型,一个连接对应一个进程;nginx是异步的,多个连接(万级别)可以对应一个进程(nginx是多进程的) - 作用:作为前端服务器拥有响应静态页面功能;作为集群构建者拥有反向代理功能
- 单个tomcat支持最高并发,测试结果:150人响应时间1s、250人响应1.8s(理想情况下最大并发数)、280人出现连接丢失、600人系统异常
- Nginx中文文档
Tengine是nginx的加强版,封装版,淘宝开源- OpenResty: 定位为动态应用平台 + 全功能网关, OpenResty = Nginx + Lua, 配置和 Nginx 一致
- 原生 Lua 脚本,支持热加载
- 内置库直连 Redis/MySQL/Kafka
- 典型场景: 动态 API 网关、边缘计算、WAF
- nginx日志分析goaccess: https://goaccess.io/ 对linux友好
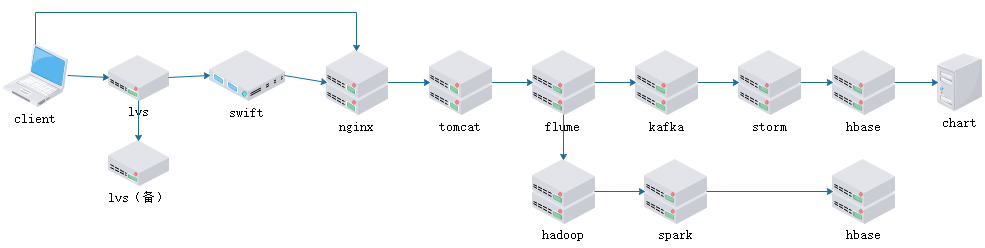
nginx在整体架构中的作用
nginx安装
安装
yum install -y nginx基于源安装(傻瓜式安装). 有的服务器可能需要先安装yum install -y epel-release- 默认可执行文件路径
/usr/sbin/nginx(已加入到系统服务); 配置文件路径/etc/nginx/nginx.conf - 安装时提示”No package nginx available.”。问题原因:nginx位于第三方的yum源里面,而不在centos官方yum源里面,解决办法为安装epel(Extra Packages for Enterprise Linux)
- 下载epel源
wget https://dl.fedoraproject.org/pub/epel/epel-release-latest-7.noarch.rpm(http://fedoraproject.org/wiki/EPEL) - 安装epel
rpm -ivh epel-release-latest-7.noarch.rpm - 再下载
yum install nginx
- 下载epel源
- 默认可执行文件路径
- 程序包解压安装
- 安装多个版本的nginx(未测试): https://www.cnblogs.com/weibanggang/p/11487339.html
卸载
1
2
3
4
yum remove nginx
rm -rf /etc/nginx
rm -rf /var/log/nginx
rm -rf /usr/share/nginx
编译安装: (详细参考下文
基于编译安装tengine)
1 | ## 参考: https://blog.csdn.net/L66666xiaoliu/article/details/138197698 |
nginx使用
- 查看nginx版本
nginx -v简单查看nginx -V查看安装时的配置信息,包含模块信息2>&1 nginx -V | tr ' ' '\n'查看安装时的配置信息并美化
- 启动
systemctl start nginx启动- 进入到
nginx执行文件目录,运行sudo ./nginx
停止
systemctl stop nginx- 有时候启动失败可能是端口占用,
listen对应的端口必须是空闲状态
- 有时候启动失败可能是端口占用,
sudo ./nginx -s stopwindows停止脚本
1
2
3@echo off
echo Stopping nginx...
taskkill /F /IM nginx.exe > nul
相关命令
ps -ef | grep nginx查看nginx安装位置(nginx的配置文件.conf在此目录下)sudo find / -name nginx.conf查看配置文件位置- 校验配置:
/usr/sbin/nginx -t检查配置文件的配置是否合法(也会返回配置文件位置),适用windows - 重载配置文件:
/usr/sbin/nginx -s reload,适用windows - 重启:
/usr/sbin/nginx -s restart有的配置文件改了必须重启
- nginx两种进程
- master进程,root用户打开,接收信号,管理worker进程
- worker进程,nginx用户打开,工作进程,负责处理http请求
- 日志分析
1 | # 根据访问IP统计UV |
nginx配置(nginx.conf)
- 查找配置文件
sudo find / -name nginx.conf
常见问题
- 代理端口时,访问提示
Permission denied。检查配置文件中启动用户是否为root(user root;) - 代理端口时,Header中数据丢失。nginx中默认不支持带
_的key- Header名不要带
_ - 解除nginx的限制:配置文件的http部分增加
underscores_in_headers on;
- Header名不要带
- 参数调试
1 | # 增加类似自定义响应头,通过观察响应信息进行调试 |
配置示例
1 | # 备案专用(直接映射nginx即可通过备案) |
配置详细说明
1 | # ***.定义Nginx访问资源的用户和用户组. |
HTTPS证书配置
- 检查证书配置: https://www.myssl.cn/tools/check-server-cert.html
- 需要全部通过,一般为三项: 服务器证书、中间证书、根证书
- 如果提示
错误: 服务器缺少中间证书,解决如下- 使用完整的证书
fullchain.pem - 如果中间证书(ca_bundle.crt)和网站证书(test.aezo.cn.crt)分开了,则可手动将两个.crt证书合并成一个文件,并配置到nginx。如果有多个中间证书也都合并到一起
- apache也可尝试通过SSLCertficateChianFile来配置中间证书
- 使用完整的证书
- 如果只配置服务器证书,漏掉中间证书,浏览器一般会通过,但是微信小程序无法正常使用
- 证书分析工具(测试连接): https://www.ssllabs.com/ssltest/index.html
1 | # 开启 HTTPS |
WSS协议配置(加密WebSocket)
- WS/WSS测试工具:http://wstool.js.org/
1 | # WSS配置 |
Nginx访问日志过大自动清理
- 参考上文自动分割方案
- 自动清理方案https://www.chinastor.com/nginx/11143LK2017.html
更安全的配置
1 | http { |
语法说明
server_name和listen
- 多个server_name
server_name www.aezo.cn baidu.com;- 正则
server_name ~^.+-api-dev\.aezo\.cn$;匹配xxx-api-dev.aezo.cn
- nginx支持三种类型的虚拟主机配置
- 基于域名的虚拟主机(server_name不同;listen相同,如80)
- 基于端口的虚拟主机(server_name相同;listen不同)
- 基于ip的虚拟主机(如listen 192.168.6.131:80; server_name 192.168.1.1/www.aezo.cn)
location匹配规则
- 语法规则:
location [=|^~|~|~*|!~|!~*] /uri/ { … }^1=表示精确匹配^~表示uri以某个常规字符串开头,理解为匹配url路径即可(如果路径匹配那么不测试正则表达式)- nginx不对url做编码,因此请求为
/res/20%/aa,可以被规则^~ /res/ /aa匹配到(注意是空格)
- nginx不对url做编码,因此请求为
- 正则匹配
~区分大小写的正则匹配~*不区分大小写的正则匹配!~区分大小写不匹配的正则!~*不区分大小写不匹配的正则- location的正则仅匹配路径,不考虑url中的参数(相当于把?后的参数去掉后进行匹配)
/通用匹配,任何请求都会匹配到
- 多个location配置的情况下匹配顺序如下,当有匹配成功时候,停止匹配,按当前匹配规则处理请求
- 首先匹配路径相等
= - 其次匹配路径开头
^~location /test/等同于location ^~ /test/location ^~ /test/和location ~ ^/test/为不同优先级的location
- 再是按文件中location的顺序进行正则匹配
- 最后是交给 / 通用匹配
- 首先匹配路径相等
- 正则表达式
1 | * #重复前面的字符0次或者多次 |
全局变量
- Nginx 获取自定义请求header头和URL参数:https://blog.csdn.net/JineD/article/details/125434338
- 如使用
$http_x_test获取Header的X-Test值
- 如使用
- 可以用作if判断的全局变量
1 | $args #这个变量等于请求行中的参数,同$query_string |
- 可用在log_format的全局变量
1 | $remote_addr #客户端地址。211.28.65.253 |
if语句
1 | ## 常见案例(if可以在server/location节点使用) |
模块说明
访问控制
- 禁止允许规则(
ngx_http_access_module):按照顺序依次检测,直到匹配到第一条规则
1 | location / { |
- 用户认证(
ngx_http_auth_basic_module) ^4- 需要使用htpasswd等工具生成密码文件,不能直接写明文密码
auth_basic <string | off>;- 默认值: auth_basic off; (默认表示不开启认证,后面如果跟上字符,这些字符会在弹窗中显示。)
- 配置段: http, server, location, limit_except
auth_basic_user_file <密码文件>;- 配置段: http, server, location, limit_except
nginx缓存
- 参考文章
- nginx可配置的缓存有2种
- 客户端的缓存(一般指浏览器的缓存)
- 服务端的缓存(使用proxy-cache实现的)
结合浏览器缓存
- HTTP缓存:https://developer.mozilla.org/zh-CN/docs/Web/HTTP/Caching
- 参考:https://blog.csdn.net/qq_43271330/article/details/108335974
- 缓存机制
- 强缓存:直接从浏览器缓存中取,但会判断浏览器缓存的文件是否过期
- 协商缓存:先发送请求到服务器判断文件是否改动,服务器返回未改动状态,则从浏览器中取
- 即第一次请求的响应头带上某个字段(ETag或Last-Modified),则后续请求会带上对应的请求字段(If-None-Match或If-Modified-Since);若响应头没有 ETag或Last-Modified字段,则请求头也不会有对应的字段
- 这两组字段都是成对出现的,Last-Modified与ETag可以一起使用,服务器会优先验证ETag,一致的情况下才会比对Last-Modifed
- 强缓存相关参数
- Expires(Http1.0) 响应头过期时间
- 如果cache-control与expires同时存在的话,cache-control的优先级高于expires
- Cache-Control(Http1.1) 该字段的优先级要比Expires优先级高
no-store不使用缓存(无此参数就表示可以使用缓存,此时需要看其他参数是否对缓存有限制)。禁止将响应存储在任何缓存中(但不会删除相同 URL 的任何已存储响应,已经缓存的仍然能使用)no-cache强制重新验证(也可用max-age=0代替),一般不和max-age同时使用。每次请求都会验证本地缓存和服务器是否一致(更新时间Last-Modified和文件内容Hash值ETag),一致则返回304并使用本地缓存(不下载服务器资源)max-age缓存的内容将在多少秒后失效,相对于请求时间来说的- max-age=0便是无论服务端如何设置,在重新获取资源之前,先检验ETag/Last-Modified。在设置max-age=no-cache或0后,在资源无更新的情况下访问都会返回304
- 只设置
expires 7d;会转换成Cache-Control max-age=604800设置到返回头中 - 设置对jsp等页面设置了如
Cache-Control max-age=36000,则浏览器地址栏回车/F5刷新/路径增加了参数都会重新获取数据,只有在通过<a>标签进行跳转到此页面时才会出现被缓存的问题(js/css等静态文件一般都是页面引用的,不会出现刷新情况,所有此参数会进行缓存静态资源)
private客户端可以缓存public客户端和代理服务器都可缓存must-revalidate告诉浏览器/缓存服务器;在本地文件过期之前可以使用本地文件;本地文件一旦过期需要去源服务器进行有效性校验;如果有缓存服务器且该资源未过有效期则命中缓存服务器并返回200;如果过期且源服务器未发生更改;则校验后返回304
- Expires(Http1.0) 响应头过期时间
- 协商缓存相关参数
- Etag / If-None-Match
- Last-Modified / If-Modified-Since
- 协商缓存执行流程
- (不检查强缓存是否过期,直接向服务器发起请求)
- 请求头会携带 Cache-Control: max-age=0 或 If-Modified-Since/If-None-Match
- 服务器判断资源是否更新:未更新, 则返回 304 Not Modified,浏览器用本地缓存; 已更新, 则返回 200 OK 和新资源
- 其他参数
- Pragma(Http1.0) 它用来向后兼容只支持 HTTP/1.0 协议的缓存服务器,那时候 HTTP/1.1 协议中的 Cache-Control 还没有出来
- 判断请求是否使用了浏览器缓存:F12 - Network - 观察Size和Status列
- Size为(memory cache)和(disk cache),此时Status为200:表示使用了浏览器缓存或磁盘缓存(当关闭浏览器后重新打开,那默认会到本地磁盘上获取此数据)
- Size有值,Status为304:表示通过max-age判断文件已经超过了设置的缓存时间,但是服务端返回此文件未被更新,则返回304,数据仍然从本地缓存读取
- 浏览器刷新模式
- 地址栏直接回车: 优先使用 强缓存(本地缓存未过期时,如 Cache-Control: max-age 未到,完全不发请求到服务器;本地过期则发送请求)
- 左侧刷新按钮: 跳过强缓存,走协商缓存
- Ctrl + F5 等强制刷新
- 不使用任何本地缓存,请求头会携带 Cache-Control: no-cache 和 Pragma: no-cache
- 服务器会直接返回最新资源(无论缓存是否有效),返回 200 OK 并携带新内容
- Chrome浏览器本身控制缓存机制. 参考:https://blog.csdn.net/andy_csdn007/article/details/115210818
Ctrl + Shift + R/Ctrl + F5强制刷新不走缓存Ctrl + Shift + Delete弹出删除缓存和Cookie的确认框- F12 - Network - Disable cache 关闭缓存
- F12 - Setting - Network - Disable cache(当打开F12时关闭缓存)
- 浏览器启动命令增加相关参数
- HTML设置相关参数
1 | <!-- 不缓存此HTML文件中的JS/CSS等资源 --> |
- Nginx相关配置
1 | server { |
proxy缓存功能
- 参考
- 对应模块
ngx_http_proxy_module - 反向代理时先从nginx缓存中寻找资源,如果缓存中没有则向tomcat请求
1 | http { |
清除指定url缓存
- 对应模块
ngx_cache_purge - 添加安装清除缓存模块(基于下文【基于编译安装tengine】安装状态进行说明)
- 下载ngx_cache_purge模块
http://labs.frickle.com/files/ngx_cache_purge-2.3.tar.gz - 将ngx_cache_purge-2.3.tar.gz解压到tengine源码目录
- 在上述安装的
./configure命令后加上--add-module=./ngx_cache_purge-2.3(ngx_cache_purge源码路径) make进行编译(不用执行make install)cp /opt/soft/tengine-2.1.0/sbin/nginx /opt/soft/tengine-2.1.0/sbin/nginx.bak备份cp ./objs/nginx /opt/soft/tengine-2.1.0/sbin/将新编译出来的nginx执行文件复制到原始安装目录
- 下载ngx_cache_purge模块
- 添加清除缓存配置
1 | location ~ /purge(/.*) { |
- 访问
http://192.168.6.132/purge/tomcat.png(提示Successful purge),即可清除http://192.168.6.132/tomcat.png的缓存
反向代理和负载均衡
- 代理一般指客户端代理(比如Google agent代理翻墙),反向代理则指服务器代理
- 反向代理配置
proxy_pass(ngx_http_proxy_module):访问http://127.0.0.1,nginx会将请求转给 http://127.0.0.1:8080
1 | location / { |
- 负载均衡
upstream(ngx_http_upstream_module),实现简单的故障转移(Failover)
1 | # 参考:https://www.cnblogs.com/kevingrace/p/8185218.html |
- nginx自带健康检查的缺陷
- Nginx只有当有访问时,才发起对后端节点请求
- 如果本次请求中,节点正好出现故障,Nginx依然将请求转交给故障的节点,然后再转交给健康的节点处理(之后每次都有可能出现部分静态文件先请求到错误节点)。所以不会影响到这次请求的正常进行,但是会影响效率,因为多了一次转发
- 自带模块无法做到预警,属于被动健康检查
- 解决:使用第三方模块nginx_upstream_check_module,为tengine模块,可用于nginx,参考:https://juejin.cn/post/7121879473158373406
- tengine主动健康检查(ngx_http_upstream_check_module)
- tengine特有。如果集群中有某个服务器挂掉则检查面板中会标记成红色
1 | upstream backend { |
session一致性问题解决方案:
memcached或redis等缓存数据库保存所有的session(以tomcat-7.0.61为例)- tengine的会话保持功能:同一个客户端会话有效期间永远访问的是同一个服务器(ngx_http_upstream_session_sticky_module)
- 基于cookies实现
- 在
upstream中加入session_sticky;
redis方式
- 安装redis缓存数据库(参考《redis》)
- 修改配置文件
vi /etc/redis.conf将bind的127.0.0.1修改为本机地址,否则只能本机访问了 - 将web服务器连接redis的jar包拷贝到tomcat的lib针对tomcat-7.0.61相关jar下载地址
配置tomcat的
conf/context.xml1
2
3
4
5
6<Valve className="com.orangefunction.tomcat.redissessions.RedisSessionHandlerValve" />
<Manager className="com.orangefunction.tomcat.redissessions.RedisSessionManager"
host="192.168.1.1"
port="6379"
database="0"
maxInactiveInterval="60" />
redis方式也可使用tomcat-cluster-redis-session-manager插件,参考集群配置Session共享(基于redis))
memcached方式(安装查看:《memcached缓存数据库》)
- 将web服务器连接memcached的jar包拷贝到tomcat的lib针对tomcat-7.0.61相关jar下载地址
配置tomcat的
conf/context.xml配置memcachedNodes属性,配置memcached数据库的ip和端口(默认11211),多个的话用空格隔开。主要是让tomcat服务器从memcached缓存里面拿session或者是放session1
2
3
4
5
6
7<Manager className="de.javakaffee.web.msm.MemcachedBackupSessionManager"
memcachedNodes="n1:192.168.1.1:11211 n2:192.168.1.2:11211"
sticky="false"
lockingMode="auto"
sessionBackupAsync="false"
requestUriIgnorePattern=".*\.(ico|png|gif|jpg|css|js)$"
sessionBackupTimeout="1000" transcoderFactoryClass="de.javakaffee.web.msm.serializer.kryo.KryoTranscoderFactory" />修改tomcat中
conf/server.xml里面修改Engine标签,添加jvmRoute属性,目的是让sessionid里面带有tomcat的名字<Engine name="Catalina" defaultHost="localhost" jvmRoute="tomcat1">修改tomcat的
webapps/ROOT/index.jsp1
2
3
4
5
6<%@ page language="java" contentType="text/html; charset=UTF-8" pageEncoding="UTF-8"%>
<html lang="en">
SessionID:<%=session.getId()%></br>
SessionIP:<%=request.getServerName()%></br>
<h1>tomcat1</h1>
</html>memcached集群需要多台服务器时间一致(30s以内)
- tengine的会话保持功能:同一个客户端会话有效期间永远访问的是同一个服务器(ngx_http_upstream_session_sticky_module)
nginx-sticky-module-ng(cookie负载均衡)
- Sticky就是基于cookie的一种负载均衡解决方案,它是通过基于cookie实现客户端与后端服务器的会话保持,在一定条件下可以保证同一个客户端访问的都是同一个后端服务器(要求浏览器必须支持cookie)
- 粘性会话/会话保持
- 负载均衡器
- 使用nginx自带cookie_jessionid
- 使用nginx模块sticky
- 客户端负载均衡
- 基于Ribbon,根据用户的某些标识(如用户 ID)来选择实例
- 在网关(如 Zuul、Spring Cloud Gateway)层面实现
- 负载均衡器
- 会话保持案例,参考: https://cloud.tencent.com/developer/article/2331129
1 | upstream myserver { |
ngx-http-map-module(变量转换)
ngx-http-map-module可以基于其他变量及变量值进行变量创建,其允许分类,或者映射多个变量到不同值并存储在一个变量中。(nginx默认已存在,除非由人为移除–without-http_map_module)map $var1 $var2 {...}- 配置段位http
- $var1 为源变量,$var2 是自定义变量。$var2 的值取决于 $var1 在对应表达式的匹配情况。如果一个都匹配不到则 $var2 就是 default 对应的值
- 部分参数
- default: 指定源变量匹配不到任何表达式时将使用的默认值。当没有设置 default,将会用一个空的字符串作为默认的结果
- 示例
1 | # 如果 $http_user_agent 为 curl 则 $agent=curl,如果 $http_user_agent 为 apachebench 则 $agent=ab,否则为 "" |
ngx-http-geo-module(客户端IP-变量)
ngx-http-geo-module可以用来创建变量,变量值依赖于客户端 ip 地址(nginx默认已存在)geo [$address] $variable { ... }配置段位http- 示例:限速白名单的配置实例
1 | http{ |
结合keepalived实现高可用
示意图
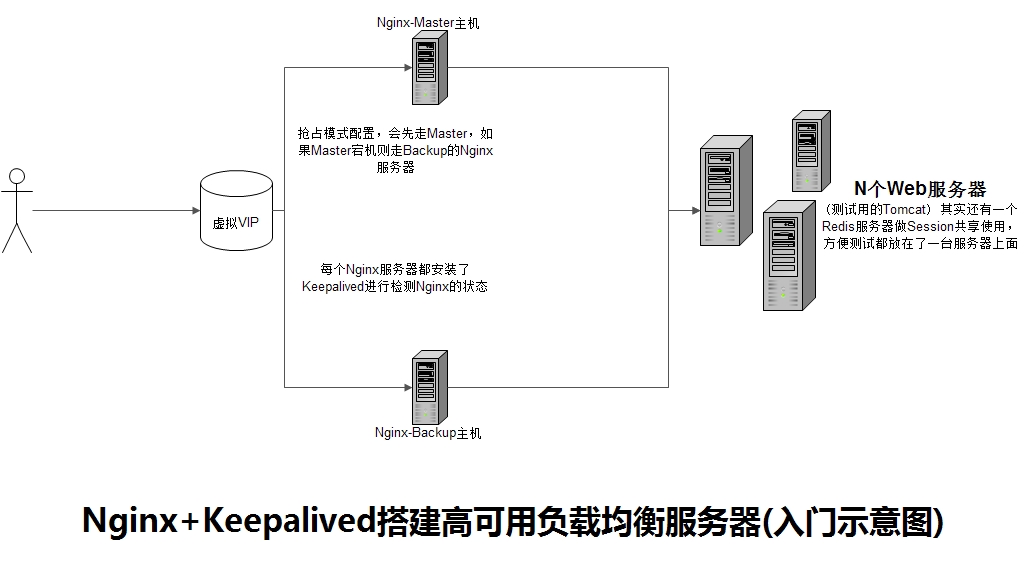
到达高可用需要配置nginx集群。主nginx宕机后,备用nginx可正常使用。判断nginx是否可用通过keepalived来判断:每台nginx服务器上需安装一个keepalived,配置如下
- 两台nginx均进行安装:
yum -y install keepalived - 新建文件
/etc/keepalived/check_nginx.sh,内容如下(并设置可执行权限)- keepalived是通过检测keepalived进程是否存在判断服务器是否宕机,如果keepalived进程在但是nginx进程不在了那么keepalived是不会做主备切换,所以我们需要写个脚本来监控nginx进程是否存在,如果nginx不存在就将keepalived进程杀掉。在主nginx上需要编写nginx进程检测脚本(check_nginx.sh),判断nginx进程是否存在,如果nginx不存在就将keepalived进程杀掉
1 |
|
配置Keepalived(抢占模式配置) 增加VIP 启动服务
MASTER(192.168.6.131)配置信息
1
2
3
4
5
6
7
8
9
10
11
12
13
14
15
16
17
18
19
20
21
22
23
24
25
26
27
28
29
30
31
32
33
34
35
36
37
38
39
40
41global_defs {
# 用户标识本节点的名称,通常为hostname
router_id server1.aezocn
}
vrrp_script check_nginx {
#检测nginx的脚本
script "/etc/keepalived/check_nginx.sh"
#每2秒检测一次
interval 2
#如果某一个nginx宕机 则权重减20
weight -20
}
vrrp_instance VI_1 {
#状态 MASTER或BACKUP
state MASTER
#绑定的网卡(如:eth0、ens33等)
interface eth0
#虚拟路由的ID号,两个节点设置必须一样(*)
virtual_router_id 51
#本机的IP
mcast_src_ip 192.168.6.131
# 节点优先级,取值范围0~254,MASTER要比BACKUP高(*)
priority 100
advert_int 1
# 设置验证信息,两个节点必须一致(*)
authentication {
auth_type PASS
auth_pass 1111
}
# 虚拟IP,两个节点设置必须一样(*)
virtual_ipaddress {
# 此虚拟ip为web服务对外提供访问的ip
192.168.6.100
}
# nginx存活状态检测脚本
track_script {
check_nginx
}
}BACKUP(192.168.6.132)配置信息
1
2
3
4
5
6
7
8
9
10
11
12
13
14
15
16
17
18
19
20
21
22
23
24
25
26
27
28global_defs {
router_id server2.aezocn
}
vrrp_script check_nginx {
script "/etc/keepalived/check_nginx.sh"
interval 2
weight -20
}
vrrp_instance VI_1 {
state BACKUP
interface eth0
virtual_router_id 51
mcast_src_ip 192.168.6.132
priority 99
advert_int 1
authentication {
auth_type PASS
auth_pass 1111
}
virtual_ipaddress {
192.168.6.110
}
track_script {
check_nginx
}
}
基于编译安装tengine
- tengine功能特点
- 主动健康检查。nginx则需使用第三方模块(nginx_upstream_check_module),参考上文反向代理和负载均衡
- 编译安装好处:更方便的插拔模块(yum安装只能使用源默认的模块,nginx同理安装)
- 安装依赖
yum install gcc openssl-devel pcre-devel zlib-devel(否则configure时报错) - 创建用户和用户组,为了方便nginx运行而不影响linux安全(也可省略)
groupadd -r nginx创建组useradd -r -g nginx -M nginx创建用户(-M表示不创建用户的家目录)
- 上传tar并解压
tar -zxvf tengine-2.1.0.tar.gz(解压出的tengine-2.1.0为源码目录) 安装(进入到解压目录tengine-2.1.0)
./configureconfigure详细参数介绍如下--prefix安装位置--sbin-path执行文件路径--conf-path配置文件路径(启动和配置路径用默认)--http-log-pathhttp请求日志路径--lock-path锁文件位置--pid-pathpid路径--group、--user限制某个组下某用户有权运行(如果未创建对应的用户可省略)--with-xxx加入相关模块--http-xxx-temp-path临时文件路径(下例中需要手动创建mkdir -p /var/tmp/nginx/client/目录)1
2
3
4
5
6
7
8
9
10
11
12
13
14
15
16
17./configure \
--prefix=/opt/soft/tengine-2.1.0/ \
--error-log-path=/var/log/nginx/error.log \
--http-log-path=/var/log/nginx/access.log \
--pid-path=/run/nginx.pid \
--lock-path=/var/lock/nginx.lock \
--with-http_ssl_module \
--with-http_flv_module \
--with-http_stub_status_module \
--with-http_gzip_static_module \
--with-pcre \
--http-client-body-temp-path=/var/tmp/nginx/client/ \
--http-proxy-temp-path=/var/tmp/nginx/proxy/ \
--http-fastcgi-temp-path=/var/tmp/nginx/fcgi/ \
--http-uwsgi-temp-path=/var/tmp/nginx/uwsgi \
--http-scgi-temp-path=/var/tmp/nginx/scgi \
--add-module=./ngx_cache_purge-2.3 ## --add-module=./ngx_cache_purge-2.3 # 添加清除缓存模块
make && make install
自定义服务
方法一 ^3
- nginx安装一般会自动注册到服务中取,有些手动安装可能需要自己注册,以nginx手动注册成服务为例
方法:在
/usr/lib/systemd/system(或/etc/systemd/system) 路径下创建755的文件nginx.service:sudo vi /usr/lib/systemd/system/nginx.service,文件内容如下:1
2
3
4
5
6
7
8
9
10
11
12
13
14
15
16
17
18
19
20
21
22
23
24
25
26
27
28## 服务的说明
[Unit]
# 描述服务
Description=nginx
# 依赖,当依赖的服务启动之后再启动自定义的服务
After=network.target remote-fs.target nss-lookup.target
## 服务运行参数的设置
[Service]
# forking是后台运行的形式; oneshot适用于只执行一项任务,随后立即退出的服务; simple
Type=forking
# pid存放文件
# PIDFile=/var/run/nginx.pid
# 指定当前服务的环境参数文件。该文件内部的 KEY=VALUE 键值对,指定的KEY可当前变量在此文件中使用$KEY
# EnvironmentFile=-/etc/sysconfig/xxx
# 为服务的具体运行命令(注意:启动、重启、停止命令全部要求使用绝对路径) /usr/local/nginx/conf/nginx.conf
ExecStart=/usr/local/nginx/sbin/nginx -c /etc/nginx/nginx.conf
# 停止命令
ExecStop=/usr/local/nginx/sbin/nginx -s stop
# 重启命令(其他软件也适用)
ExecReload=/usr/local/nginx/sbin/nginx -s reload
# 表示给服务分配独立的临时空间
# PrivateTmp=True
## 服务安装的相关设置
[Install]
# 表示该服务所在的Target,此时为多用户模式下
WantedBy=multi-user.targetsystemctl daemon-reload修改服务配置文件后重新加载
- 设置开机启动:
systemctl enable nginx - 自定义服务文件模板(如
/usr/lib/systemd/system/test@.service)- 大多数情况下,包含
@标记都意味着这个文件是模板。模板单元中的%i(会转义,如空格转义成\x20)或%I(不会转义,但是传入-会替换成/) 会被@之后的字符串替换,如果一个模板单元没有实例化就调用,该调用会返回失败。调用如systemctl start test@argument.service - 关于转义字符,如模板文件为
ExecStart=/bin/echo %i === %I,当执行systemctl start echo@'\x2da -a \x2db b',则打印\x2da\x20-a\x20\x2db\x20b === -a /a -b b。参考:https://www.freedesktop.org/software/systemd/man/systemd-escape.html - 参考:https://www.freedesktop.org/software/systemd/man/systemd.unit.html、https://superuser.com/questions/393423/the-symbol-and-systemctl-and-vsftpd
- 大多数情况下,包含
- 方法二
- 新建755权限文件
/etc/rc.d/init.d/nginx,文件内容参考/data/images/arch/nginx- 注意修改其中
nginx="/opt/soft/tengine-2.1.0/sbin/nginx"和NGINX_CONF_FILE="/opt/soft/tengine-2.1.0/conf/nginx.conf"的配置
- 注意修改其中
chkconfig --add nginx将nginx加入到服务列表chkconfig nginx on设置nginx服务开机自启动systemctl start nginx手动启动
- 新建755权限文件
版本更新变化
- v1.12.1
- 当访问
http://www.aezo.cn/index.html不进入对应的页面,而是显示默认的/usr/share/nginx/html/index.html。解决办法:注释掉此文件即可
- 当访问
常见错误
- 错误代码
10060。某次:windows server 2012,无并发,某天开始出现此错误,最终通过修改注册表解决(需重启,将localhost优先按ipv4解析),参考:https://blog.csdn.net/u010267491/article/details/52775115
参考文章
