RabbitMQ

RabbitMQ 简介

  • RabbitMQ 的官方站:http://www.rabbitmq.com/
  • 相关文章
  • rabbitMQ 是一个在 AMQP 协议(高级消息队列协议)标准基础上完整的,可服用的企业消息系统。他遵循 Mozilla Public License 开源协议。采用 Erlang 实现的工业级的消息队列(MQ)服务器。
  • 相关概念
    • Broker 消息队列服务器实体
    • VirtualHost 在 RabbitMQ 中可以虚拟消息服务器 VirtualHost,每个 VirtualHost 相当于一个相对独立的 RabbitMQ 服务器,每个 VirtualHost 之间是相互隔离的,一个 broker 里可以开设多个 vhost,用作不同用户的权限分离。exchange、queue、message 不能互通。VirtualName 一般以/开头
    • Exchange 消息交换机,它指定消息按什么规则,路由到哪个队列
    • Queue 消息队列载体,每个消息都会被投入到一个或多个队列
    • Binding 绑定,它的作用就是把 exchange 和 queue 按照路由规则绑定起来
    • RoutingKey 路由关键字,exchange 根据这个关键字进行消息投递
    • Producer 消息生产者,就是投递消息的程序
    • Consumer 消息消费者,就是接受消息的程序
    • Channel 消息通道,在客户端的每个连接里,可建立多个 channel,每个 channel 代表一个会话任务
  • 数据传输

    数据传输

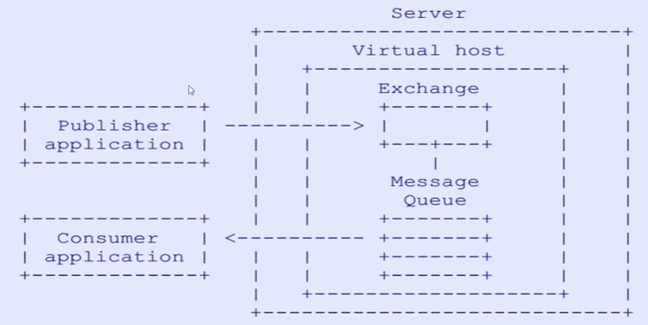
    • 也可以不用先发送给交换机,直接点对点进行传输
    • 生成者和消费者必须通过 Channel 向虚拟机开启一个会话
  • 7 种消息模型:https://www.rabbitmq.com/getstarted.html
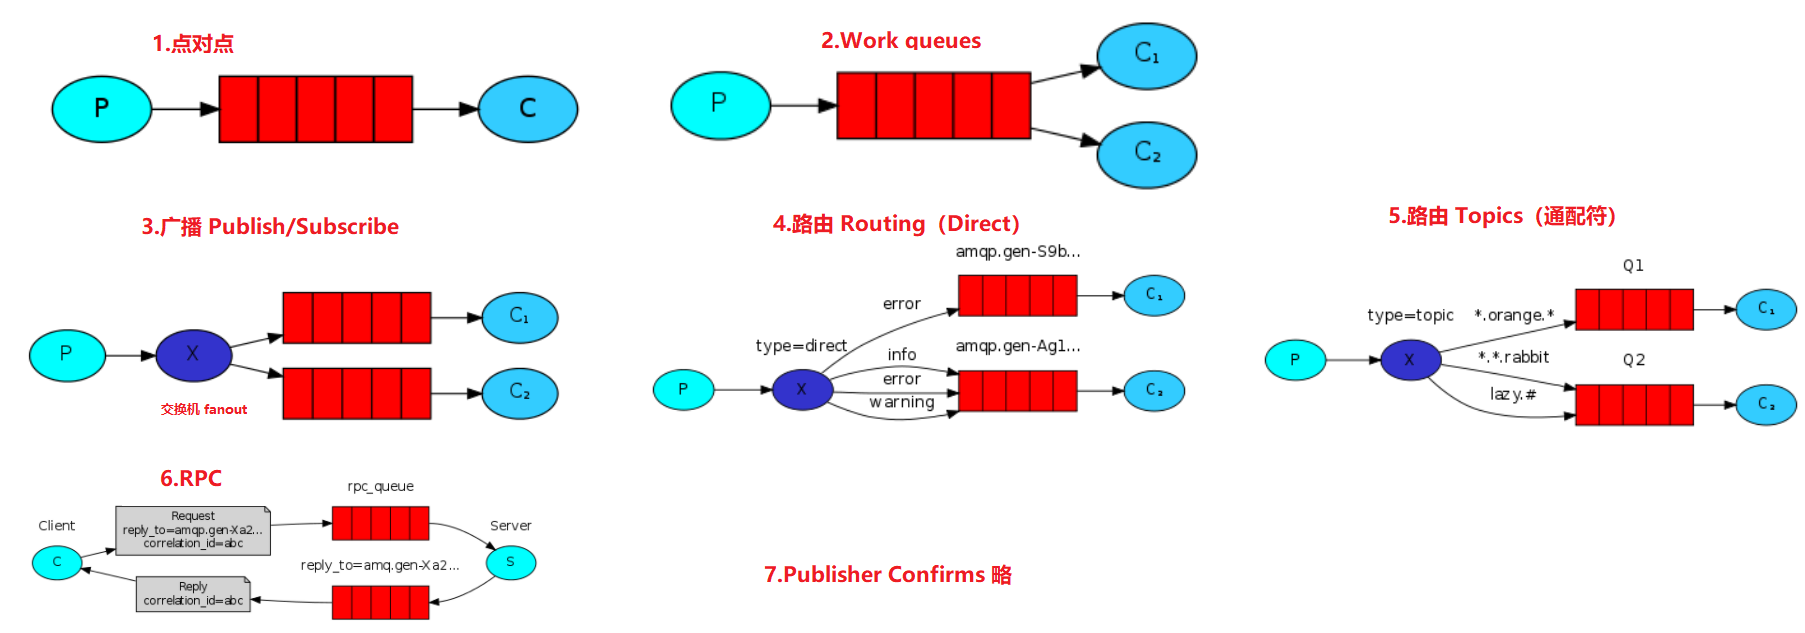
    消息模型

    • 常用
      • 点对点、工作队列(point和work模式配置相同,当多个消费者监听该队列时则任务是work模式,point只有一个消费者)
      • 订阅类模式(包括:fanout 广播、direct 直连、topic 主题)
        • 广播:同一消息,所有的消费者都可以接收到
        • Direct 直连(RoutingKey 固定),只能接受固定类型的消息
        • Topic 基于通配符(RoutingKey 包含通配符:*匹配一个单词,#匹配多个单词),只能接受主题相匹配的消息
    • Publisher Confirms(发送确认模式):用来实现消息的可靠投递。当在某个通道(channel)上开启发布确认后,客户端发布的消息会被MQ服务器(broker)异步的确认 ^2

相关原理

  • RabbitMQ如何保证消息不丢失?
    • 生产者发送消息不丢失
      • 对于单个数据,生产者将消息发送到RabbitMQ,RabbitMQ将消息持久化到磁盘,并返回一个确认给生产者(支持同步确认和异步确认)
      • 如果发送批量消息,可使用手动事务的方式保证消息正确发送:channel.txSelect() 开启事务;channel.txCommit()
        提交事务;channel.txRollback() 回滚事务
    • RabbitMQ消息存盘不丢消息
      • 对于Classic经典队列,直接将队列声明成为持久化队列即可;Quorum队列和Stream队列都是默认持久化队列
    • RabbitMQ主从消息同步时不丢消息
      • 使用镜像模式集群,数据会主动在集群各个节点当中同步;另外,也可启用Federation联邦机制,给包含重要消息的队列建立一个远端备份
    • RabbitMQ消费者不丢失消息
      • RabbitMQ在消费消息时可以指定是自动应答,还是手动应答
      • 如果是自动应答模式,消费者会在完成业务处理后自动进行应答,而如果消费者的业务逻辑抛出异常,RabbitMQ会将消息进行重试,这样是不会丢失消息的,但是有可能会造成消息一直重复消费(消费时考虑幂等即可)
      • 在SpringBoot集成案例中,也可以在配置文件中通过属性spring.rabbitmq.listener.simple.acknowledge-mode进行指定。可以设定为 AUTO 自动应答; MANUAL手动应答;NONE 不应答
  • 如何保证消息幂等?
    • 在SpringBoot集成案例中,可通过设置spring.rabbitmq.listener.simple.retry开头的一系列属性,来制定重试策略,如重试此次等(未获取到应答时,RabbitMQ重复推送消息)
    • 在业务上需要给每个消息一个唯一的标识,从而再消费时进行判断
  • 如何保证消息的顺序?
    • 可使用单队列+单消息推送,但是这种吞吐量会降低。目前RabbitMQ还没有比较好的解决方案,应该尽量避免
  • RabbitMQ的数据堆积问题
    • 新推出的Quorum队列以及Stream队列,目的就在于解决这个核心问题,但其生态不够完善,大部分企业还是基于Classic经典队列构建应用
    • 应该尽量让消息的消费速度和生产速度保持一致,避免堆积产生
    • spring.rabbitmq.listener.simple.concurrency=5 设置消费者的消费线程数量,spring.rabbitmq.listener.simple.prefetch=1 单次推送消息数量
    • 当确实遇到紧急状况,来不及调整消费者端时,可以紧急上线一个消费者组,专门用来将消息快速转录。保存到数据库或者Redis,然后再慢慢进行处理

RabbitMQ 安装

linux

1
2
3
4
5
6
7
8
9
10
11
12
13
14
15
16
17
18
19
20
21
22
23
24
25
## 安装erlang,版本有一定的要求,参考:https://www.rabbitmq.com/which-erlang.html。具体[参考下文](#erlang)
# 不能使用默认源,否则安装的是R16B03-1。如是centos8则配置为.../el/8/
cat > /etc/yum.repos.d/erlang.repo << EOF
[rabbitmq-erlang]
name=rabbitmq-erlang
baseurl=https://dl.bintray.com/rabbitmq-erlang/rpm/erlang/21/el/7
gpgcheck=1
gpgkey=https://dl.bintray.com/rabbitmq/Keys/rabbitmq-release-signing-key.asc
repo_gpgcheck=0
enabled=1
EOF
yum install erlang -y

## 安装rabbitmq
wget https://github.com/rabbitmq/rabbitmq-server/releases/download/v3.8.7/rabbitmq-server-generic-unix-3.8.7.tar.xz
tar -xvf rabbitmq-server-generic-unix-3.8.7.tar.xz -C /opt/
echo 'export PATH=$PATH:/opt/rabbitmq_server-3.8.7/sbin' >> /etc/profile
source /etc/profile
# 添加web管理插件
rabbitmq-plugins enable rabbitmq_management

## 后台启动rabbitmq服务
rabbitmq-server -detached

## 设置loopback_users.guest = false,[参考下文](#配置文件)

windows

Rabbit MQ 是建立在强大的 Erlang OTP 平台上,因此安装 Rabbit MQ 的前提是安装 Erlang。通过下面两链接下载安装 3.7.7 版本

配置文件

1
2
# 默认为true,仅允许guest用户通过localhost访问;false表示任何网络均可访问
loopback_users.guest = false
  • 默认端口
    • 5672 客户端通信amqp端口
    • 15672 开启后台则默认此http端口访问管理界面
    • 25672 集群通信端口

相关命令

RabbitMQ 启动与停止

  • windows
    • rabbitmq-service start 启动 RabbitMQ 服务
    • rabbitmq-service stop 停止服务
  • linux
    • rabbitmq-server -detached 后台启动服务
    • rabbitmqctl stop 停止
    • rabbitmqctl status

命令说明

1
2
3
4
5
6
rabbitmq-server # **启动 RabbitMQ 和 Erlang VM**(关闭需要使用rabbitmqctl)
rabbitmqctl # 管理工具。rabbitmqctl help [command]
rabbitmq-diagnostics # 诊断。rabbitmq-diagnostics help [command]
rabbitmq-plugins # 插件管理。rabbitmq-plugins help [command]
rabbitmq-env # 环境配置
rabbitmq-defaults # 默认参数设置

rabbitmqctl

1
2
3
4
5
6
7
8
9
10
11
12
13
14
15
16
17
18
19
20
21
22
23
24
25
26
27
28
29
30
31
32
33
34
35
36
37
38
39
40
41
42
43
44
45
46
47
48
49
50
51
52
53
54
55
56
57
58
59
60
61
62
63
64
65
66
67
68
69
70
71
72
73
74
75
76
77
78
79
80
81
82
83
84
85
86
87
88
89
90
91
92
93
94
95
96
97
98
99
100
101
102
103
104
105
106
107
108
109
110
111
112
113
114
115
116
117
118
119
120
121
122
123
124
125
126
127
128
129
130
131
132
133
134
135
136
137
138
139
140
141
142
143
144
145
146
147
148
149
150
### rabbitmqctl
Usage

rabbitmqctl [--node <node>] [--timeout <timeout>] [--longnames] [--quiet] <command> [<command options>]

Available commands:

Help:

autocomplete Provides command name autocomplete variants
help Displays usage information for a command
version Displays CLI tools version

Nodes: ### 节点

await_startup Waits for the RabbitMQ application to start on the target node
reset # 设置节点离开集群并回到初始状态
rotate_logs Instructs the RabbitMQ node to perform internal log rotation
shutdown Stops RabbitMQ and its runtime (Erlang VM). Monitors progress for local nodes. Does not require a PID file path.
start_app # 启动 RabbitMQ 程序. Starts the RabbitMQ application but leaves the runtime (Erlang VM) running
stop # 关闭 RabbitMQ 和 Erlang VM 程序. Requires a local node pid file path to monitor progress.
stop_app # 仅关闭 RabbitMQ 程序. leaving the runtime (Erlang VM) running
wait Waits for RabbitMQ node startup by monitoring a local PID file. See also 'rabbitmqctl await_online_nodes'

Cluster: ### 集群

await_online_nodes Waits for <count> nodes to join the cluster
change_cluster_node_type Changes the type of the cluster node
cluster_status # 查看集群状态
force_boot Forces node to start even if it cannot contact or rejoin any of its previously known peers
force_reset Forcefully returns a RabbitMQ node to its virgin state
forget_cluster_node Removes a node from the cluster
join_cluster # 加入集群
rename_cluster_node Renames cluster nodes in the local database
update_cluster_nodes Instructs a cluster member node to sync the list of known cluster members from <seed_node>

Replication:

cancel_sync_queue Instructs a synchronising mirrored queue to stop synchronising itself
sync_queue Instructs a mirrored queue with unsynchronised mirrors (follower replicas) to synchronise them

Users: ## 账户管理

add_user # 创建用户。如:rabbitmqctl add_user <用户名> <密码>
authenticate_user Attempts to authenticate a user. Exits with a non-zero code if authentication fails.
change_password Changes the user password
clear_password Clears (resets) password and disables password login for a user
delete_user Removes a user from the internal database. Has no effect on users provided by external backends such as LDAP
list_users # 查看用户(有一个guest默认用户)和角色(tag)
set_user_tags # 设置用户角色(administrator:超级管理员;management:虚拟机管理者;policymaker:策略制定者;monitoring:监控者;none)
# rabbitmqctl set_user_tags smalle administrator

Access Control: ## 权限控制

clear_permissions Revokes user permissions for a vhost
clear_topic_permissions Clears user topic permissions for a vhost or exchange
list_permissions Lists user permissions in a virtual host
list_topic_permissions Lists topic permissions in a virtual host
list_user_permissions Lists permissions of a user across all virtual hosts
list_user_topic_permissions Lists user topic permissions
list_vhosts Lists virtual hosts
set_permissions # 设置用户对虚拟机的访问权限
# rabbitmqctl set_permissions -p /test smalle '.*' '.*' '.*' # 设置smalle用户对/test虚拟机拥有所有权限
set_topic_permissions Sets user topic permissions for an exchange

Monitoring, observability and health checks: ## 健康观测

list_bindings Lists all bindings on a vhost
list_channels Lists all channels in the node
list_ciphers Lists cipher suites supported by encoding commands
list_connections Lists AMQP 0.9.1 connections for the node
list_consumers Lists all consumers for a vhost
list_exchanges Lists exchanges
list_hashes Lists hash functions supported by encoding commands
list_queues # 列举所有队列和其配置
list_unresponsive_queues Tests queues to respond within timeout. Lists those which did not respond
ping Checks that the node OS process is up, registered with EPMD and CLI tools can authenticate with it
report Generate a server status report containing a concatenation of all server status information for support purposes
schema_info Lists schema database tables and their properties
status Displays status of a node

Parameters:

clear_global_parameter Clears a global runtime parameter
clear_parameter Clears a runtime parameter.
list_global_parameters Lists global runtime parameters
list_parameters Lists runtime parameters for a virtual host
set_global_parameter Sets a runtime parameter.
set_parameter Sets a runtime parameter.

Policies: ### 策略

clear_operator_policy Clears an operator policy
clear_policy Clears (removes) a policy
list_operator_policies Lists operator policy overrides for a virtual host
list_policies # 列举策略
set_operator_policy Sets an operator policy that overrides a subset of arguments in user policies
set_policy # 设置或更新策略
# rabbitmqctl set_policy -p /test ha-all '^hello' '{"ha-mode":"all","ha-sync-mode":"automatic"}' # 对/test虚拟主机增加策略,策略名为ha-all,且交换机和队列以hello开头的,策略描述为 {"ha-mode":"all","ha-sync-mode":"automatic"} (automatic自动同步镜像到集群的all所有节点)。策略增加成功后,会在对应的对应的Features上显示`ha-all`的标识

Virtual hosts: ## 虚拟机

add_vhost Creates a virtual host
clear_vhost_limits Clears virtual host limits
delete_vhost Deletes a virtual host
list_vhost_limits Displays configured virtual host limits
restart_vhost Restarts a failed vhost data stores and queues
set_vhost_limits Sets virtual host limits
trace_off
trace_on

Configuration and Environment:

decode Decrypts an encrypted configuration value
encode Encrypts a sensitive configuration value
environment Displays the name and value of each variable in the application environment for each running application
set_cluster_name Sets the cluster name
set_disk_free_limit Sets the disk_free_limit setting
set_log_level Sets log level in the running node
set_vm_memory_high_watermark Sets the vm_memory_high_watermark setting

Definitions:

export_definitions Exports definitions in JSON or compressed Erlang Term Format.
import_definitions Imports definitions in JSON or compressed Erlang Term Format.

Feature flags:

enable_feature_flag Enables a feature flag on target node
list_feature_flags Lists feature flags

Operations:

close_all_connections Instructs the broker to close all connections for the specified vhost or entire RabbitMQ node
close_connection Instructs the broker to close the connection associated with the Erlang process id
eval Evaluates a snippet of Erlang code on the target node
eval_file Evaluates a file that contains a snippet of Erlang code on the target node
exec Evaluates a snippet of Elixir code on the CLI node
force_gc Makes all Erlang processes on the target node perform/schedule a full sweep garbage collection

Queues: ## 队列

delete_queue Deletes a queue
purge_queue # 清空某个队列里的数据。rabbitmqctl purge_queue <queue_name>
Deprecated:

hipe_compile DEPRECATED. This command is a no-op. HiPE is no longer supported by modern Erlang versions
node_health_check DEPRECATED. Performs intrusive, opinionated health checks on a fully booted node. See https://www.rabbitmq.com/monitoring.html#health-checks instead

Use 'rabbitmqctl help <command>' to learn more about a specific command

rabbitmq-diagnostics

1
2
# rabbitmq-diagnostics [--node <node>] [--timeout <timeout>] [--longnames] [--quiet] <command> [<command options>]
status # 获取rabbitmq状态

简单使用

1
2
3
4
# 添加用户和设置角色和权限
rabbitmqctl add_user smalle mypass
rabbitmqctl set_user_tags smalle administrator
rabbitmqctl set_permissions -p /test smalle '.*' '.*' '.*' # 可访问/test虚拟机的

客户端使用

简单使用

1
2
3
4
5
<dependency>
<groupId>com.rabbitmq</groupId>
<artifactId>amqp-client</artifactId>
<version>5.9.0</version>
</dependency>

point/work(点对点/工作模式)

  • point和work模式配置相同,当多个消费者监听该队列时则任务是work模式(point只有一个消费者)
1
2
3
4
5
6
7
8
9
10
11
12
13
14
15
16
17
18
19
20
21
22
23
24
25
26
27
28
29
30
31
32
33
34
35
36
37
38
39
40
41
42
43
44
45
46
47
48
49
50
51
52
53
54
55
56
57
58
59
60
61
62
63
// =============== 生产者
// 获取连接(springboot则直接在配置文件中配置即可)
ConnectionFactory factory = new ConnectionFactory();
factory.setHost("127.0.0.1");
factory.setPort(5672);
factory.setUsername("guest");
factory.setPassword("guest");
factory.setVirtualHost("/test"); // 需要提前创建好此虚拟主机,默认是 /
Connection onnection = factory.newConnection();

// 开启一个会话
Channel channel = connection.createChannel();

/*
* 声明一个消息队列,如果无此消息队列会自动创建。参数如下:
* 1.queue: 消息队列名称
* 2.durable: 是否持久化。true时,管理后台的Queues-Features会增加"D"标识。false不进行持久化,当MQ服务端重启后,消息队列会丢失(包括队列中的数据)
* 3.exclusive: 是否独占。true独占,表示只能这个channel(会话)访问这个消息队列
* 4.autoDelete: 是否自动删除。true自动删除,当消息消费完成后,且消费者断开连接,则删除此队列
* 5.arguments: 额外参数
*/
channel.queueDeclare("hello", false, false, false, null);

/*
* 发布消息,参数如下:
* 1.exchange: 使用的交换机名。此时案例展示点对点,留空
* 2.routingKey: 路由键名。此时为点对点传输,填写队列名
* 3.props: 传递消息的额外配置。AMQP.BasicProperties
* 4.body: 消息体
*/
channel.basicPublish("", "hello", null, "这是一条消息".getBytes());

// 之后关掉 connection 程序才会退出,否则会一直运行
// 关闭资源
channel.close();
connection.close();

// =============== 消费者
Connection connection = RabbitmqU.getConnection();
Channel channel = connection.createChannel();
// 设置prefetchCount=1,一次只能消费一个消息,**否则MQ会把消息队列的中的消息都发channel中,可能导致数据丢失**
// channel.basicQos(1);
// 声明队列时,参数需要和生产者定义的队列一样
channel.queueDeclare("hello", false, false, false, null);

/*
* 消费消息,参数如下:
* 1.queue: 消息队列名
* 2.autoAck: 是否开启自动消息确认机制
* - autoAck=true 开启自动确认。则消息发送到channel,不管是否已经消费完成,都会告诉服务端,从而服务端会继续发消息。当有多个消费者的时候是平均消费消息的
* - autoAck=false 关闭消息自动确认,即消费完消息后需要手动确认告知MQ服务端。到MQ发送到消费者的Channel,但是又没有手动确认的,会在管理端的Queues-Messages-Unacked显示未确认数
* 3.deliverCallback: 收到消息回调
* 4.cancelCallback
* */
channel.basicConsume("hello", true, new DefaultConsumer(channel) {
@Override
public void handleDelivery(String consumerTag, Envelope envelope, AMQP.BasicProperties properties, byte[] body) throws IOException {
System.out.println("收到消息:" + new String(body, "UTF-8"));
}
});

// 测试时不关闭,防止还没进行 handle 就退出了
// RabbitmqU.close(channel, connection);

topic

1
2
3
4
5
6
7
8
9
10
11
12
13
14
15
16
17
18
19
20
21
22
23
24
25
26
27
28
29
30
31
32
33
34
35
36
// 获取连接(springboot则直接在配置文件中配置即可)
ConnectionFactory factory = new ConnectionFactory();
factory.setHost("127.0.0.1");
factory.setPort(5672);
factory.setUsername("guest");
factory.setPassword("guest");
factory.setVirtualHost("/test"); // 需要提前创建好此虚拟主机,默认是 /
Connection onnection = factory.newConnection();

// 生成者发布消息
channel.queueDeclare("hello", false, false, false, null);
/*
* 声明一个Exchange交换机,参数如下
* 1.exchange: 交换机名称
* 2.type: 交换机类型,fanout/direct/topic等。在管理端Exchanges-Type中会显示
* 3.其他参数参考 queueDeclare:Durability是否持久化,Auto delete是否自动删除
*/
channel.exchangeDeclare("my_exchange_name", "topic");
channel.basicPublish("my_exchange_name", "aezo.user", null, ("这是一条消息").getBytes());

// 消费者
Channel channel = connection.createChannel();
channel.exchangeDeclare("my_exchange_name", "topic");
String queueName = channel.queueDeclare().getQueue(); // 获取一个临时队列。管理后台的Queues-Features会增加"AD"(autoDelete)和"Excl"(exclusive)标识
channel.queueBind(queueName, "my_exchange_name", "aezo.#"); // *匹配一个单词,#匹配多个单词
channel.queueBind(queueName, "my_exchange_name", "*.vip");
channel.basicConsume(queueName, true, new DefaultConsumer(channel) {
@Override
public void handleDelivery(String consumerTag, Envelope envelope, AMQP.BasicProperties properties, byte[] body) throws IOException {
System.out.println("consumer收到消息:" + new String(body, "UTF-8"));
}
});

// 关闭资源
channel.close();
connection.close();

整合 SpringBoot

  • RabbitMQ 是实现了高级消息队列协议(AMQP)的开源消息代理软件,也称为面向消息的中间件。后续操作需要先安装 RabbitMQ 服务
  • 引入对 amqp 协议支持依赖
1
2
3
4
<dependency>
<groupId>org.springframework.boot</groupId>
<artifactId>spring-boot-starter-amqp</artifactId>
</dependency>
  • 配置 rabbitmq 服务器链接
1
2
3
4
5
6
7
8
spring:
rabbitmq:
host: localhost
port: 5672
username: guest
password: guest
# 可以基于多环境配置rabbitmq虚拟服务器(队列是隔离的)
virtualHost: /test
  • 配置队列、生产者、消费者
1
2
3
4
5
6
7
8
9
10
11
12
13
14
15
16
17
18
19
20
21
22
23
24
25
26
27
28
29
30
31
32
33
34
35
36
37
38
39
40
41
// 配置队列 hello
@Bean
public Queue helloQueue() {
return new Queue("hello");
}

// 生产者
@Component
public class Provider {

@Autowired
private AmqpTemplate rabbitTemplate;

// 发送消息
public void send() {
String context = "hello " + new Date();
System.out.println("Provider: " + context);
// 会创建一个"hello"的队列
rabbitTemplate.convertAndSend("hello", context);
}

// 发送TTL类型的消息: 过期则会自动丢弃(只会检测队头消息,如果整个队列进行检测需要设置队列全局TTL,参考: https://www.cnblogs.com/yuluoxingkong/p/13965204.html)
public void testTTL() {
MessageProperties messageProperties = new MessageProperties();
messageProperties.setExpiration("20000"); // 设置过期时间,单位:毫秒
byte[] msgBytes = "测试消息自动过期".getBytes();
Message message = new Message(msgBytes, messageProperties);
rabbitTemplate.convertAndSend("TTL_EXCHANGE", "TTL", message);
}
}

// 消费者
@Component
@RabbitListener(queues = "hello")
public class Consumer {

@RabbitHandler
public void process(String msg) {
System.out.println("Consumer: " + msg);
}
}

集群搭建

  • 两种集群模式
    • 普通集群模式
      • 集群的各个节点之间只会有相同的元数据,即队列结构,而消息不会进行冗余,只存在一个节点中
      • 消费时,如果消费的不是存有数据的节点, RabbitMQ会临时在节点之间进行数据传输,将消息从存有数据的节点传输到消费的节点
      • 这种集群模式的消息可靠性不是很高
    • 镜像集群搭建
      • 是在普通集群模式基础上的一种增强方案,这也就是RabbitMQ的官方HA高可用方案,是基于普通集群增加镜像策略实现
      • 其本质区别在于,这种模式会在镜像节点中间主动进行消息同步备份,而不是在客户端拉取消息时临时同步
      • 并且在集群内部有一个算法会选举产生master和slave,当一个master挂了后,也会自动选出一个来
  • 高可用方案
    • 使用Federation联邦插件给关键的RabbitMQ服务搭建一个备份服务
    • 镜像集群+Haproxy+Keepalived
  • 集群搭建(普通+镜像)
1
2
3
4
5
6
7
8
9
10
11
12
13
14
15
16
17
18
19
20
21
22
23
## 在 test1、test2、test3 三台机器上搭建rabbit服务
## 同步 .erlang.cookie 文件:在 test1 机器上找到 .erlang.cookie 文件(如:`/root/.erlang.cookie`,`C:/Users/smalle/.erlang.cookie`,具体位置可find一下),将此文件复制到B、C相同的目录

## 后台启动所有节点服务(erlang vm 和 rabbitmq)
rabbitmq-server -detached

## 在 test2、test3 上操作
# 关闭 rabbitmq, 但是会保留 erlang vm 进程
rabbitmqctl stop_app
# 加入到集群 rabbit@test1 (需要hosts中有test1的ip映射)
rabbitmqctl join_cluster rabbit@test1 # 成功则提示 Clustering node rabbit@test2 with rabbit@test1
# 重新启动 rabbitmq 进程
rabbitmqctl start_app

## 查看集群状态。也可以在管理界面的 Overview-Nodes 看到多个节点
rabbitmqctl cluster_status
## 此时 test1 的队列等信息会映射到其他两个节点。客户端可以连接任何一个节点读写消息,但是如果 test1 宕机,则映射过来的队列的 State=down,且改队列不可对外通过服务

## 增加镜像策略解决上述问题
# 对/test虚拟主机增加策略,策略名为ha-all,且交换机和队列以hello开头的,策略描述为 {"ha-mode":"all","ha-sync-mode":"automatic"} (automatic自动同步镜像到集群的all所有节点)。策略增加成功后,会在对应的对应的Features上显示`ha-all`的标识
rabbitmqctl set_policy -p /test ha-all '^hello' '{"ha-mode":"all","ha-sync-mode":"automatic"}'
rabbitmqctl list_policy # 查看策略
# 此时尽管 test1 宕机,其他节点还是可以对外提供服务
  • 常见错误:Authentication failed (rejected by the remote node), please check the Erlang cookie
1
2
3
4
5
6
7
8
# 还有如下输出,此时 Erlang cookie hash 是.erlang.cookie文件内容经过hash得到,且.erlang.cookie文件处于/root目录。出现此问题可能是:
# 1.几个节点的.erlang.cookie内容不一致
# 2.Erlang VM没有启动
# 3.rabbitmq app没有关闭(需执行rabbitmqctl stop_app)
Current node details:
* node name: 'rabbitmqcli79@LAPTOP-SDG10LIN'
* effective user's home directory: /root
* Erlang cookie hash: Jx59lsGpH45Mhu5eAkFMGQ==

插件

日志插件

  • rabbitmq默认没有开启日志插件
  • 开启插件
1
2
3
4
5
6
7
# 开启插件
rabbitmq-plugins enable rabbitmq_tracing
# 关闭插件
rabbitmq-plugins disable rabbitmq_tracing

# 查看插件列表(有标记的表示已开启)
rabbitmq-plugins list
  • 开启插件后还需手动设置,在后台管理界面 - Admin - Tracing可查看
    • Add a new trace增加一个日志规则,假设Name=test,Format=Text,则会生成一个test.log的文件
    • 在后台管理界面也可查看
  • 日志格式
1
2
3
4
5
6
7
8
9
10
11
12
13
14
15
16
17
18
19
20
## 发送消息为"my-msg"
================================================================================
2021-04-14 20:02:55:020: Message published

Node: rabbit@node1
Connection: <rabbit@node1.3.1620.0>
Virtual host: /
User: guest
Channel: 1
Exchange: amq.direct
Routing keys: [<<>>]
Routed queues: []
Properties: [{<<"delivery_mode">>,signedint,2},{<<"headers">>,table,[]}]
Payload:
my-msg

## 接受消息
================================================================================
2021-04-14 20:02:55:020: Message received
...

后台管理

  • 参考
  • 常用测试配置
    • 创建虚拟机(可省略,即使用默认的/):Admin-VirtualHost. 如需要多环境测试可创建虚拟机(因为队列必须一致,最简单的就是改变服务器/虚拟机配置)
    • 创建项目用户:Admin-Users
    • 创建项目队列(也可通过程序自动创建)
    • 创建交换机(当使用订阅类模式时需要)
  • 激活 Rabbit MQ’s Management Plugin(可激活管理插件)
    • CMD 进入 RabbitMQ 安装目录,进入到 rabbitmq_server-3.8.7/sbin 目录
    • 运行 rabbitmq-plugins enable rabbitmq_management
  • 登录管理后台
    • http://localhost:15672 使用guest/guest登录(需要激活 rabbitmq_management)
    • 如果需要通过内网访问,可设置配置 loopback_users.guest=false,具体参考上文安装
  • Overview 概览页面
    • Queued messages last minute 最后一分钟所有队列中的消息
      • Ready 没有投递给消费者的消息(大于0则表示有消息堆积)
      • Unacked 投递给消费者但是还没有收到ACK应答的(由于界面是数据是5s中刷新一次,如果消息较多此处可能有一定量的消息是此状态)
    • Message rates last minute 最后一分钟所有队列的消费情况
      • Publish:producter pub消息的速率
      • Publisher confirm:broker确认pub消息的速率
      • Deliver(manual ack):customer手动确认的速率
      • Deliver(auto ack):customer自动确认的速率
      • Consumer ack:customer正在确认的速率
      • Redelivered:正在传递’redelivered’标志集的消息的速率
      • Get (manual ack):响应basic.get而要求确认的消息的传输速率
      • Get (auto ack):响应于basic.get而发送不需要确认的消息的速率
      • Return:将basic.return发送给producter的速率
      • Disk read:queue从磁盘读取消息的速率
      • Disk write:queue从磁盘写入消息的速率
  • Connections 连接客户端查看页
  • Channels 客户端会话查看页
    • 在客户端的每个连接里,可建立多个 channel,每个 channel 代表一个会话任务
    • Springboot一个消费者可能会自动创建多个会话
  • Exchanges 交换机管理页
  • Queues 队列管理页面
    • Purge - Purge Messages 清空队列(将队列里的消息全部丢弃掉),或者执行rabbitmqctl purge_queue xxx_queue
  • Admin 管理员操作页面
    • Users 用户管理
      • Add a user 添加用户
      • 点击用户进入详情页面
        • Permissions 可设置用户权限
          • 选择 Virtual Host,其他为.*表示拥有此虚拟机的所有权限(包括配置交换机、队列等)
        • Topic permissions 可设置监听消息队列和订阅权限
          • 选择 Virtual Host,需要看队列所属的虚拟机
          • Exchange交换机类型:如direct(默认)、topic
          • 其他为.*表示对此虚拟机下的该交换机类型拥有所有权限
        • Update this user
          • Tags 角色
            • admin(administrator):管理员角色,可以管理所有虚拟机资源
            • management:只能管理某个虚拟机下的资源
    • Virtual Hosts 虚拟主机管理
      • Add a new virtual host 添加虚拟主机
        • 输入名称如/vhost_aezocn_test,命名上 abc 和 /abc 是不同的
        • 需要先有对应的虚拟主机,客户端才能连接
      • 点击某个虚拟主机进入到详情页面
        • Permissions 和 Topic permissions 可设置用户权限,参考 Users 中的
    • Policies 策略管理

erlang

1
2
3
4
5
6
7
8
9
10
11
# 不能使用默认源,否则安装的是R16B03-1。如是centos8则配置为.../el/8/
cat > /etc/yum.repos.d/erlang.repo << EOF
[rabbitmq-erlang]
name=rabbitmq-erlang
baseurl=https://dl.bintray.com/rabbitmq-erlang/rpm/erlang/21/el/7
gpgcheck=1
gpgkey=https://dl.bintray.com/rabbitmq/Keys/rabbitmq-release-signing-key.asc
repo_gpgcheck=0
enabled=1
EOF
yum install erlang -y
  • 命令
1
2
3
# 进入erlang shell。表示版为 R16B03-1 (rabbitmq 3.8.7 至少需要版本 OTP 21.3,参考:https://www.rabbitmq.com/which-erlang.html)
erl # Erlang R16B03-1 (erts-5.10.4) [source] [64-bit] [smp:2:2] [async-threads:10] [hipe] [kernel-poll:false]
Ctrl+G, q # 退出(需要输入两次两次命令)

参考文章

ChatGPT开源小程序